
What you will make
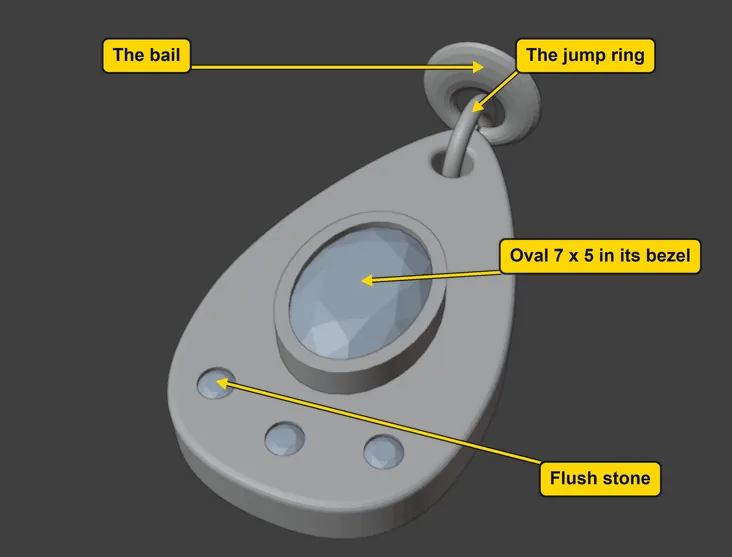
A drop pendant that lies flat, 12.00 mm wide and 20.00 mm long, 2.2 mm thick, with its top edge softened by 0.30. An Oval 7 x 5 stands in a rub-over bezel at its middle, and three Round 1.50 stones sit flush in the metal below it. A hole at the top, 1.80 mm across, carries a jump ring, a small closed ring of round wire that links two parts: its wire is 0.80 and it is 3.6 mm inside. A bail, the loop that a chain passes through, hangs through the jump ring as a separate part: it is the swept loop of P2-15, and from above it looks like a thick ring. Measured on the finished file: the least gap between ring and bail is 0.27 mm, between ring and plate 0.24 mm and between bail and plate 0.31 mm, and no two faces cross, so the three parts touch nowhere. The jump ring is modelled closed and cut open at the bench. This is a practice file and its parts stand loose, as the bezel does on its plate. For casting, join them: a bezel loose on a plate is two pieces. The add-on’s plate rounds the top edge and the corners but cannot swell the edge as a hand-carved pendant would, so this one reads flatter.
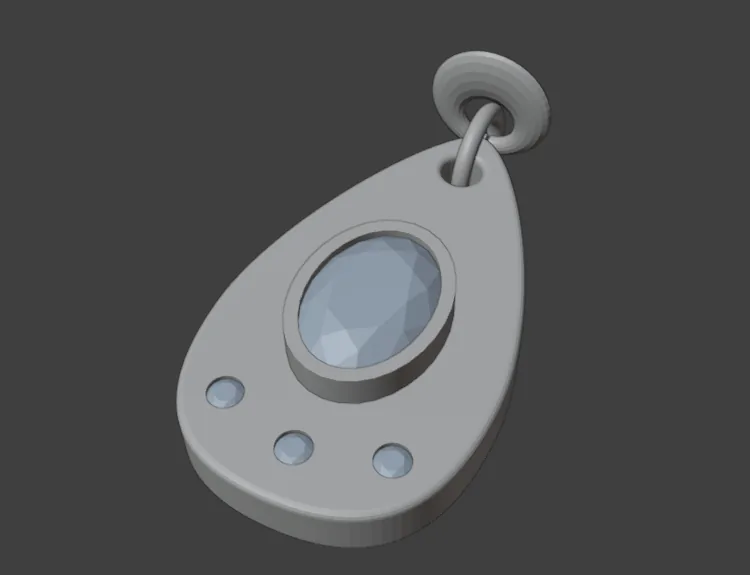
About 30 minutes.
Files
- p5-14-start.blend (128 KB): open this one to begin.
- p5-14-finished.blend (298 KB): the result, to compare with yours.
Both were made in Blender 5.2.0.
Before you start
- CAD/CAM Jeweller 2.22.0 or later (Preferences > Add-ons shows the version). You have done Part 0, Blender from nothing, and these pages: Turn a closed outline into a plate (P2-08, which teaches Make Plate and the Live Forms panel), Cut a hole that stays live (P2-09), Turn a curve into wire and strip (P2-07), Taper a wire from both ends: the cone of a bail (P2-15), Look from the top, weigh the ring and check it (P1-03, which teaches Report Weight and Run Print Check), Shape a bezel’s section and make it real (P5-02) and Sink a stone flush into a band (P5-09). The start file is in millimetres.
- The start file holds a drop outline, a circle 1.80 mm across for the hole, a larger circle for the jump ring, an Oval 7 x 5, three Round 1.50 stones and the bail of P2-15, an ordinary object. Pink handles may show on a piece before its exercise: they change numbers by dragging, so leave them alone for now.
Build it
Step 1. Open the start file and save your copy
WhereThe top bar: the row of words that begins File, Edit.
DoDownload p5-14-start.blend from Files above and open it. Then choose File > Save As and save it under the name below, in a folder of yours. Open an exercise file and keep the start file safe (P0-07) shows how.
Typemy-drop-pendant.blend
You should seeThe 3D view looks straight down. It shows a drop-shaped outline, a larger oval stone and three small round stones inside it, two circles and a loop, the bail. The picture below looks from a slant, for this picture only, so that you can tell the two upright rings apart: the pale thin one is the circle for the jump ring, and the thicker loop across it is the bail. The title bar, the strip above File and Edit, begins my-drop-pendant.
It worked whenThe title bar, the strip above File and Edit, begins my-drop-pendant.
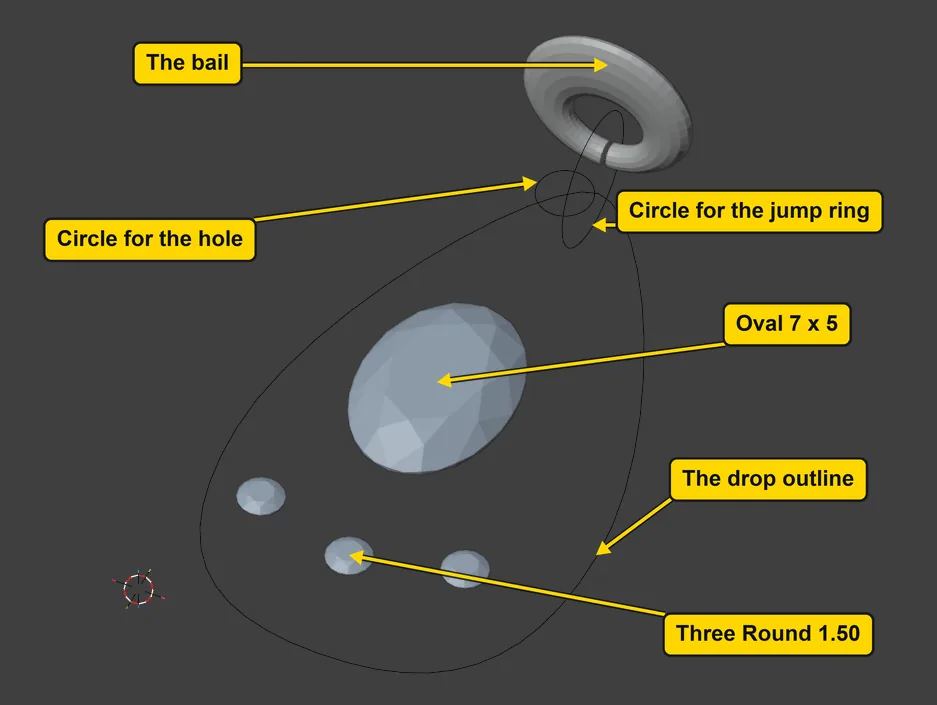
Step 2. Click the drop and press Make Plate
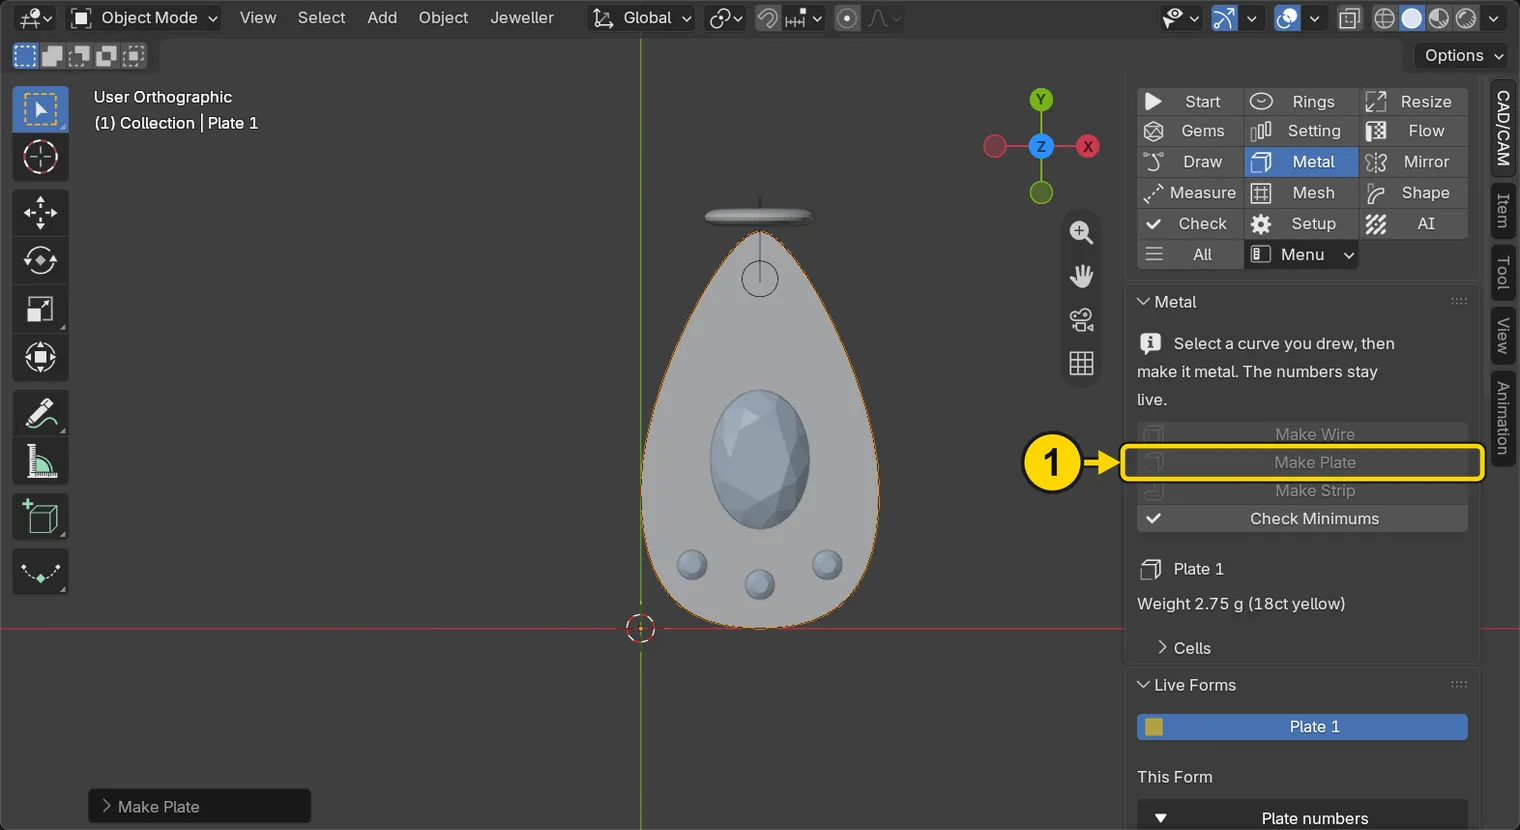
WhereThe 3D view, then the sidebar: the CAD/CAM tab, the section bar, Metal, the Metal panel. If the sidebar is shut, press N with the pointer over the 3D view.
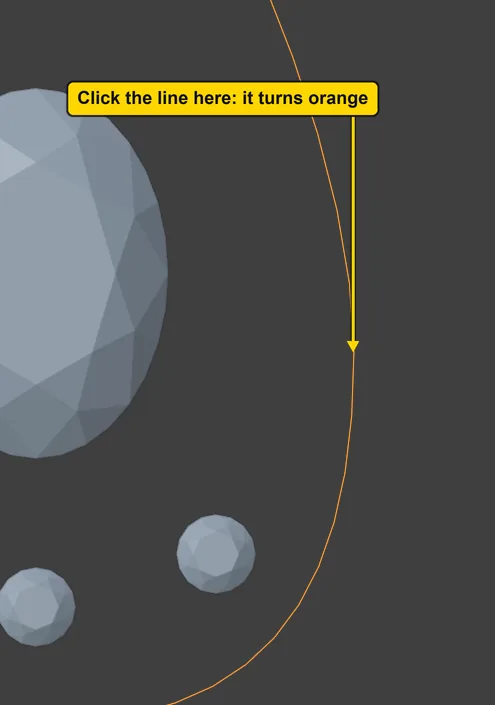
DoClick the drop’s line at the place marked in the first picture (its right side, about halfway down), so that the line turns orange. Then click Metal in the section bar and press Make Plate.
You should seeThe drop fills in as a plate of metal, and a row Plate 1 stands in the Live Forms panel. A plate is a flat piece of metal cut to an outline, and it is live: its numbers can still change.
It worked whenA row Plate 1 stands in the Live Forms panel.
Step 3. Set the plate’s thickness and top edge
WhereThe Live Forms panel, This Form, the box Plate numbers.
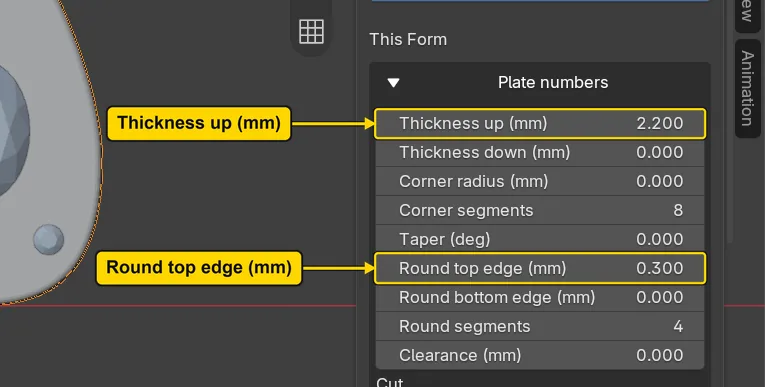
DoClick the middle of Thickness up (mm), type 2.2 and press Enter. Then do the same in Round top edge (mm) with 0.3.
You should seeThe fields read 2.2 and 0.3. Thickness up (mm) builds the plate upward from the flat level the drawing lies in, so 2.20 mm of metal stands above the drawing. That leaves room for the seats, so that a stone sinks into the metal and still leaves the back whole. A pendant plate carries load: 2.20 is well over the bench’s structural 0.80. The top edge is softened by 0.30, the add-on’s nearest to a swelling edge.
It worked whenThickness up (mm) reads 2.2 and Round top edge (mm) reads 0.3.
Step 4. Cut the hole with Add Selected
WhereThe Live Forms panel, then the 3D view.
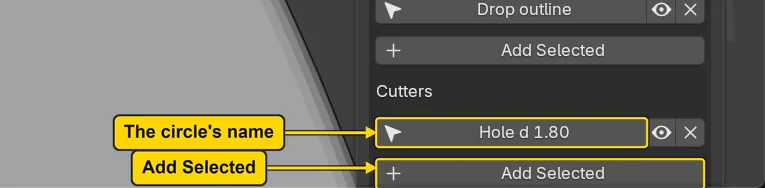
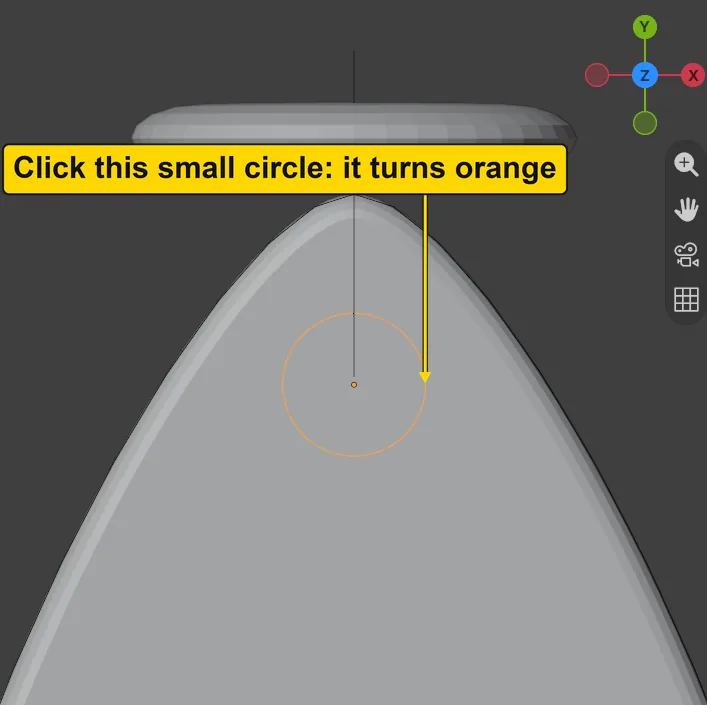
DoPress Plate 1 in the list, click the small circle in the top of the drop (the first picture marks it), so that its line turns orange, then press Add Selected under Cutters: the second one, the row Cutters owns.
You should seeThe circle’s name stands under Cutters and a round window opens in the plate where it lies. The circle stays live: move it and the hole follows. The hole is 1.80 mm across, over twice the 0.80 wire of the jump ring.
It worked whenThe circle’s name stands under Cutters in This Form.
Step 5. Set the oval in a bezel
WhereThe 3D view, then the sidebar: the section bar, Setting, the Stone Settings panel.
DoClick the oval stone’s table, the flat top that faces you, click Setting in the section bar, then press Set Stone.
You should seeA wall round the oval, drawn live. The panel’s numbers start from the bench’s own bezel: Wall 0.55, Over the girdle 0.32, Seat 0.15 and Seat angle 56 degrees. They are the set’s starting numbers: Wall 0.55 is the bench’s own bezel section, under the Standards Check’s least of 0.60. None of them rolls a lip over the crown: the stone drops in from above. Pink handles and the button Done, one of the words beside the setting, show round the oval: leave them alone.
It worked whenThe oval has a wall round it.
Step 6. Make the bezel real
WhereThe Stone Settings panel.
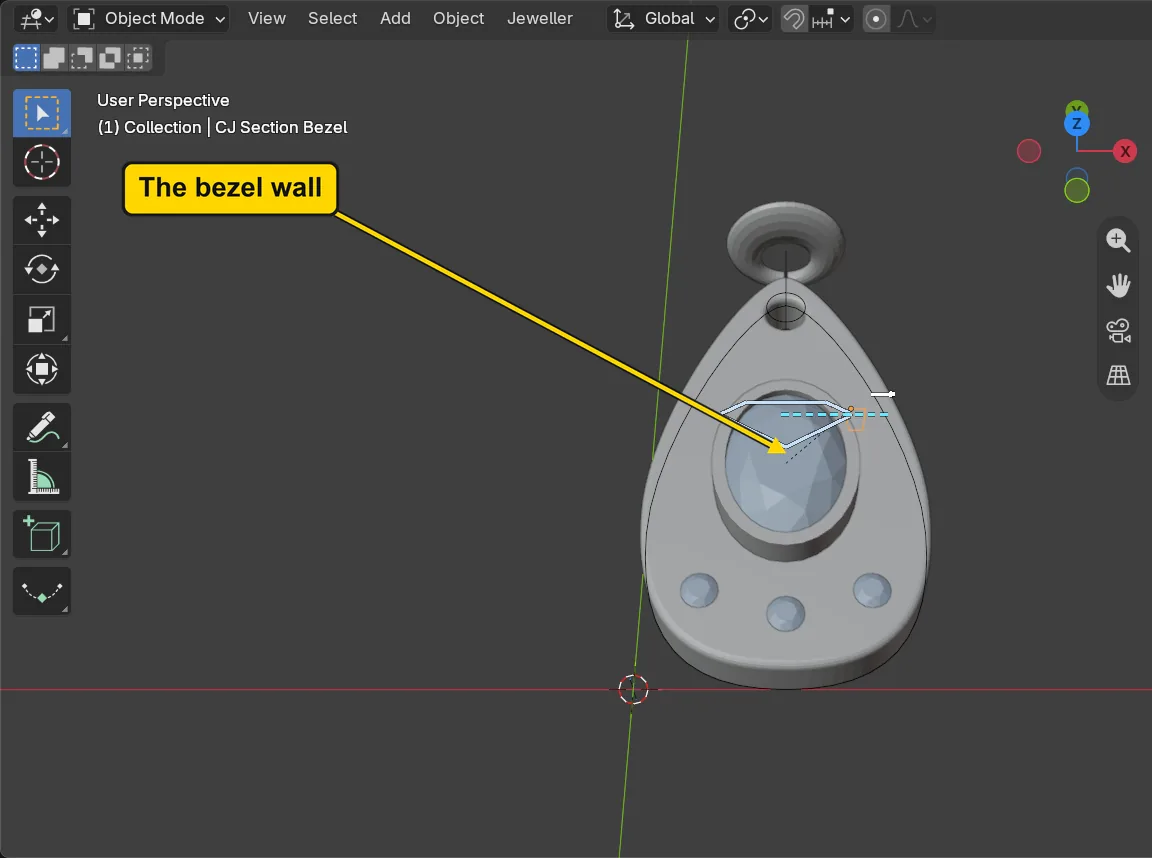
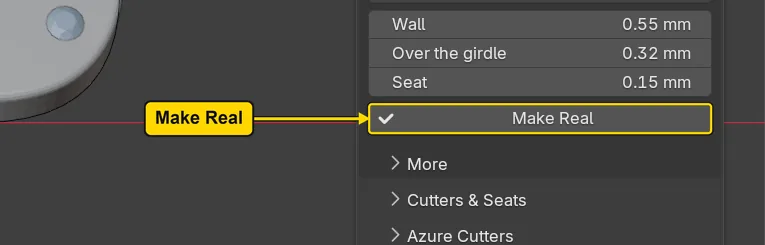
DoPress Make Real under Stone Settings.
You should seeThe live wall becomes one solid, a separate part named for the oval with the word real after it (the Outliner, the list at the top right of the window, is too narrow to show the end of the name). The status bar, the line along the bottom of the window, reads “1 solid made” for a moment, as the second picture shows. A real part no longer follows its numbers. The bezel now stands on the plate as a second solid: for casting, join them, because a bezel loose on a plate is two pieces.
It worked whenThe file holds a part named for the oval with the word real after it: the Outliner, the list at the top right, shows the start of its name.

Step 7. Sink the three small stones flush
WhereThe 3D view, then the More Settings panel, the Flush box.
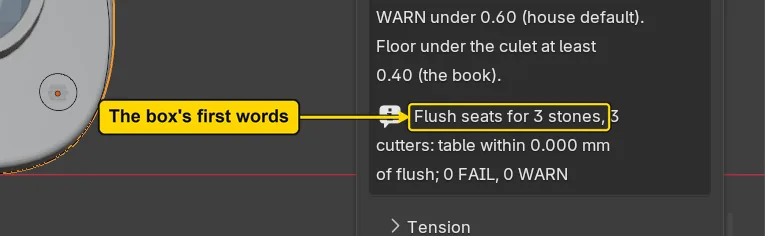
DoClick one small stone, hold Shift and click the other two, then Shift and click the plate between the stones and the oval, so that the plate is the active object. Open Flush and press Make Flush Seats.
You should seeThe box reads “Flush seats for 3 stones” and ends “0 FAIL, 0 WARN”. Each stone is sunk until its table lies level with the metal. The plate is the active object, the last one clicked, because the seats are made in the active metal.
It worked whenThe box reads “Flush seats for 3 stones”.
Step 8. Read the burnish walls
WhereThe Flush box.
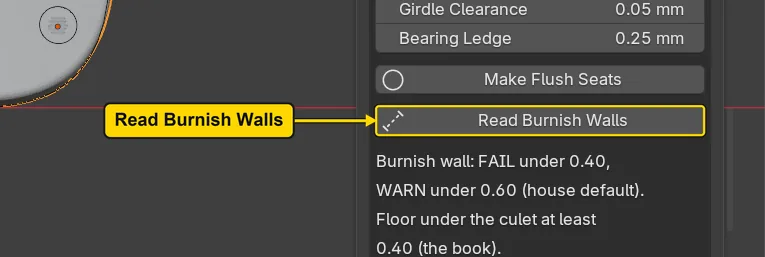
DoPress Read Burnish Walls.
You should seeA line for each stone: how far its table is from flush, the burnish wall, which is the metal between its seat and the nearest edge, hole or seat, and the floor under its culet, the metal beneath the stone’s point. Each floor reads 1.28 mm, over the bench’s 0.40, and every line ends “OK”. These figures are read before any seat is cut: step 10 measures the metal under each seat again. Nothing has moved.
It worked whenThe box reads a line for each of the three stones ending “OK”.
Step 9. Choose Hole: Divot
WhereThe sidebar: Setting, the Cutters & Seats panel, the picture under its box of numbers.
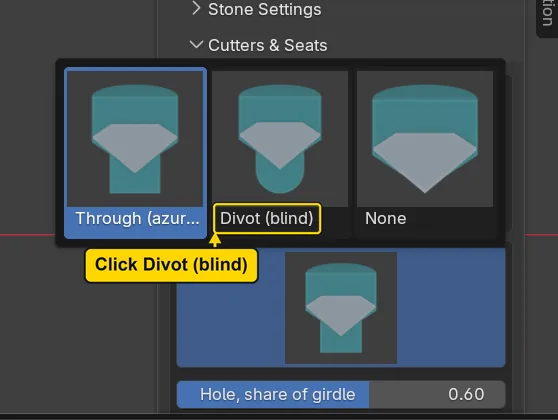
DoClick Setting in the section bar if it is not lit, open Cutters & Seats by its title, click the picture of the hole, then click the one named Divot (blind) in the grid that opens.
You should seeThe picture changes to a rounded hole, and Divot Floor reads 0.4 mm. A divot is a blind hole under the stone’s culet, its point, that ends round and never goes through the back. Divot Floor is the least metal left under it: the bench keeps 0.40 or more, and the add-on cuts a divot shallower where the plate is thin. The panel starts on a hole that goes through. A plate is thin for a stone when the stone’s depth below its girdle plus the 0.40 kept under a divot is more than the plate is thick: that is so for the oval here, whose seat would go through the back of this 2.20 plate. Step 10 reads the metal left under each seat.
It worked whenThe picture reads “Divot (blind)”.
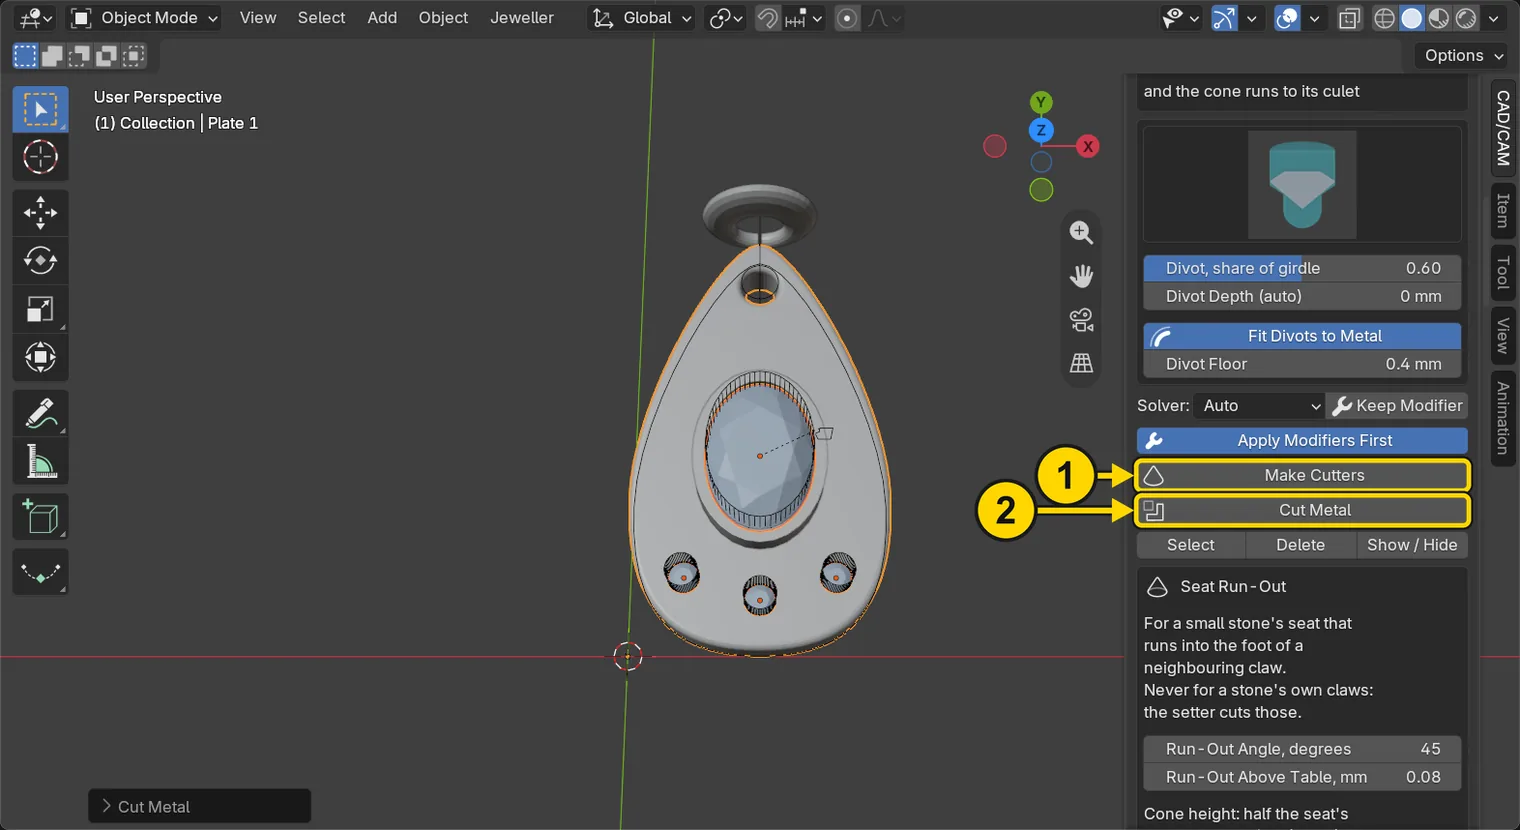
Step 10. Make the cutters and cut the seats
WhereThe 3D view, then the Cutters & Seats panel.
DoHold Shift and click the oval’s table, then Shift and click the plate again so that it is active. Press Make Cutters, then Cut Metal.
You should seeThe seats are cut into the plate: a round hollow under each of the three small stones and a larger oval one under the oval. The three small stones sit flush, level with the metal, and the oval stands in its bezel on top, but all four seats take the Hole you chose in step 9: each is a divot, a seat that ends in the metal and never goes through the back, so the plate’s underside stays whole. Measured on the plate, 0.78 mm of metal is left under each small stone (the plate is 2.20 thick) and 0.40 mm under the oval, which is the Divot Floor 0.40 the bench keeps. The 1.28 of step 8 was read before any seat was cut.
It worked whenThe 3D view shows a hollow round each of the four stones.
Step 11. Make the jump ring from its circle
WhereThe 3D view, then the Metal panel.
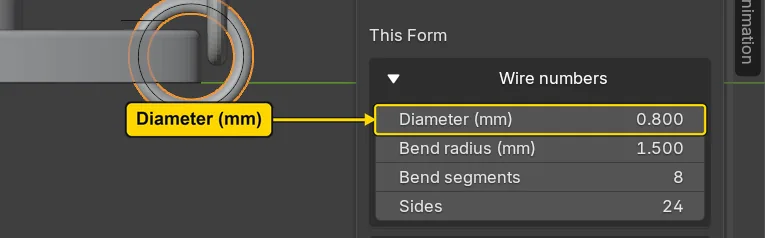
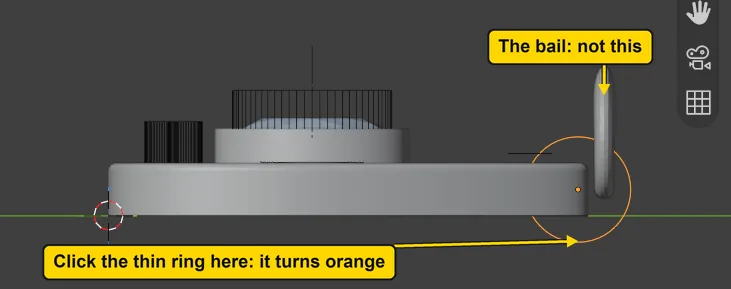
DoClick the large circle at its lowest point (the first picture marks it), click Metal in the section bar, press Make Wire, then type 0.8 in Diameter (mm) under Live Forms and press Enter.
You should seeThe thin pale ring below the drop turns orange when clicked (the bail is the thicker loop standing up across it, not this one). The circle becomes a ring of round wire 0.80 across: 5.2 mm across outside and 3.6 mm inside. A jump ring is modelled closed and cut open at the bench, by twisting the ends sideways: never pulled open into a C. The wire passes up through the hole, and the bail’s loop passes through the ring: the bail’s wire is 0.80 mm at its foot and 0.90 mm at its thickest. Measured on the finished file: the least gap is 0.27 mm between ring and bail, 0.24 mm between ring and plate and 0.31 mm between bail and plate, and 0 pairs of faces cross between ring and bail, 0 between ring and plate and 0 between bail and plate. The Print Check does not read this: it reads each part alone. The metal from the hole’s edge to the drop’s tip measures 1.50 mm along the middle of the drop: the plate carries load, so the figure to beat is 0.80 (0.60 at the least), and this is over it.
It worked whenA row Wire 1 stands in the Live Forms panel and Diameter (mm) reads 0.8.
Step 12. Weigh the pendant
WhereThe section bar, Check, then the Reports & Checks panel.
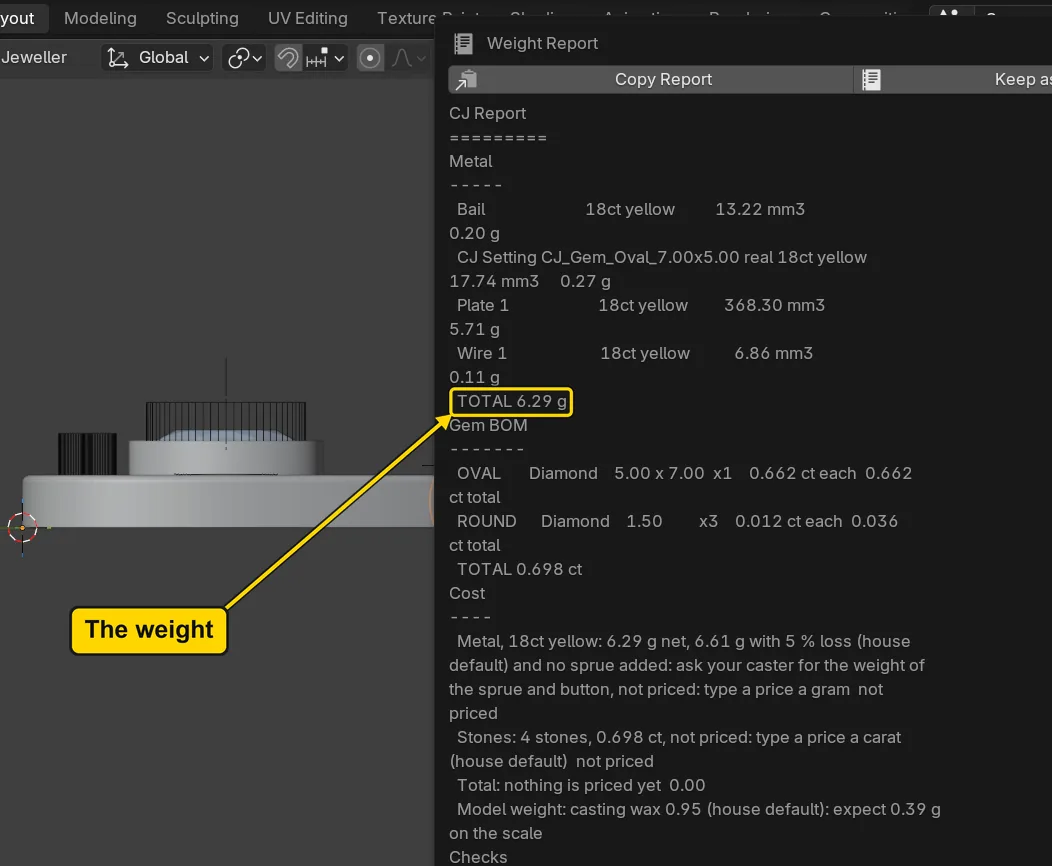
DoClick Check, then press Report Weight. Read the line TOTAL, then press Esc.
You should seeA window headed “Weight Report” lists the plate, the bezel, the jump ring and the bail, each in 18ct yellow, with a TOTAL near 6.29 g. The stones are weighed in carats on their own lines. Read only TOTAL. Each line wraps: the grams stand on the line under the metal’s name.
It worked whenThe window reads a TOTAL line.
Step 13. Run the print check
WhereThe Reports & Checks panel.
DoPress Run Print Check, read the window that opens, then press Esc to shut it.
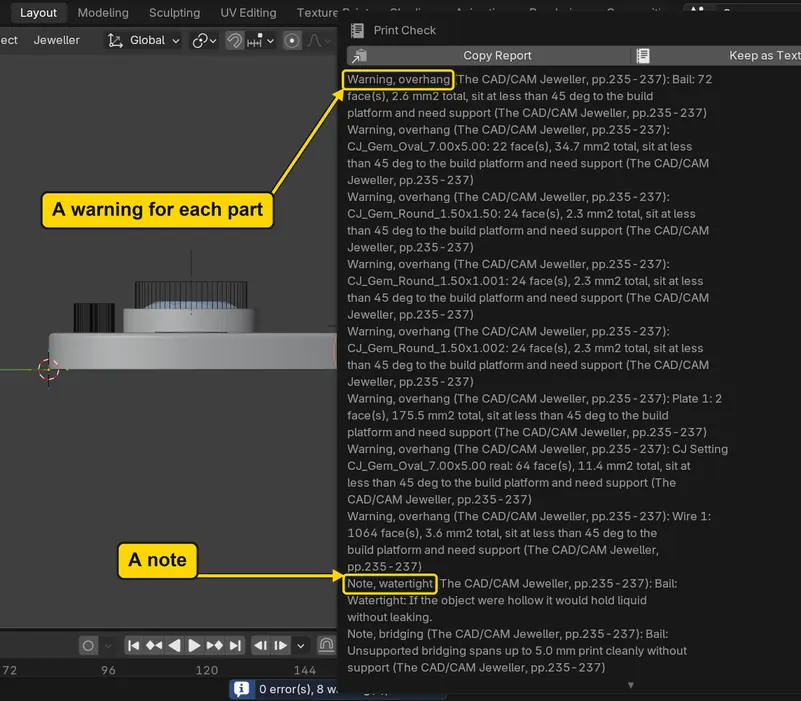
You should seeA window headed “Print Check” lists a warning for each part, such as “Warning, overhang”, and notes beginning “Note, watertight”. An overhang warning says that some faces lean at less than 45 degrees to the platform a printer builds on, and need support: it tells you how to orient the part for a printer, and here the plate’s flat underside gives one. The bail has its own lines, as it is its own part. The window is long: read its first lines. The Print Check reads each part on its own: it does not say that the bezel is joined to the plate, that the ring and bail clear each other, or how much metal lies round the hole.
It worked whenA window headed “Print Check” opens, and shuts again with Esc.
Step 14. Look at the finished pendant
WhereThe 3D view. The picture looks from above and is framed on the pendant for this picture only.
DoLook at the picture.
You should seeThe flat drop with the oval in its bezel, three small stones sunk in the metal below it, the jump ring through the hole at the top and the bail through the ring. The bail is its own part, clear of the plate and of the ring by 0.27 mm at the least, and fused to nothing. The jump ring is modelled closed: a jeweller saws it open at the bench and twists it shut again after the bail is on.
It worked whenYou can see the oval, the three small stones, the ring and the bail on the drop.
Step 15. Save your work
WhereThe 3D view: move the pointer over it.
DoPress Ctrl+S.
You should seeBlender writes your copy at once, with no question, because the file already has a name. An asterisk, *, in the title bar marks changes that are not saved, and it goes now. Save your work and get it back (P0-12) says more about saving.
It worked whenThe title bar begins my-drop-pendant and carries no asterisk.
No picture: the only change is a message on the status bar, and it fades.
Check your result
| What to read | Where | What it should say |
|---|---|---|
| The plate | The Metal section, Live Forms panel, This Form | Thickness up (mm) reads 2.2 |
| The flush seats | The Setting section, More Settings panel, Flush box | It begins “Flush seats for 3 stones” and ends “0 FAIL, 0 WARN” |
| The weight | The Weight Report window, the line TOTAL | About 6.29 g: your own file may differ in the last digit |
| Separate parts | The Metal section, Live Forms panel, the list | Plate 1 and Wire 1 stand as two rows of their own. The bail, an ordinary object, is in neither. No panel shows it. Measured on the finished file: ring to bail 0.27 mm at the least, and no faces crossing |
Try it yourself
Open your copy again (Blender asks whether to save the changes: choose Don’t Save, the button that drops what you did since the last save) and do steps 2 and 3 only. Then type 1.60 in Thickness up (mm) and read the weight line in the Metal panel: a thinner plate is lighter. Put it back to 2.20 before you go on.
What you learned
- A pendant is built part by part: the plate, the stones in their settings, the seats, the jump ring and a separate bail. Each part has its own button, and each reads its own verdicts.
- The bench’s rules held here: stones at stocked sizes, a divot and not a through hole in thin metal, a jump ring and a separate bail, and no lip rolled over the crown. The plate, the ring and the bezel carry load, so the figures to beat are 0.80 and 0.60 at the least.
- This is a practice file. The Print Check reads each part on its own: it does not say that the bezel is joined to the plate, that the ring and the bail clear each other, or how much metal lies round the hole. Those you measure, as this page did.
- The next part starts with the shape of a band’s section.