
What you will make
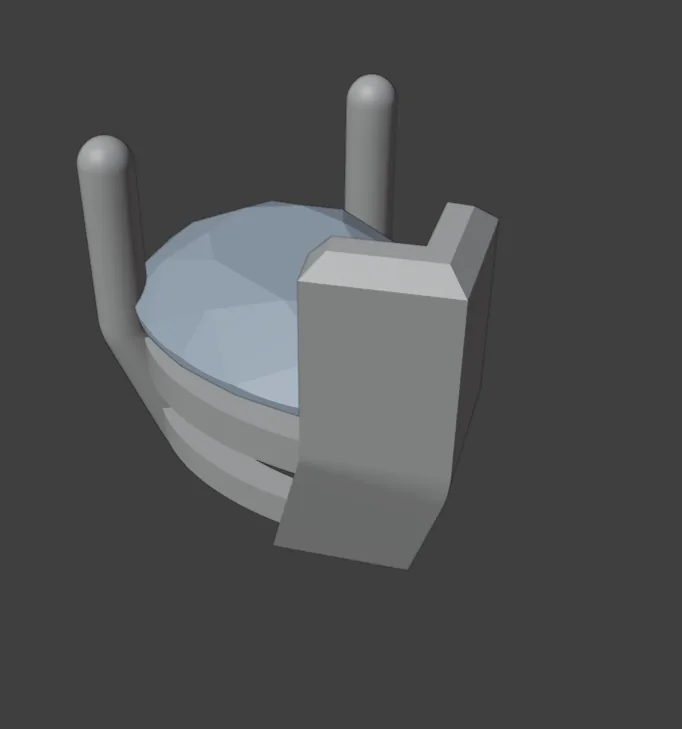
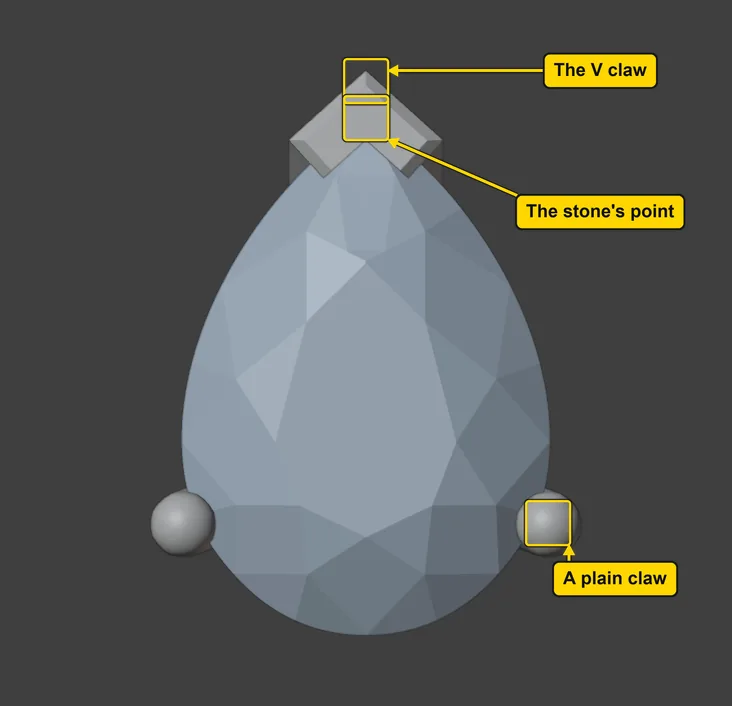
A Pear 7 x 5, a pear-shaped stone 7.00 mm long and 5.00 mm across, with one pointed end and one round, broad end, in a head of 3 claws: a V claw at its point and two plain claws round its broad end. A point or a corner takes a V claw, a chevron (a V shape) whose two inner faces run along both of the stone’s edges, so the point lies inside the V and is held on both sides. The claws stand 2 mm over the table, the stone’s flat top, and the plain claws are 0.9 mm across. You change the V’s reach, Arms, and the cut on its top edges, Top chamfer, by dragging marks on the model.
About 10 minutes.
Files
- p4-07-start.blend (112 KB): open this one to begin.
- p4-07-finished.blend (235 KB): the result, to compare with yours.
Both were made in Blender 5.2.0.
Before you start
- You have done Part 0, Blender from nothing, Drag a number on the model (P4-02) and Go down a level: lean, bend, rail sizes (P4-04): a head’s pink marks, its handles, change a number when you drag them, and the level button on the model chooses which marks show.
- CAD/CAM Jeweller 2.22.0 or later (Preferences > Add-ons shows the version). The start file holds a Pear 7 x 5 stone with no head, in millimetres. A pear’s point stands toward the back of the 3D view.
Build it
Step 1. Open the start file and save your copy
WhereThe top bar: the row of words that begins File, Edit.
DoDownload p4-07-start.blend from Files above and open it. Then choose File > Save As and save it under the name below, in a folder of yours. Open an exercise file and keep the start file safe (P0-07) shows how.
Typemy-pear.blend
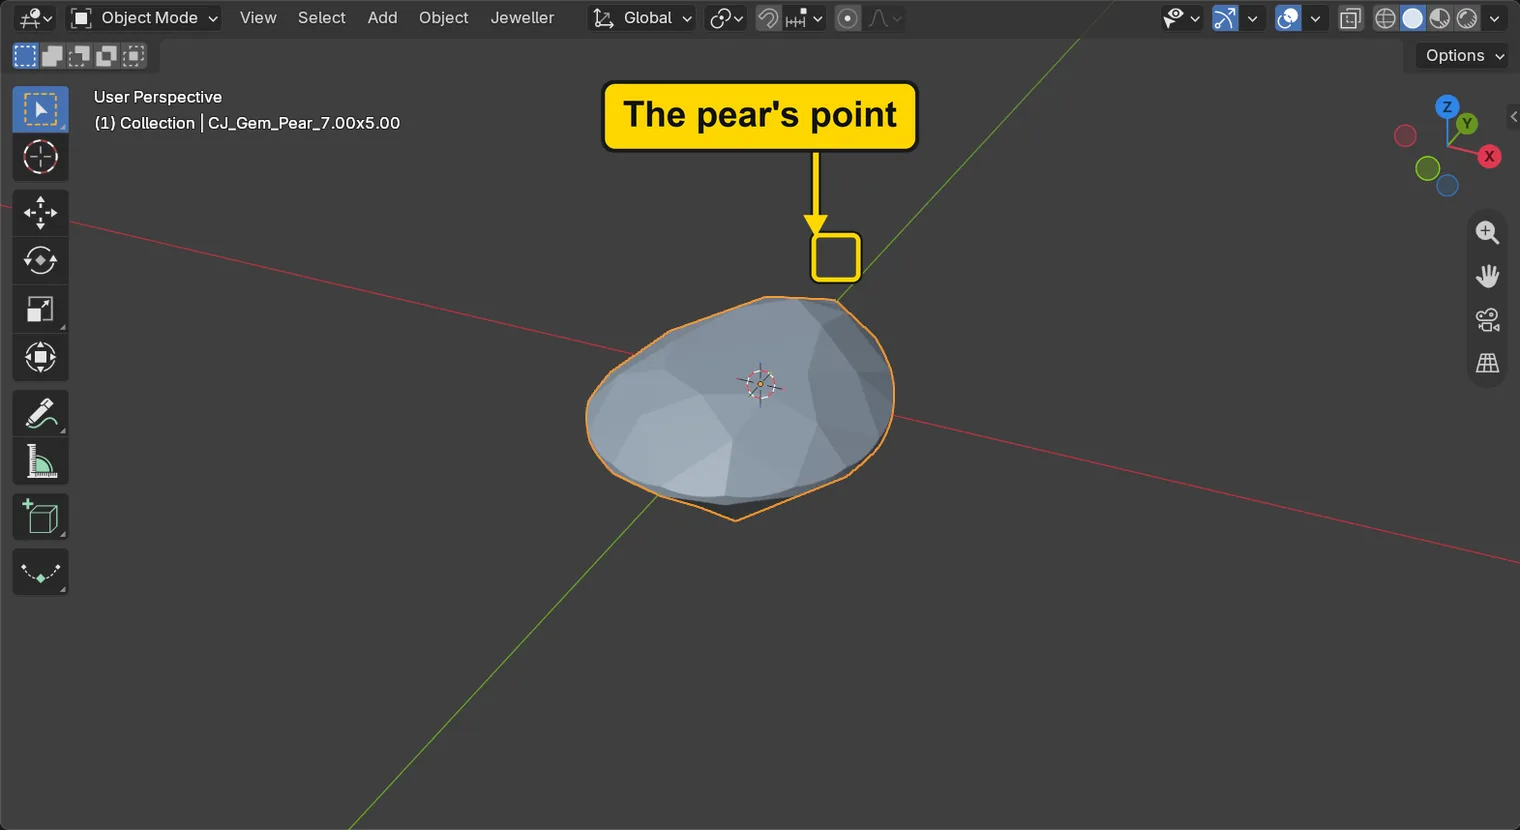
You should seeThe 3D view shows a pale pear-shaped stone seen from a little above, with an orange outline: it is selected. It has no head yet. The Outliner, the list at the top right of the window, holds one stone, and the title bar, the strip above File and Edit, begins my-pear. The first picture is the 3D view and the second is the title bar.
It worked whenThe title bar, the strip above File and Edit, begins my-pear.

Step 2. Open the Head Builder
WhereThe sidebar: the CAD/CAM tab, the Setting section, the Head Builder panel. Press N with the pointer over the 3D view if the sidebar is shut. Scroll the sidebar down until the panel’s rows show.
DoClick Setting in the section bar, and open Head Builder if it is shut. With the stone selected, read the panel.
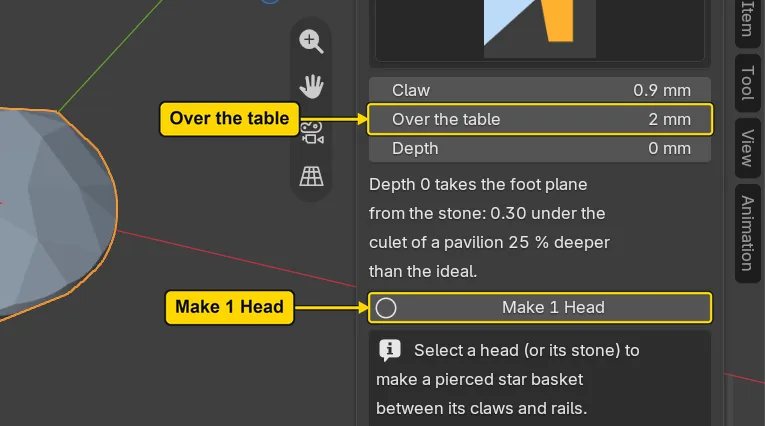
You should seeThe line “1 stone selected.”, pictures of the claws and the rail, the numbers Claw, Over the table and Depth, and the button Make 1 Head. There is no V claw box yet: it shows only once a head has a V claw.
It worked whenThe button reads Make 1 Head.
Step 3. Press Make 1 Head
WhereThe Head Builder panel, the button Make 1 Head.
DoLeave every number as it is, and press Make 1 Head.
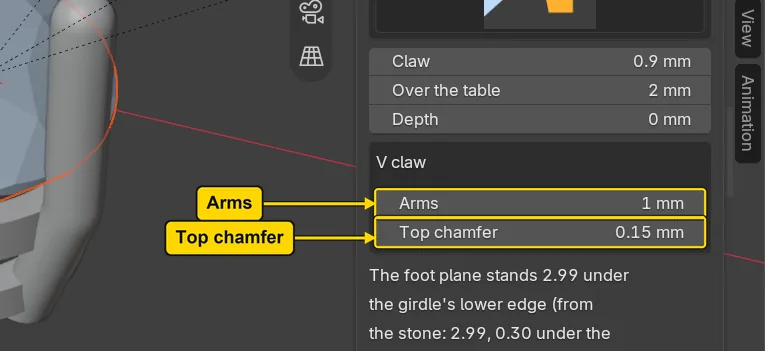
You should seeA head round the pear: a claw at the point and two at the broad end. A new box, V claw, stands in the panel with two numbers, Arms and Top chamfer. The numbers under the pictures are the bench’s: Claw 0.9 mm, and Over the table 2 mm.
It worked whenThe panel has a box headed V claw.
Step 4. Look straight down on the head
WhereThe 3D view: move the pointer over it.
DoLook at the picture. To look straight down yourself, click the blue Z ball on the small coloured axes at the top right of the 3D view.
You should seeThe pear with a chevron at its point, and a round claw on each side of its broad end. The point lies in the V, and the V’s inner faces run along the stone’s two edges. The rails are under the stone, so no rail shows.
It worked whenYou see a chevron at the pear’s point and two round claws.
Step 5. Click a claw to bring the marks back
WhereThe 3D view, the tip of one of the round claws.
DoClick the tip of one of the round claws, at a point clear of every pink mark.
You should seeAn orange outline round the head, pink marks on it and, to its right, the buttons on the model, the words beside the head, ending Level 1 of 3: main and Done. The pink marks are the head’s handles: the stone was selected, and now the head is. A click on a claw selects the head; a click on the stone selects the stone. If no pink marks show, you clicked off the head: click a claw again.
It worked whenThe words at the top left of the 3D view end in the head’s name, and the buttons on the model stand to the right of the head.
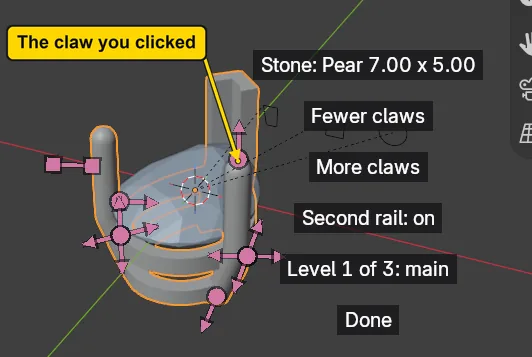
If it goes wrongNothing is selected, or the stone is: the click missed the claw, and no pink marks show. Click nearer its round tip, in the middle of it.
Step 6. Press the level button
WhereThe 3D view, the button that reads Level 1 of 3: main.
DoClick Level 1 of 3: main once.
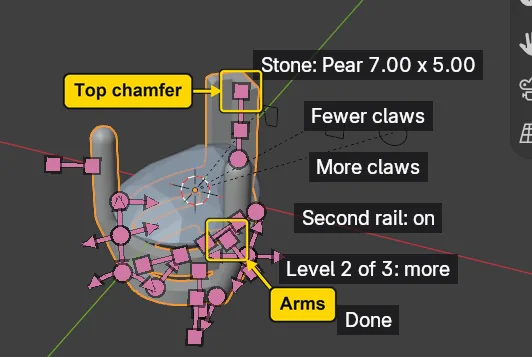
You should seeTwo marks stand on the V claw, Arms and Top chamfer, and the button reads “Level 2 of 3: more”. There is no Turn mark on this head: turning the set would move nothing on a head whose V claw sits on the stone’s point.
It worked whenThe button reads “Level 2 of 3: more”, and there is no curved mark round the stone.
Step 7. Drag Arms
WhereThe 3D view, the mark on the V claw’s arm. Press and drag as in Drag a number on the model (P4-02), step 4.
DoRest the pointer on the mark until its label reads “Arms”. Press on it, drag a little way, and let go.
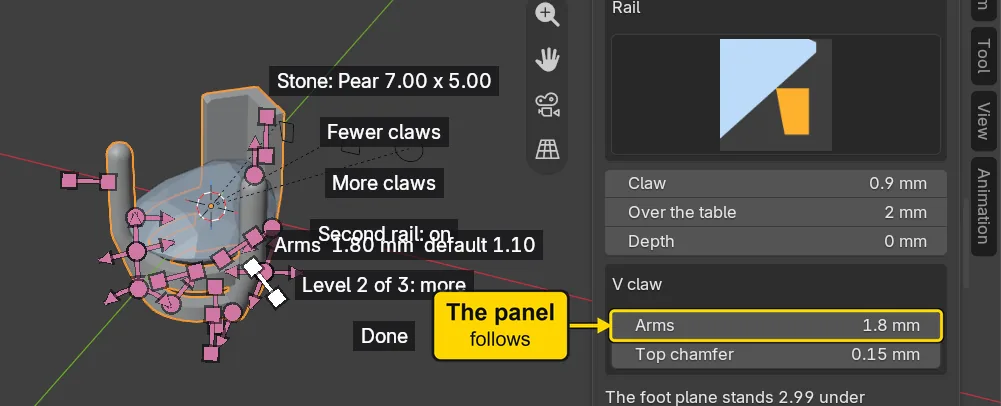
You should seeBoth arms of the V grow longer along the stone’s edges at once: Arms is one length for both. The label begins “Arms” and gives your number (the picture’s is 1.80 mm), and Arms in the V claw box of the panel reads the same. The label also says “default 1.10”, while the head began at 1 mm: trust the panel and the first number of the label, which is the head’s own. The word default on this one label does not match the head (an add-on fault, noted for its maker).
It worked whenArms in the panel is longer than the 1 mm it began at, and the label gives the same number. Yours will differ from the picture’s 1.80 mm.
Step 8. Drag Top chamfer
WhereThe 3D view, the mark on the V claw’s top. Press and drag as in Drag a number on the model (P4-02), step 4.
DoRest the pointer on the mark until its label reads “Top chamfer”. Press on it, drag a long way, and let go.
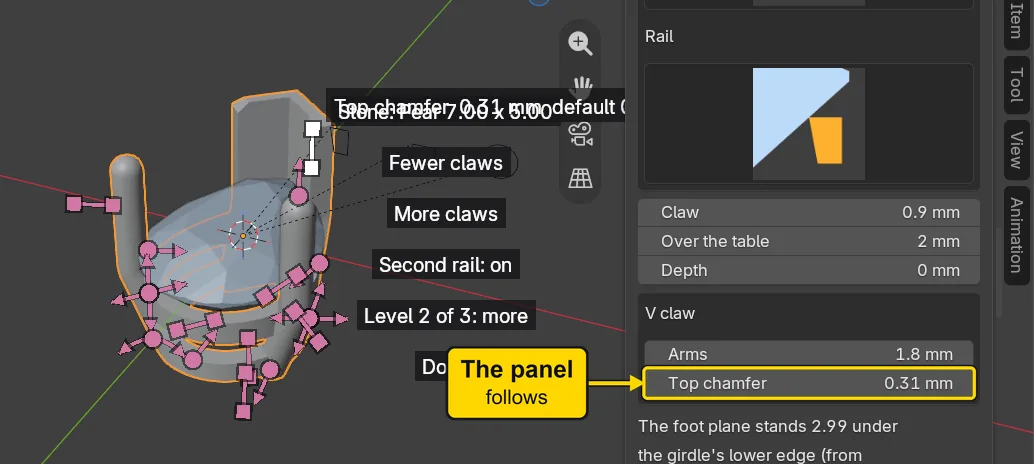
You should seeThe edges round the top of the V are cut at 45 degrees. The label reads “Top chamfer” and gives 0.31 mm, and Top chamfer in the panel reads the same. The mark stops at its ceiling, however far you drag, so your number is the same as the picture’s.
It worked whenTop chamfer in the panel is more than the 0.15 mm it began at, and a long drag stops at 0.31 mm, the ceiling.
Step 9. Save your work
WhereThe 3D view: move the pointer over it.
DoPress Ctrl+S.
You should seeBlender writes your copy at once, with no question, because the file already has a name. An asterisk, *, in the title bar marks changes that are not saved, and it goes now. Save your work and get it back (P0-12) says more about saving.
It worked whenThe title bar begins my-pear and carries no asterisk.
No picture: the only change is a message on the status bar, and it fades.
Check your result
| What to read | Where | What it should say |
|---|---|---|
| The claws | The 3D view, looking straight down (the blue Z ball of the small coloured axes, at the top right of the 3D view) | 3 claws: a V claw round the pear’s point and two plain claws. No rail shows from above |
| Arms | The CAD/CAM tab, Setting section, Head Builder panel, the V claw box, Arms | It is longer than the 1 mm it began at: the picture reads 1.80 mm, and yours will be your own number |
| Top chamfer | The same V claw box, Top chamfer | It is more than the 0.15 mm it began at, and a long drag stops at its ceiling, 0.31 mm |
| The marks at Level 2 | The 3D view, after step 6 | Arms and Top chamfer stand on the V claw, and there is no Turn mark. |
| Over the table | The panel, under the Claws and Rail pictures | It reads 2 mm: the V claw’s top stands as high as the top of the plain claws |
Try it yourself
Open your copy again, click a claw, and press the level button. Drag Arms to the far end of its run and then to the near end, and look from above each time: you will see how far the V reaches along the stone’s two edges, and where the handle stops.
What you learned
- A point or a corner takes a V claw, a chevron along both edges of the stone. Make 1 Head makes it by itself on a pear, a marquise, a heart, a princess or a trillion.
- The V claw box shows in the Head Builder only for a head that has a V claw. Arms is one length for both arms, and Top chamfer cuts the outer top edges at 45 degrees.
- A head with a V claw has no Turn mark: turning the set moves nothing there. Top chamfer has a ceiling, here 0.31 mm on a long drag.
Next: Edit a head’s section