
What you will make
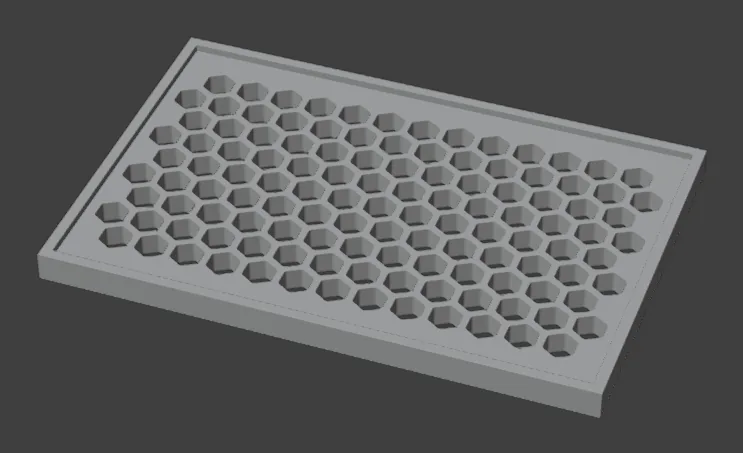
A plate 30 x 20 mm, pierced with 121 hexagon holes, with a raised rim 0.60 mm wide and 0.40 mm high round its edge, all one closed body: a mesh with no gaps. A rim frames the piercing, and one button makes both.
About 10 minutes.
Files
- p10-06-start.blend (164 KB): open this one to begin.
- p10-06-finished.blend (404 KB): the result, to compare with yours.
Both were made in Blender 5.2.0.
Before you start
- You have done Part 0, Blender from nothing.
- You have pierced a band with Make Pattern, in Pierce a band and judge it at the bore (P10-04).
- The add-on is installed, and its CAD/CAM tab is in the sidebar. Put the downloaded files in one folder you can find again.
- Steps marked Meet the refusal break something on purpose: the refusal is safe and the piece is not harmed.
Build it
Step 1. Open the start file, and save your own copy
WhereBlender’s top menu bar, File > Open, then File > Save As.
DoOpen p10-06-start.blend. Then choose File > Save As and give it a name of your own, so that the start file stays clean.
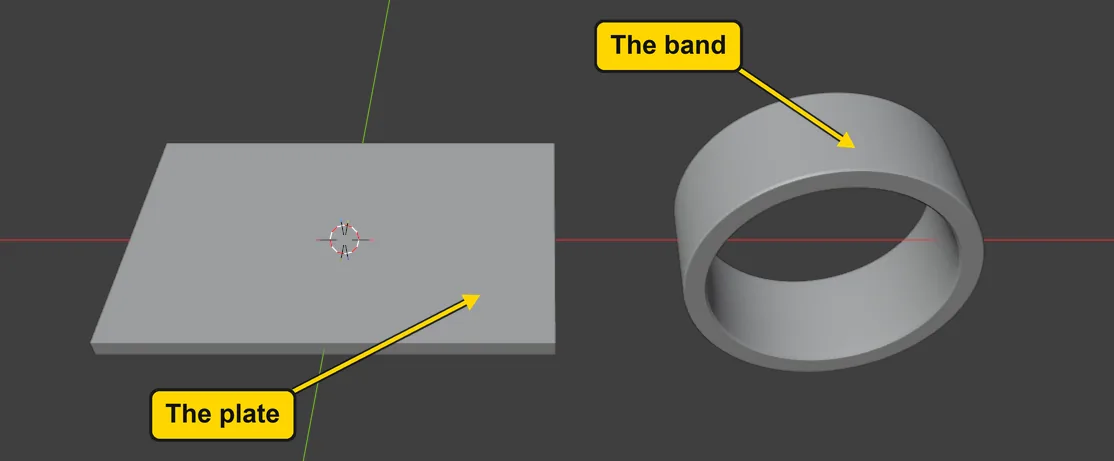
You should seeA plain flat plate, 30 x 20 mm and 1.2 mm thick, and a plain flat ring band beside it. You use the plate first, and the band at the end.
It worked whenThe 3D view shows the plate and the band and nothing else.
Step 2. Find Pierce and Rim
WhereThe sidebar at the right of the 3D view (press N with the pointer over the 3D view if it is shut), the CAD/CAM tab.
DoClick Flow in the section bar, the small word buttons. Then click the words Flow on Surface once to fold that panel: it shuts up to its title.
You should seePierce and Rim is the button right under Make Pattern. It is easy to press by mistake, so this page shows you what it does.
It worked whenYou can read Pierce and Rim without scrolling.
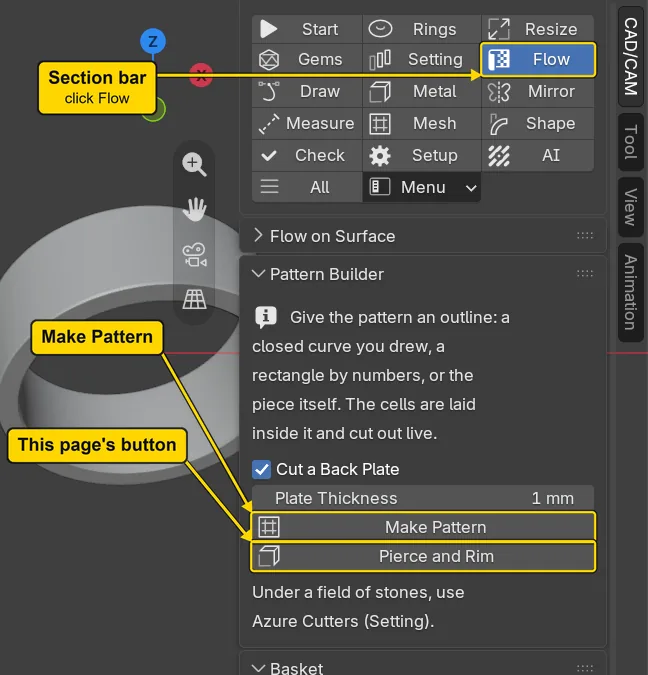
If it goes wrongYou cannot see Pattern Builder: the panel above it is open and takes the room. Click the words Flow on Surface once.
Step 3. Select the plate, and go into Edit Mode
WhereThe 3D view.
DoClick once on the plate, then press Tab with the pointer over the 3D view.
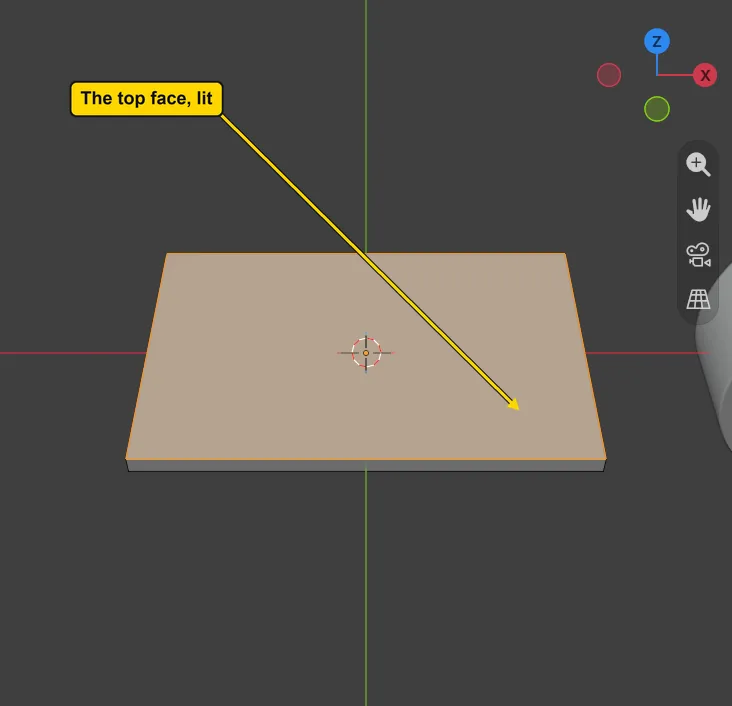
You should seeThe plate’s top face is lit: it is already picked for you in the start file. Edit Mode is where you work on one piece’s own faces, edges and points.
It worked whenThe menu at the top left of the 3D view reads “Edit Mode”.
Step 4. Press Pierce and Rim
WhereThe Pattern Builder panel. You are still in Edit Mode.
DoPress Pierce and Rim.
You should seeHexagon posts on the plate, solid until Make Real cuts them, and a low raised rim round its edge. A flat copy of the face, a guide, lies in front of the plate, partly out of the picture: it is no part of the piece. The blue marks and the word “Done” are handles: leave them alone for now. You may click Done when they get in your way.
It worked whenThe panel’s line with the tick, which counts the cells, says “121 cells”. The status bar says so too, but its message fades: the panel keeps the same figure.
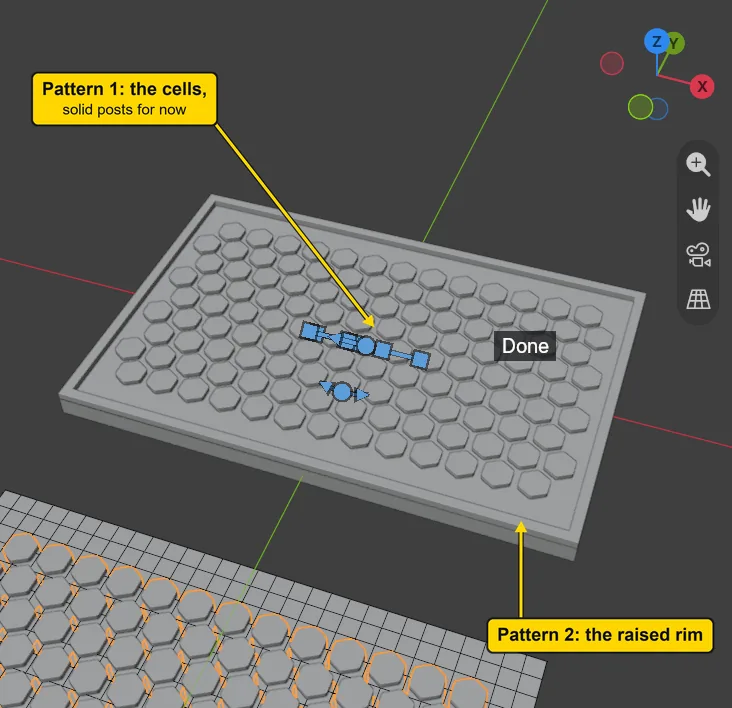
If it goes wrongThe panel says “0 cells”, and a long thin strip, a guide, appears: you pressed in Object Mode, with no face picked. Press Ctrl+Z once, press Tab to see the top face lit, then press again.
Step 5. Read the Rib and the Margin
WhereThe Pattern Builder panel, the field Margin (mm).
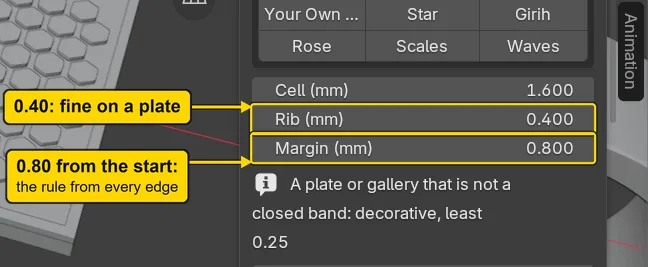
DoRead the fields Rib (mm) and Margin (mm). Do not change them.
You should seePierce and Rim starts with Rib (mm) 0.40, a rib being the bar of metal between two holes, and Margin (mm) 0.80. A margin is the metal from the edge to the nearest hole. In yellow gold 0.80 is the rule from every edge, and the add-on starts there: you type nothing. The panel counts 121 cells.
It worked whenMargin (mm) reads 0.800.
Step 6. Make it real
WhereThe Pattern Builder panel, near its foot.
DoPress Make Real.
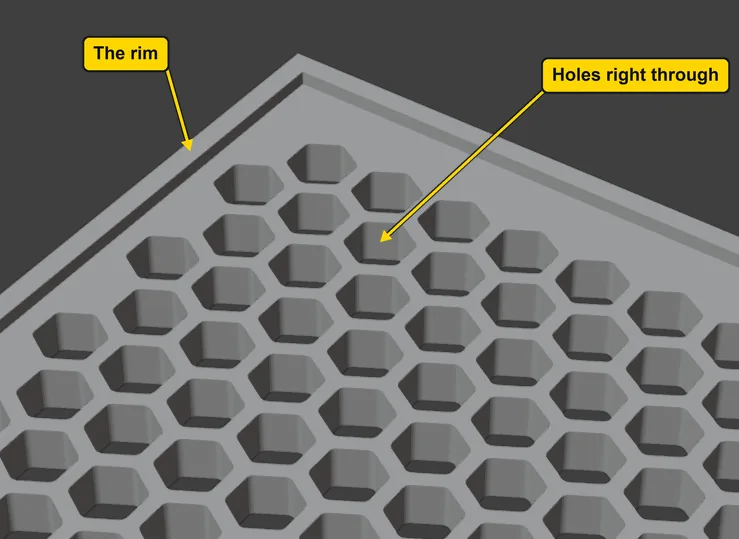
You should seeThe posts become holes, and the rim is joined to the plate.
It worked whenThe holes run right through the plate. The status bar begins “Cut 319.8 mm3 from Plate” as well, for a few seconds.
Step 7. Read the rim’s size
WhereThe 3D view.
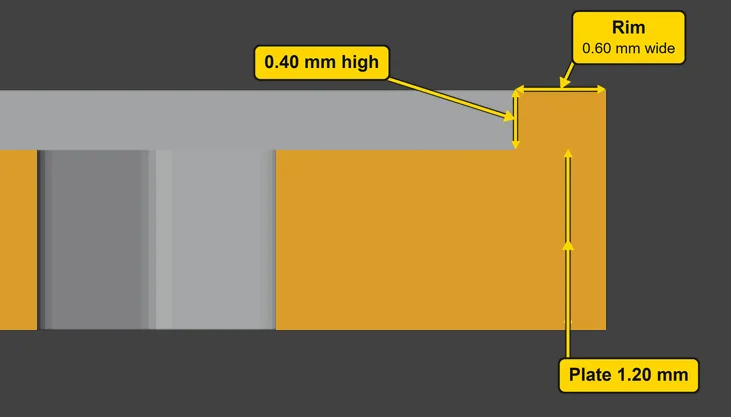
DoClick the green ball with no letter on the small coloured axes at the top right of the 3D view: you look along the plate from the front.
You should seeThe rim stands up from the plate’s top face. The picture cuts through the plate to show it: 0.60 mm wide and 0.40 mm high, on a plate 1.20 mm thick.
It worked whenYou can see the rim standing up above the plate’s top face.
Step 8. Save your copy, before the band
WhereThe 3D view, with the pointer over it.
DoPress Ctrl+S now. It saves your plate to the copy you named at step 1. The next steps break something on purpose.
No picture: nothing on the screen changes.
Step 9. Meet the refusal: press it on the band
WhereThe 3D view, then the Pattern Builder panel.
DoThis will not work on a band, and you are about to see how it fails. The band is not harmed. Click once on the top of the band, then press Pierce and Rim.
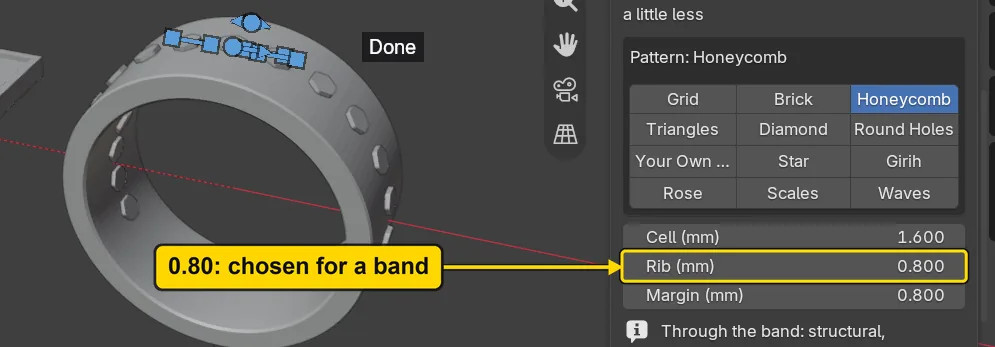
You should seePosts all over the band, and two more flat guides. The add-on reads the band as a piece that carries load, so the new pattern starts at Rib (mm) 0.80 and Margin (mm) 0.80, with 0.60 as the least.
It worked whenThe panel says “15 cells”, with Rib (mm) reading 0.800.
Step 10. Meet the refusal: press Make Real
WhereThe Pattern Builder panel, near its foot.
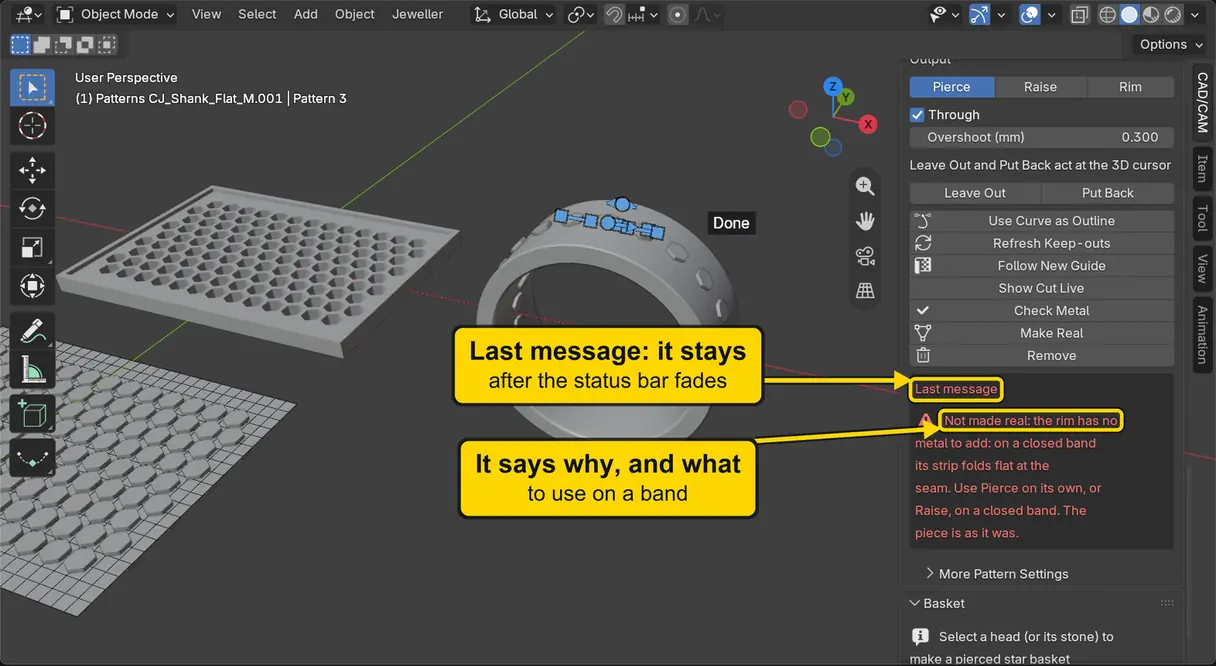
DoPress Make Real, then read the red words under Last message, lower on the panel.
You should seeLast message turns red and says: “Not made real: the rim has no metal to add: on a closed band its strip folds flat at the seam. Use Pierce on its own, or Raise, on a closed band. The piece is as it was.” The status bar says it too, but fades.
It worked whenThe band is still whole, with its posts and no holes.
Step 11. Take the band back: File > Revert
WhereBlender’s top menu bar, File > Revert.
DoChoose File > Revert. Blender asks first: press Revert.
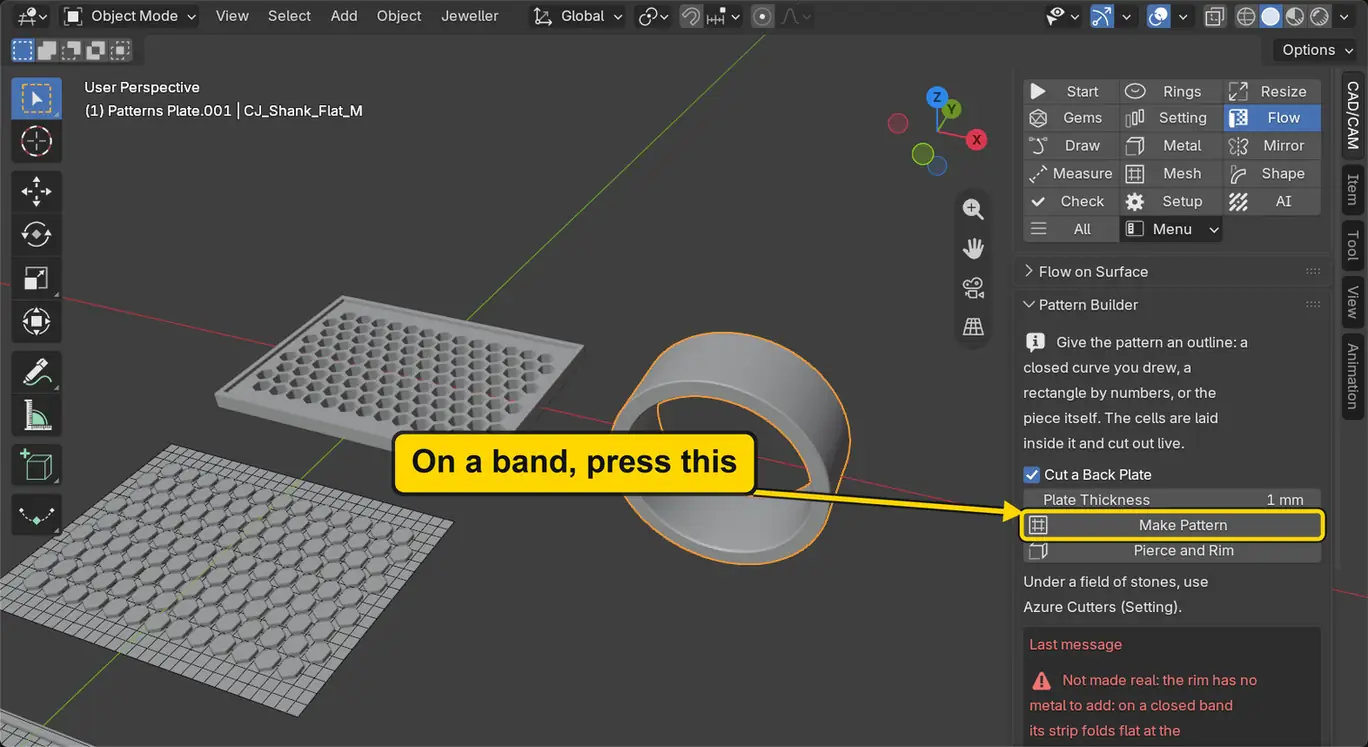
You should seeA box that reads “Revert to the Saved File” and “Any unsaved changes will be lost”. Only what you did since your save at step 8 is lost: the band’s posts and guides. Your plate keeps its holes and its rim, because you saved it. The band is plain again: click it, and the panel offers Make Pattern.
It worked whenThe band is plain, and once you click it the panel shows Make Pattern, marked in the picture.
Check your result
| What to read | Where | What it should say |
|---|---|---|
| The plate’s size | Click the plate, then the Item tab on the sidebar’s edge, Dimensions | X 30 mm, Y 20 mm, Z 1.6 mm: the plate’s 1.2 and the rim’s 0.4 |
| The holes | The plate, from any side | Holes right through it, and plain metal between them and the rim |
| The band | The 3D view: click the band, then look at the Pattern Builder panel | A plain band again, and the panel offers Make Pattern |
Try it yourself
Pierce and Rim also works on a dome. Open p10-05-start.blend, the file of Pierce a dome at true size (P10-05). Click Dome, press Tab to bring up its picked crown, and press Pierce and Rim, then Make Real: it says “Cut 121.2 mm3 from Dome (55 cells, 1.88 g saved)”. One closed body, with a raised ring round the crown. It makes 55 cells, and the holes read 1.60 mm outside and 1.60 mm inside.
What you learned
- Pierce and Rim cuts the cells through a picked face and raises a rim at its edge, as two patterns.
- It chooses its numbers from the piece: Rib 0.40 and Margin 0.80 on a plate, Rib 0.80 on a band. Read them before you press Make Real.
- On a closed band Make Real refuses. Go back to your saved copy with File > Revert, and use Make Pattern.