
What you will make
A pair of flower earrings in 18ct yellow gold. Each has a round plate 11.00 across and 2.20 thick, a Round 3.00 in the middle and six Round 2.50 stones round it. A Round 3.00 is a round stone 3.00 mm across. Each stone sits in its own seat, a blind pocket with 0.80 of metal under it. Six claws stand in the gaps round the middle stone, each shared with two petals, and one more claw stands outside each petal, so every stone is held from both sides. A post of round wire, 0.90 thick and 11.00 long, is soldered under the middle of each plate. No claw is cut at its own stone’s girdle, the stone’s widest edge. The plate is solid and heavy, and its thinnest wall, 0.64, is close to the bench’s least for structural metal, 0.60: a jeweller hollows the back of a plate like this later. The scroll, the clutch that holds a post on the ear, is bought.
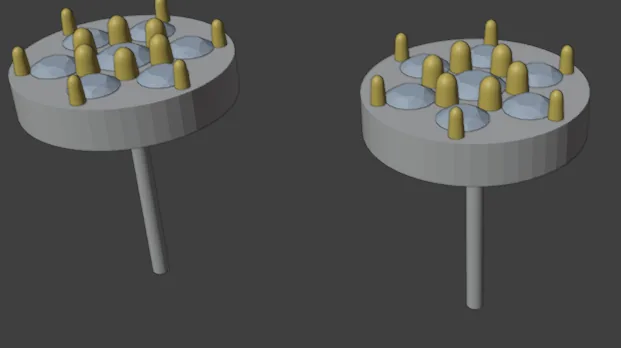
About 50 minutes.
Files
- p3-16-start.blend (99 KB): open this one to begin.
- p3-16-finished.blend (459 KB): the result, to compare with yours.
Both were made in Blender 5.2.0.
Before you start
- CAD/CAM Jeweller 2.22.0 or later (Preferences > Add-ons shows the version), installed, with its CAD/CAM tab in the sidebar.
- You have done Part 0, Blender from nothing, and these exercises: Draw a rectangle and a circle to exact sizes (P2-01), Turn a curve into wire and strip (P2-07), Turn a closed outline into a plate (P2-08), Pick a cut and a stocked size, then change it (P3-01), Cut two seats, then share one claw between two stones (P3-08), Copy stones that follow: mirror and round a centre (P3-10), Keep twins tidy (P3-11), Mirror any object about a place you choose (P3-12) and Look from the top, weigh the ring and check it (P1-03).
- The start file holds a drawn circle and a drawn line and nothing else, in millimetres. Blender’s panels drop trailing zeros: 0.8 mm is 0.80, and 9 mm is 9.00.
Build it
Step 1. Open the start file and save your copy
WhereThe top bar: the row of words that begins File, Edit.
DoDownload p3-16-start.blend from Files above and open it. Then choose File > Save As and save it under the name below, in a folder of yours. Open an exercise file and keep the start file safe (P0-07) shows how.
Typemy-earrings.blend
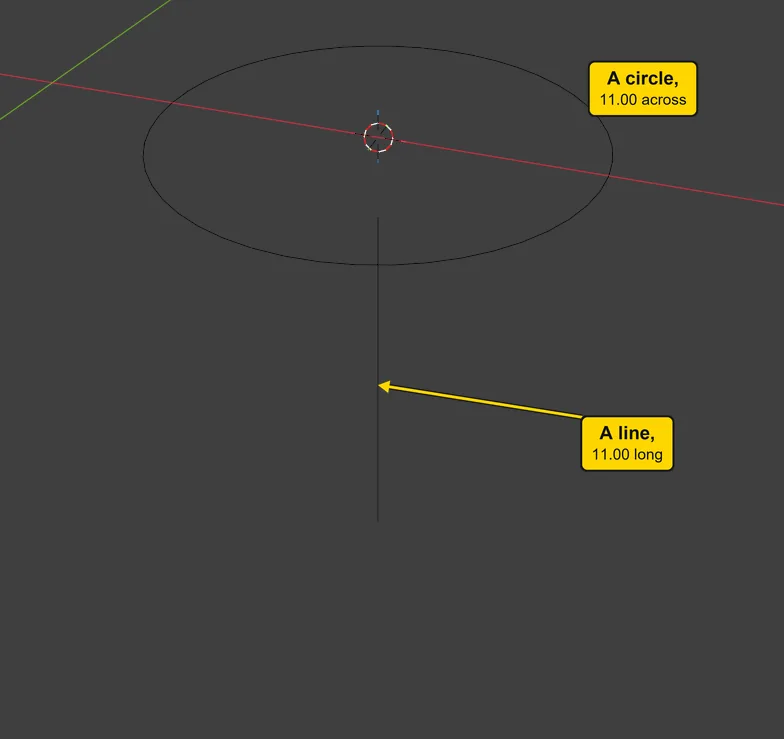
You should seeThe 3D view shows a thin circle lying flat and, hanging straight down from its middle, a thin straight line, as the picture shows. Nothing is selected. The Outliner, the list at the top right of the window, holds the two drawings, and the title bar, the strip above File and Edit, begins my-earrings: the picture shows the 3D view only.
It worked whenThe title bar, the strip above File and Edit, begins my-earrings.
Step 2. Make the plate from the circle
WhereThe 3D view: click the circle’s line once. Then the section bar, the small word buttons at the top of the CAD/CAM tab: click Metal.
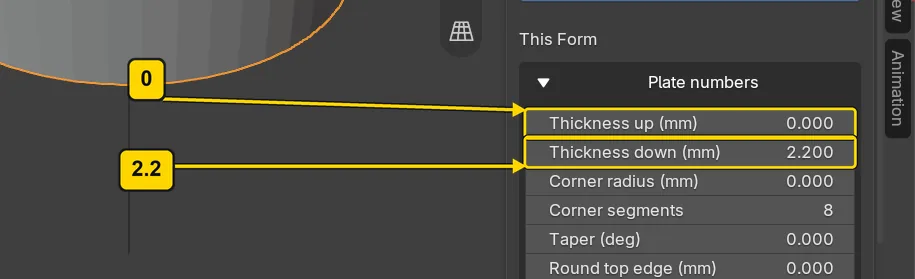
DoClick the circle, press Make Plate, then type 2.2 in Thickness down (mm) and 0 in Thickness up (mm), each followed by Enter.
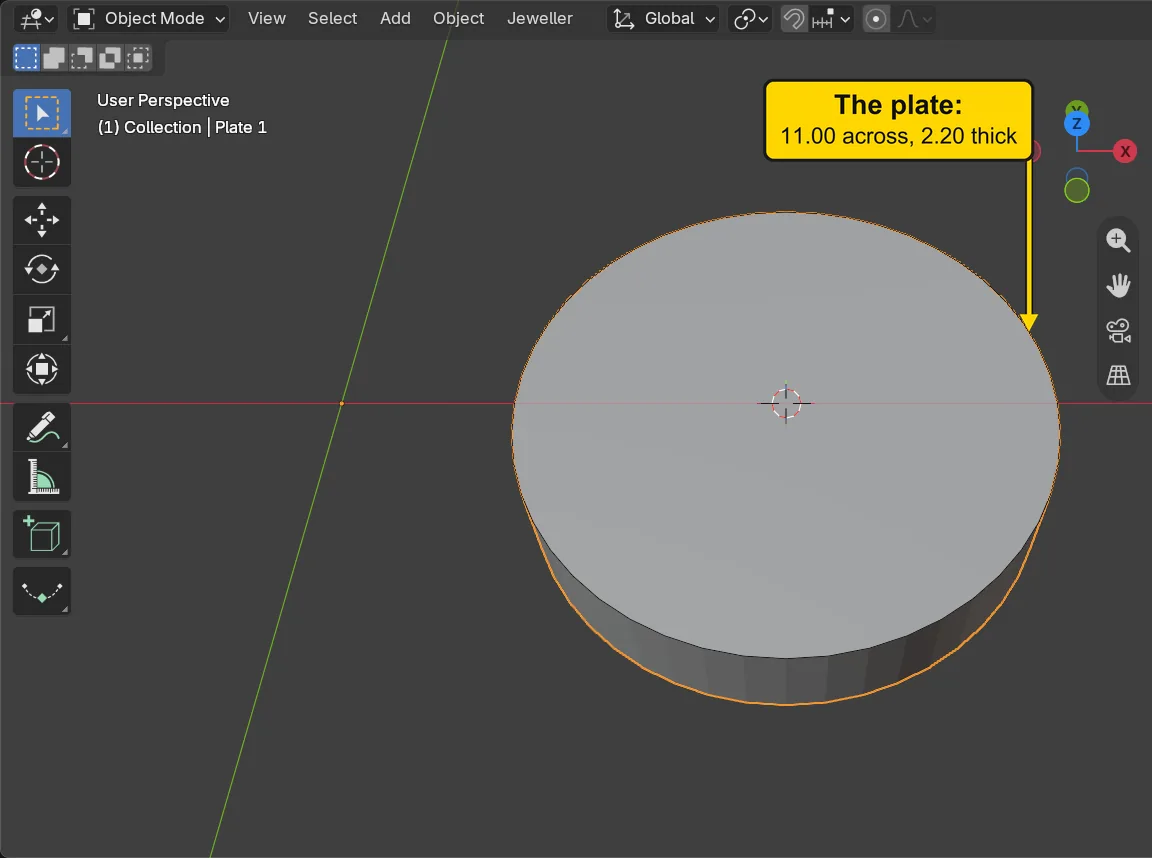
You should seeA solid round plate, 11.00 across and 2.20 thick, named Plate 1 in the panel, and the first picture shows the two fields. Its top is the plane the circle lies on. The plate is live, which means it follows the circle: change the circle and it changes. It stays live until a cut makes it real, in step 8.
It worked whenThickness down (mm) reads 2.200 and Thickness up (mm) reads 0.000.
| Field | Type | Why |
|---|---|---|
| Thickness down (mm) | 2.2 | metal under the plane the circle was drawn on: the least that leaves 0.80 under the Round 3.00, which step 6 shows |
| Thickness up (mm) | 0 | none above it: the stones’ widest edges will lie level with the top |
Step 3. Make the Round 3.00 in the middle
WhereThe sidebar: click Gems in the section bar. In the panel Gems, the box Size, mm.
DoClick the chip 3.0, then press Create at Cursor.
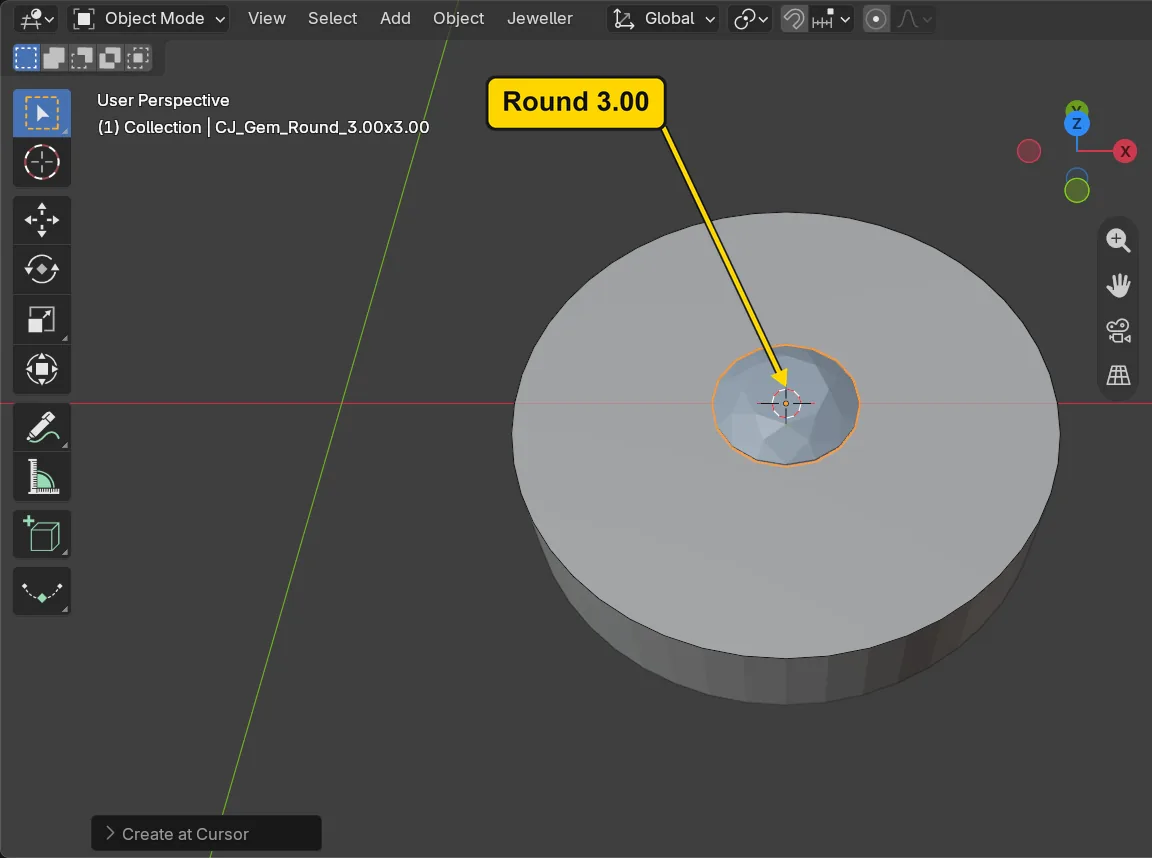
You should seeA round stone in the middle of the plate. The 3D cursor stands at the plate’s middle, so the stone comes there, with its widest edge, the girdle, level with the plate’s top. Its point, the culet, is 1.35 mm under the girdle and its flat top, the table, stands 0.49 mm over it. Part of it stands inside the plate: the seat comes later.
It worked whenThe words at the top left of the 3D view end CJ_Gem_Round_3.00x3.00.
Step 4. Make a Round 2.50 and move it out
WhereThe Gems panel: the line that begins Next stone, then the box Size, mm. Then the 3D view: move the pointer off the sidebar and into the dark area.
DoClick the line Next stone, click the chip 2.5, press Create at Cursor, then press G, Y, type 3.25 and press Enter.
TypeG, Y, 3.25, Enter
You should seeA smaller stone, a Round 2.50, standing 3.25 mm from the middle along the green line. Its edge is 0.50 mm from the middle stone’s edge: 3.25, less the 1.50 and 1.25 of the two radii. This is the first petal. It is a stocked size, a size a dealer sells as a calibrated stone.
It worked whenThe words at the top left of the 3D view end CJ_Gem_Round_2.50x2.50.
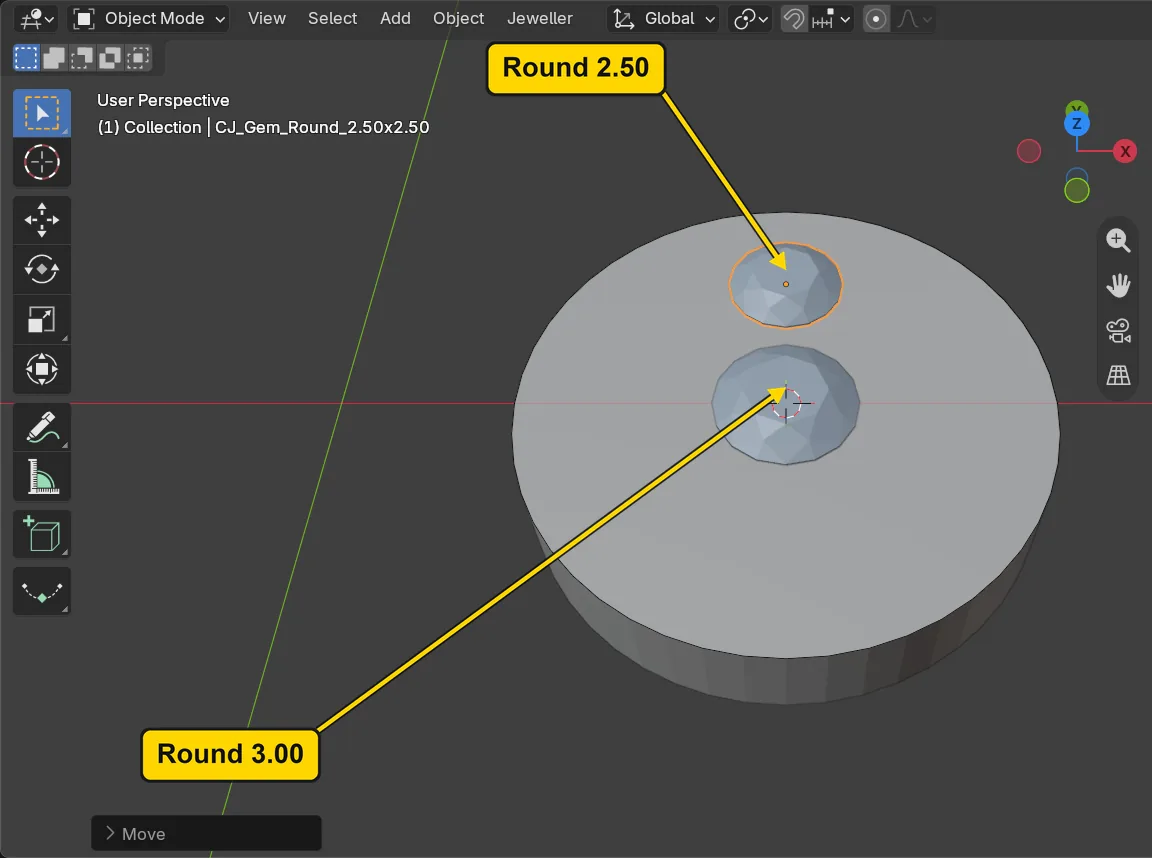
If it goes wrongNothing moves: the pointer is still over the sidebar. Move it over the 3D view and press the key again.
Step 5. Turn the petal into six
WhereThe 3D view: click the Round 2.50 once. Then the Gems panel: scroll down to the sub-panel Symmetry and click its title to open it.
DoClick the petal, click Cursor in the row of frames, then press Polar Array Selected.
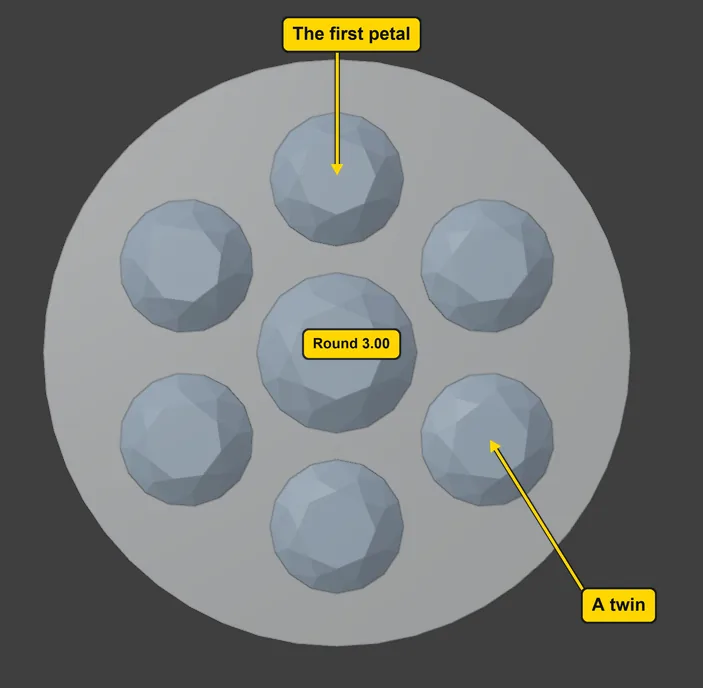
You should seeFive more petals, evenly round the middle stone: six in all, the one you made and five twins. A twin is a copy that follows its master. The frame is where the turn is measured from, and Cursor is the 3D cursor, at the middle of the plate. Each petal’s edge stands 0.50 mm from the Round 3.00’s and 0.75 mm from the next petal’s.
It worked whenSix petals stand round the middle stone.
Step 6. Choose Hole: Divot and its floor
WhereThe section bar: click Setting. A list at the top of the section names every panel in words: it is not a button. Under it stands the open panel Stone Settings: click its title once to fold it. Then open the panel Cutters & Seats.
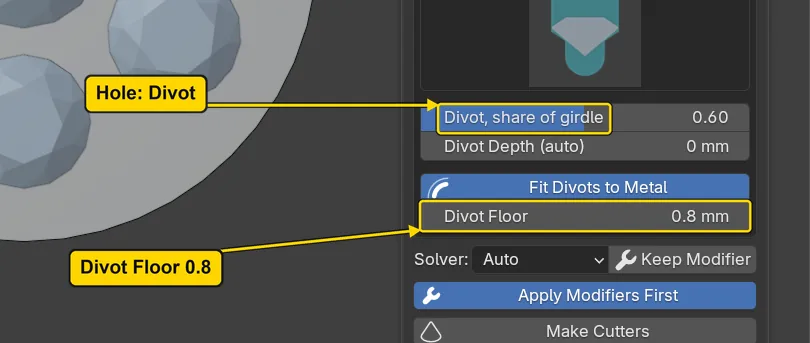
DoClick the picture under the box of numbers, click Divot (blind) in the grid that opens, then type 0.8 in Divot Floor.
You should seeThe picture under the box of numbers changes to a rounded hole. A seat is the cut a stone sits in, and a cutter is the shape that cuts it. A divot is a blind hole under the stone’s culet that ends round and never goes through. Divot Floor is the least metal left under it. It started at 0.4: the post will stand under the middle stone, and the bench wants structural metal 0.80, 0.60 at the least.
It worked whenThe picture under the box of numbers shows a rounded hole and Divot Floor reads 0.8.
Step 7. Make the cutters for all seven stones
WhereThe 3D view: move the pointer off the sidebar and into the dark area. Then the Cutters & Seats panel, the button Make Cutters: scroll the sidebar down to it.
DoPress A to select everything, then press Make Cutters.
You should seeA line at the foot of the panel: “7 cutters in CJ Cutters”. A selects everything, and Make Cutters acts on the stones among it. In the 3D view each stone has a hatched ring round it: that is its cutter, the shape that will cut the seat. Nothing is cut yet.
It worked whenThe line “7 cutters in CJ Cutters” stands at the foot of the panel.
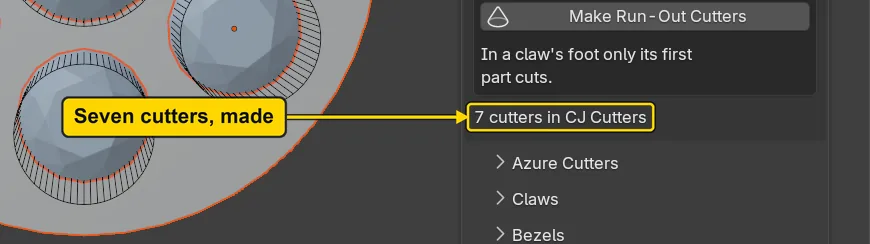
If it goes wrongThe status bar says “Select one or more gems first”: no stone is selected. Press A over the 3D view, then press Make Cutters again.
Step 8. Cut the seats, then hide the cutters
WhereThe 3D view: click the plate, away from the stones. Then the Cutters & Seats panel: Cut Metal, and Show / Hide beside it.
DoClick the plate near its edge, press Cut Metal, then press Show / Hide.
You should seeThe status bar says “Cut 7 seats” and ends “result manifold”: the plate is cut and is still one closed solid, and it is no longer live. The picture is a section through the middle of the Round 3.00 and two petals: the Round 3.00 has 0.80 mm of metal under its divot, each Round 2.50 has 0.80 mm, and the rim outside a petal is 1.00 mm. The cutters are hidden now, and still in the file.
It worked whenThe plate is outlined in orange and the foot of the panel still reads “7 cutters in CJ Cutters”.
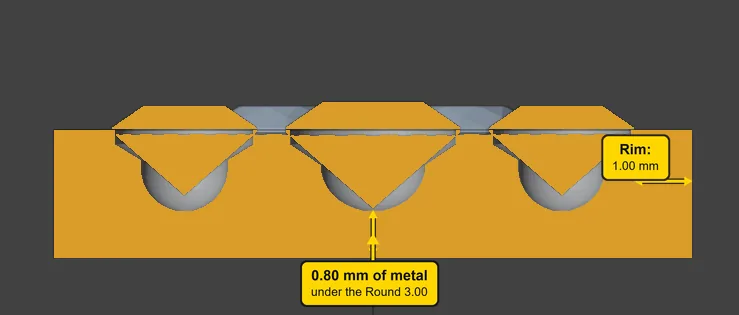
If it goes wrongThe status bar says “Make the metal object active first”: the plate is not the active object. Click it in the 3D view, then press Cut Metal again.
Step 9. Set the numbers for the claws between the stones
WhereThe section bar, Setting. Fold the panel Cutters & Seats by clicking its title once, then open the panel Claws and scroll down to the box Place Claws settings at its foot.
DoPress Gap in the Snap row, then type the numbers in the table, each followed by Enter.
You should seeSnap shows Gap, which puts a claw in the gap between the nearest stones, Diameter reads 1.2 mm and Over table reads 1 mm. Gap puts a claw in the middle of a gap, so it needs a width to touch every girdle: the claw is shared by the middle stone and two petals.
It worked whenSnap is on Gap, Diameter reads 1.2 and Over table reads 1.
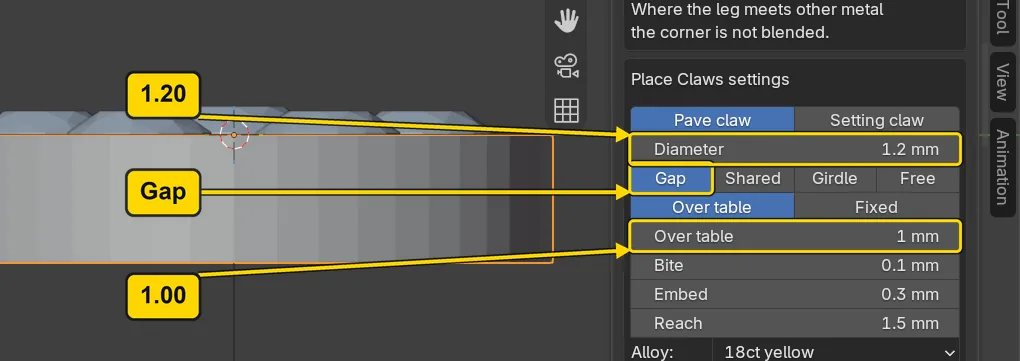
| Field | Type | Why |
|---|---|---|
| Diameter | 1.2 | the gap where two petals meet the middle stone is 1.09 across: a claw 1.20 across covers each girdle by 0.05, which the add-on reads as a good hold |
| Over table | 1.00 | stones this small take a low claw: this page’s choice |
Step 10. Place the six claws where three stones meet
WhereThe 3D view, looking straight down (click the blue Z ball of the gizmo, then choose View > Frame All). Move the pointer over the plate: it must still be the active object.
DoPress Alt+C with the pointer at mark 1, then click at each of the six marks in turn, then press Enter.
You should seeA small claw in green in the gap where two petals meet the middle stone, touching all three. Place Claws runs until you press Enter. The status bar begins “Pave claw 1.20 mm” and then lists its keys. Green means the claw covers each girdle by the bite. Amber means it covers too little, and red means it reaches a table. Each claw is a separate object, so Cut Metal will not touch it. The middle stone now has six claws.
It worked whenSix claws stand round the middle stone, and the green claw that followed the pointer is gone.
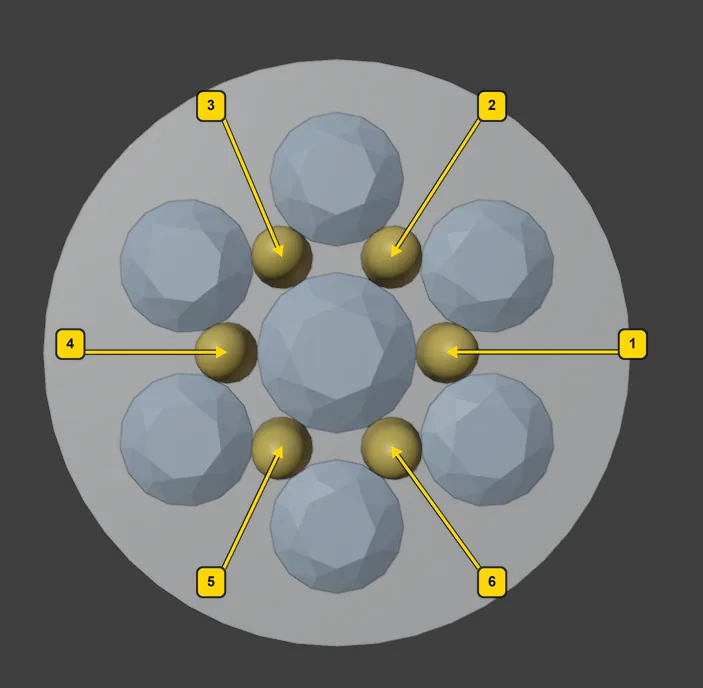
If it goes wrongNothing starts: the pointer is still over the sidebar. Move it over the 3D view and press Alt+C again.
If it goes wrongThe claw is amber: Diameter is too small for the gap, under 1.2. Type 1.2, then aim at the mark again.
Step 11. Place a claw outside each petal
WhereThe Claws panel, the box Place Claws settings. Then the 3D view, looking straight down, over the plate.
DoPress Girdle in the Snap row and type 0.8 in Diameter. Then press Alt+C at the mark, click once on the mark and press Enter.
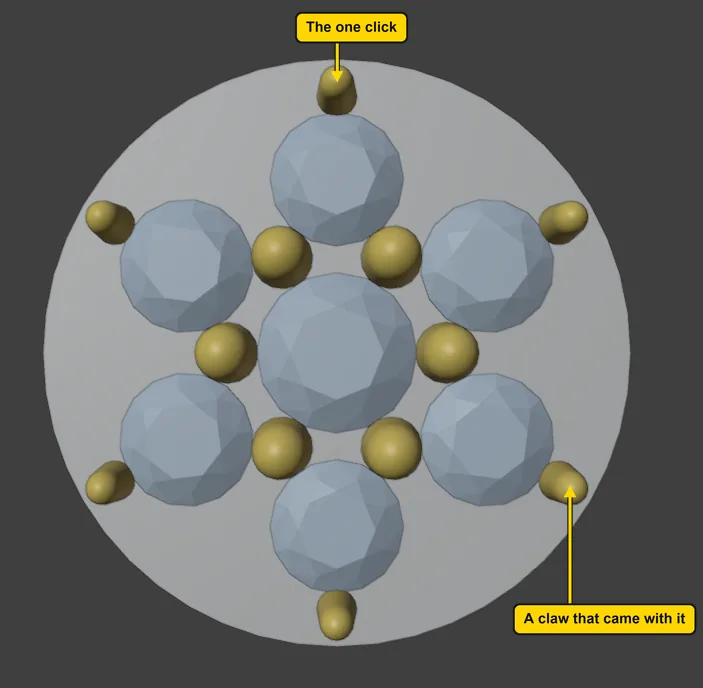
You should seeSix more claws, one outside each petal. You clicked on one petal only: the six petals are twins of one master, so a claw on a twin’s girdle comes round with the group, and the other five claws came with it. Each covers its petal’s girdle by 0.10 and reads green. Every petal now has claws on both sides, two shared and one outside, and the middle stone has six. No two claws touch.
It worked whenSix claws stand outside the petals, one at the end of each, and the green claw that followed the pointer is gone.
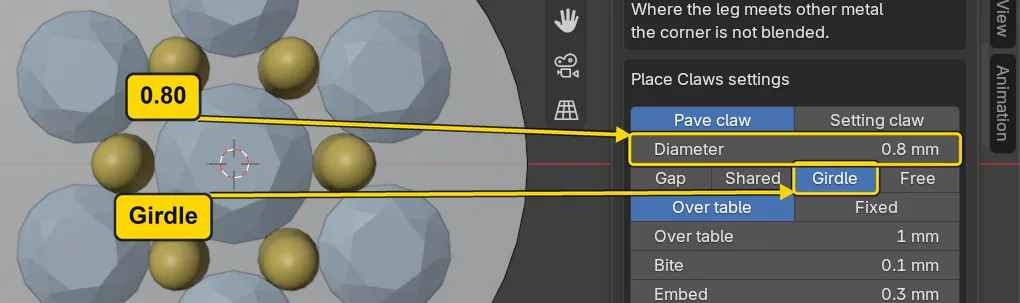
If it goes wrongThe claw is amber or red: Girdle is not pressed, or Diameter is not 0.8. Press Girdle, type 0.8, then aim at the mark again.
Step 12. Make the post from the line
WhereThe 3D view: click the thin line that hangs under the plate, once. Then the section bar: click Metal.
DoClick the line, press Make Wire, then type 0.9 in Diameter (mm) and press Enter.
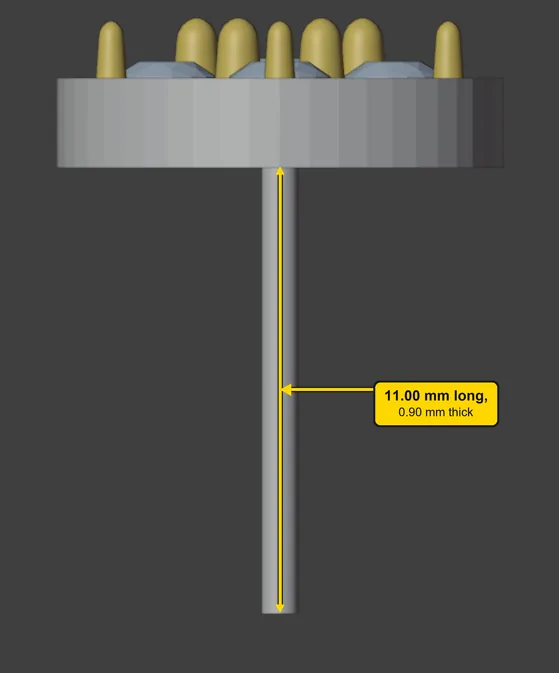
You should seeA post of round wire hanging from the back of the plate, 0.90 mm thick and 11.00 mm long. The line is the wire’s middle line. The post is an object of its own, not joined to the plate: the jeweller solders it on at the bench, under the middle stone, where the metal over it is the 0.80 mm of floor from step 8. The wire is live, so it follows its line.
It worked whenThe panel names Wire 1 and Diameter (mm) reads 0.9.
Step 13. Weigh the earring and run the standards check
WhereThe section bar: click Check. The panel Reports & Checks: the buttons Report Weight and Run Standards Check.
DoPress Report Weight, read TOTAL and the rows, press Esc. Then press Run Standards Check, read the window, press Esc.
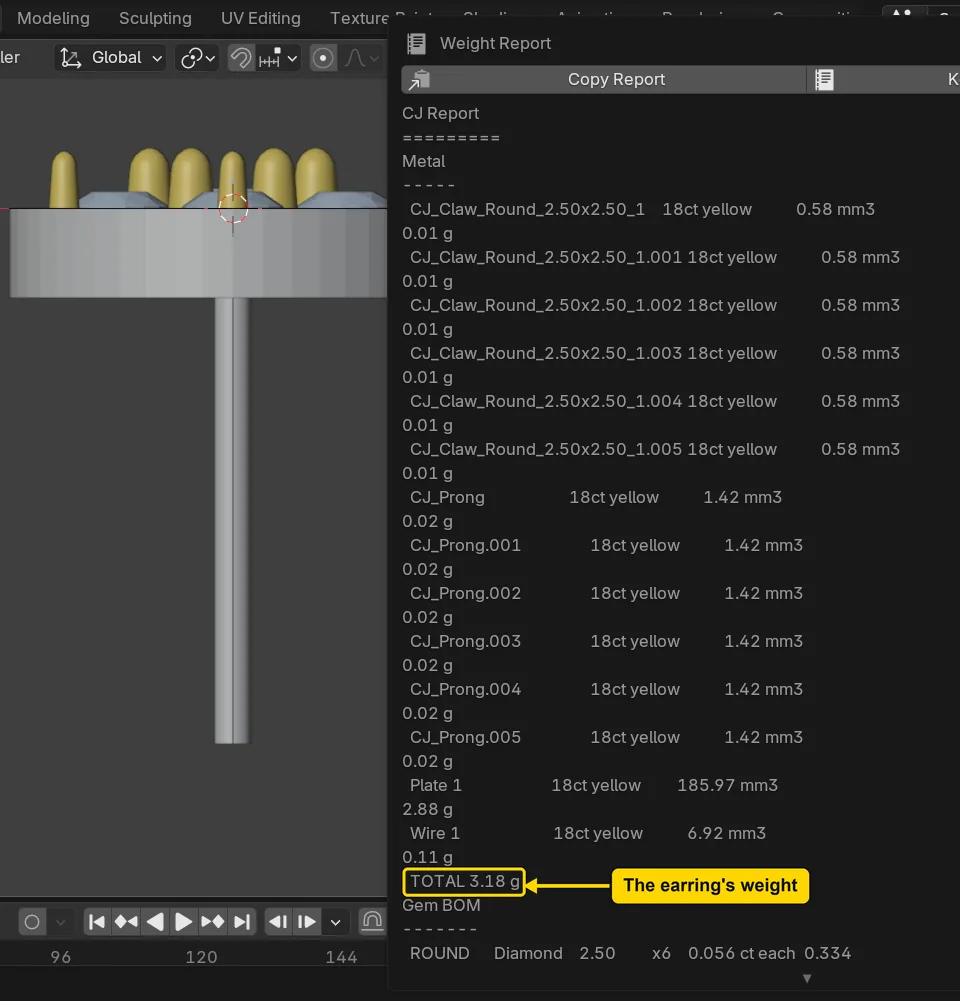
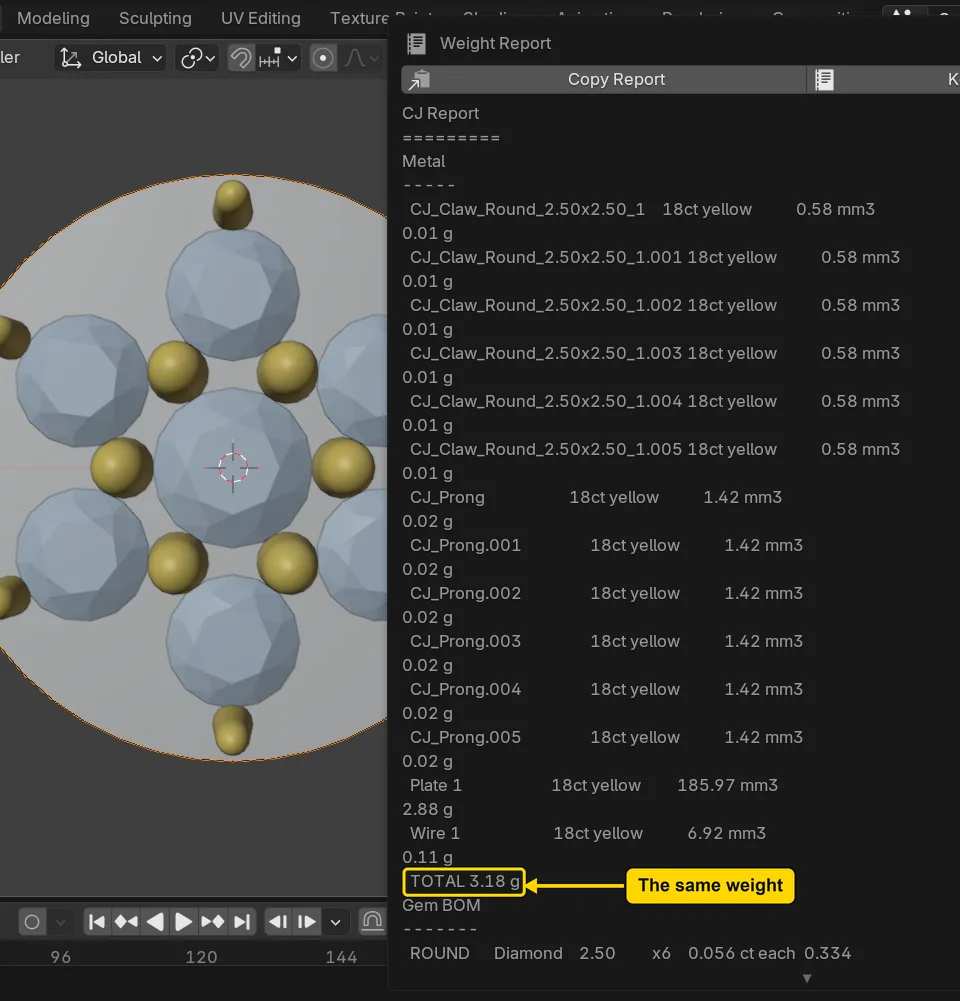
You should seeA Weight Report window over the screen: the metal of one earring in grams, TOTAL 3.18 g, with a volume for every part. The rows begin CJ_Prong for the claws between the stones (1.42 mm3 each) and CJ_Claw for the claws outside the petals (0.58 mm3 each), and Plate 1 reads 185.97 mm3. Then a Standards Check window with 7 lines that begin “Warning, wall_thickness” and a last line that begins “Note”. None begins “Error”. The line above the list in the Reports & Checks panel reads “7 warnings, 1 note”.
It worked whenThe Weight Report window reads TOTAL 3.18 g, the panel line above the list reads “7 warnings, 1 note”, and both windows shut with Esc.
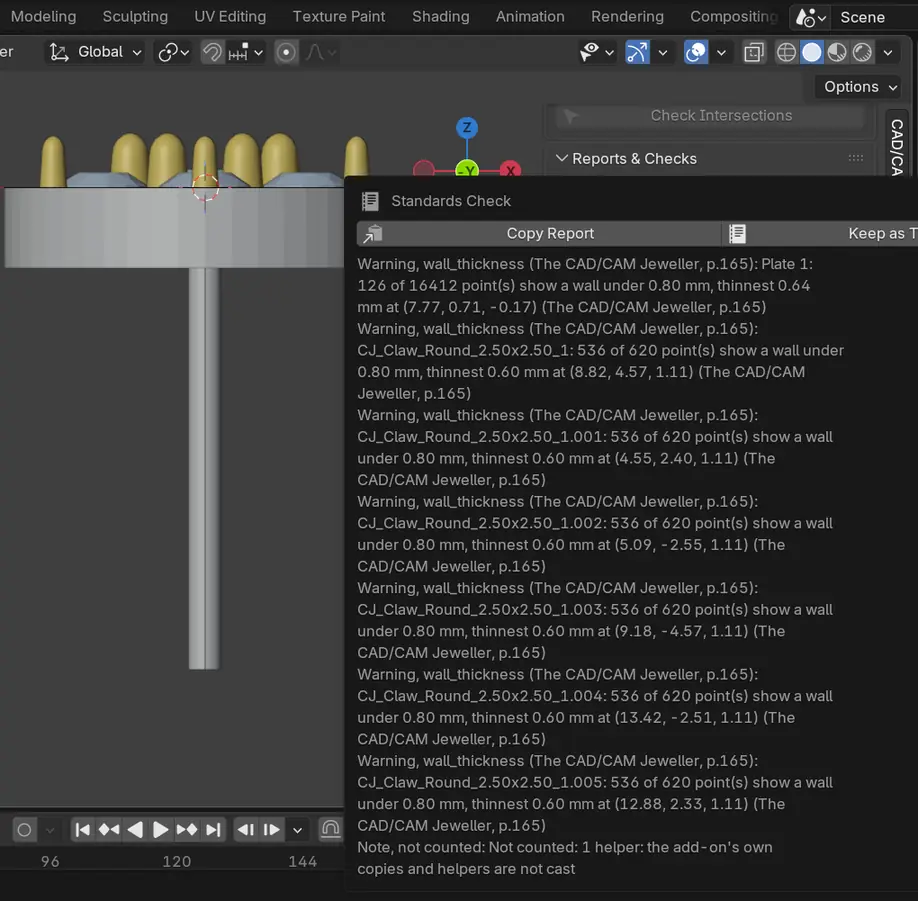
| Warning | How many | Why it is left |
|---|---|---|
| wall_thickness, on Plate 1 | 1 | thinnest 0.64 mm: the metal between the middle stone’s seat and a petal’s. The check wants 0.80, the bench’s least is 0.60. Petals 0.10 further out raise it to 0.74, but the claws between the stones would then need to be 1.31 across, outside the 0.80 to 1.20 the check allows a claw. |
| wall_thickness, on a claw | 6 | thinnest 0.60 mm: the check reads a claw as a wall, and the narrowing tip of a claw 0.80 across is thinner than 0.80. The bench’s least is 0.45 for a claw shared by two stones and 0.35 for a claw on one; the check’s own least is 0.60. |
Step 14. Cut again and weigh again
WhereThe 3D view: click the plate. Then the Setting section, the panel Cutters & Seats: the button Cut Metal. Then the Check section.
DoClick the plate near its edge, press Cut Metal, then press Report Weight, read the same rows and press Esc.
You should seeNothing changes: the plate has its seats already, and every claw reads the volume it read in step 13. Plate 1 reads 185.97 mm3 again. Cut Metal works on the plate only, and a claw is an object of its own. What keeps a claw whole at the bench is the order you followed: seats first, claws second.
It worked whenThe Weight Report window still reads TOTAL 3.18 g, with the same volume on every row.
Step 15. Free the petals before you copy the earring
WhereThe 3D view: move the pointer over it. Then the Gems panel, the sub-panel Symmetry: the button Unlink, beside Select Group.
DoPress A to select everything, then press Unlink. It frees the petals and the claws that came with them.
You should seeThe petals unlinked. They and their outside claws are ordinary objects now, in the places they stood. A stone can belong to one group at a time, and the six petals are a group of their own. Left as they were, the mirror would skip them, and its report would read “already has twins in the ACTIVE frame; use that frame or Make Independent first”: Make Independent is what Unlink does.
It worked whenA click on a petal shows the box This group reading “The active item is not in a group”.

If it goes wrongThe mirror in the next step leaves the petals out: they are still linked. Press A over the 3D view, press Unlink, then mirror again.
Step 16. Mirror the earring about the world origin
WhereThe 3D view. Move the pointer over it.
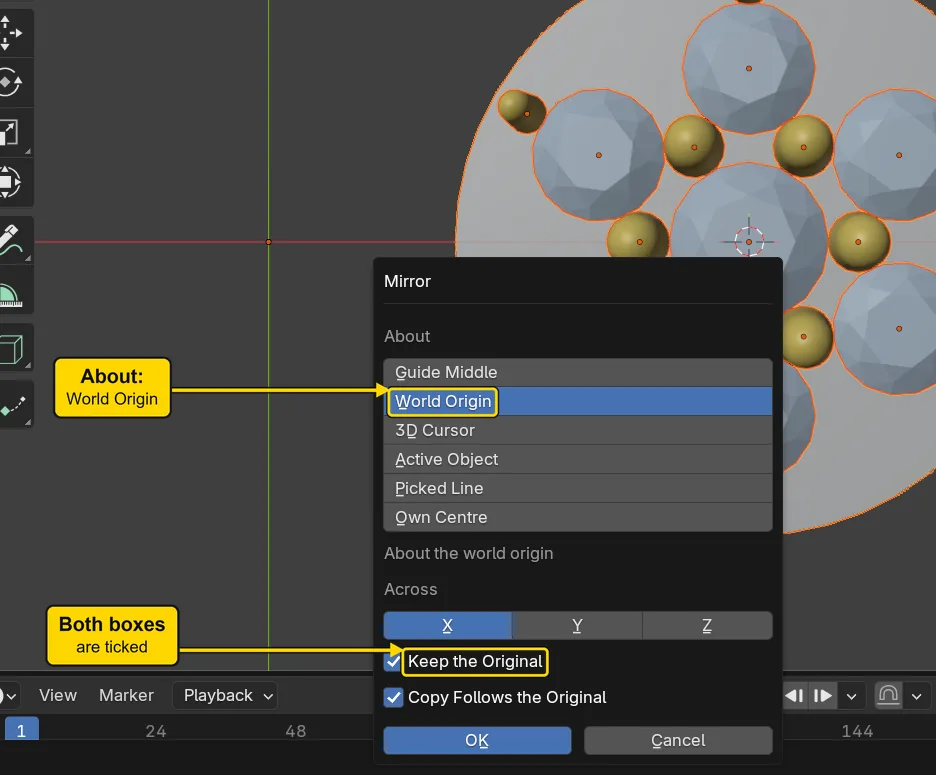
DoClick the plate, press A, then press Alt+M. Tick Copy Follows the Original, leave About on World Origin and Across on X, then press OK.
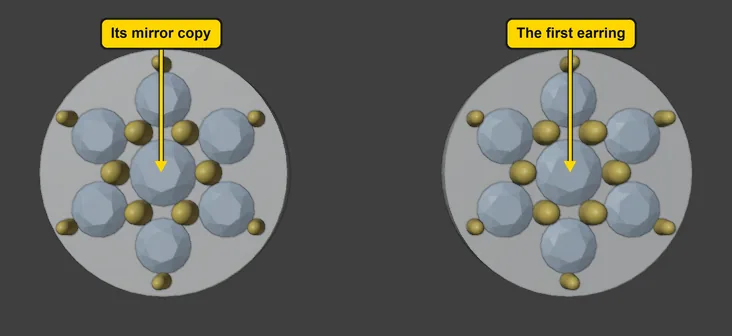
You should seeA window headed Mirror opens at the pointer, and after OK a second earring stands at the left, as far from the world origin, the middle where the red and green lines cross, as the first. A flower of six petals looks the same in a mirror, so the copy is a plain copy of the first. What Mirror does here is place the second earring, with its plate, stones, claws and post, at the mirrored place. A design with a hand, like the drop in P3-12, comes out the other way round.
It worked whenA second earring stands at the left of the world origin.
If it goes wrongThe window does not open: the pointer is over the sidebar, or nothing is selected. Click the plate, press A over the 3D view, then press Alt+M again.
Step 17. Set the copies free
WhereThe section bar: click Mirror. The panel Mirror and Copy: the button Stop Following. Everything is still selected and the plate is still the active object.
DoPress Stop Following.
You should seeThe copies standing on their own: the status bar says “4 copies stand on their own now. 19 twins unlinked”. The 4 copies are the plate, the post and the two drawings they were made from, and the 19 twins are the 7 stones and the 12 claws. While they followed, a change to one earring would have changed the other. Now the pair is two separate earrings, and each plate, post, stone and claw is its own object.
It worked whenThe 3D view shows two earrings, one at each side of the world origin.
Step 18. Save your work
WhereThe 3D view: move the pointer over it.
DoPress Ctrl+S.
You should seeBlender writes your copy at once, with no question, because the file already has a name. An asterisk, *, in the title bar marks changes that are not saved, and it goes now. Save your work and get it back (P0-12) says more about saving.
It worked whenThe title bar begins my-earrings and carries no asterisk.
No picture: the only change is a message on the status bar, and it fades.
Check your result
| What to read | Where | What it should say |
|---|---|---|
| The plate | The Item tab of the sidebar, Dimensions:, with the right-hand plate selected | X reads 11 mm, Y reads 11 mm and Z reads 2.2 mm |
| The gaps | The Check section: press Run Standards Check and read its window | No line names component_gap: every stone stands at least 0.50 from its neighbour (the petals 0.50 from the Round 3.00 and 0.75 from each other) |
| The metal under the seats | The panel Cutters & Seats, the field Divot Floor | Reads 0.8 mm: the add-on leaves at least that under every divot. The section in step 8 shows 0.80 mm under the Round 3.00 |
| The claws | The Weight Report window, which Report Weight opens: the rows begin CJ_Prong and CJ_Claw | Each claw between the stones reads 1.42 mm3 and each claw outside a petal 0.58 mm3, the same before and after a second Cut Metal |
| The post | The Item tab, Dimensions:, with a post selected | X reads 0.9 mm, Y reads 0.9 mm and Z reads 11 mm |
| The pair | The Item tab, Location: and Dimensions:, with the Round 3.00 of each earring selected | X reads 9 mm on the right-hand stone and -9 mm on the left-hand one, and both read 3 mm across |
| The weight | The Weight Report window | TOTAL 3.18 g for one earring at step 13 and 6.35 g for the pair |
Try it yourself
Open your copy, go to the Claws panel and press Gap in the Snap row. Type 0.9 in Diameter, press Alt+C over the gap where three stones meet and watch the claw: it turns amber, and the status bar ends “WEAK”. Press Esc to stop. Then press Run Standards Check again once the pair is made: its wall lines then number 12 for the claws and 2 for the two plates.
What you learned
- Cut every seat first, then place the claws. A claw is a separate object, so Cut Metal never touches it: its volume reads the same before and after.
- Every stone needs claws on both sides. A claw in the gap between stones is shared and must cover each girdle by 0.05 to 0.10, which turns the preview green. A claw on one stone’s girdle goes outside it.
- Mirror places the second earring and Stop Following sets it free. Free the six petals with Unlink before you mirror, because a stone belongs to one group at a time.