
What you will make
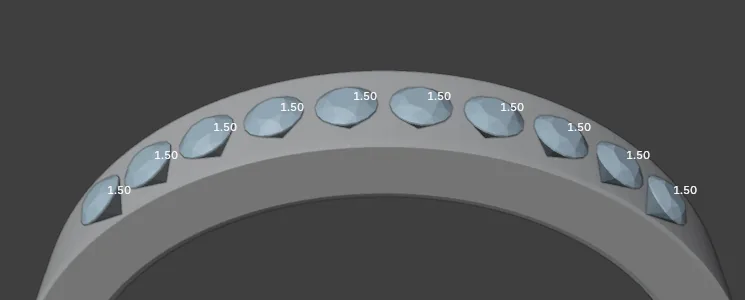
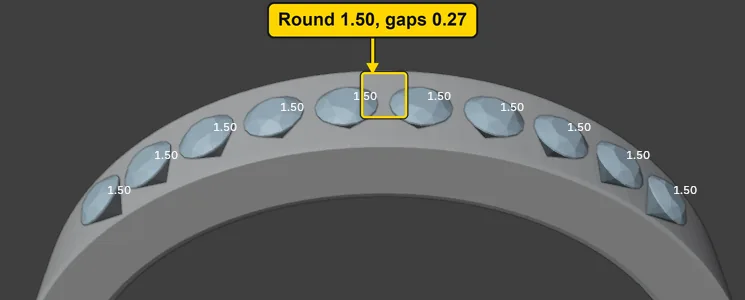
10 round stones, Round 1.50, laid in one row along a curve on the top of a flat band, inside 16.70 (a UK L and a half), 3.00 wide and 1.80 thick. A UK ring size is the size of the finger, and 16.70 is the band’s inside width, across the bore, the part against the finger. The curve is a 90 degree arc over the top of the ring. Row of Stones puts a stone on each end of the curve and spaces the rest evenly, so the gap between neighbours, measured straight across from girdle to girdle, is the same all along the row: 0.27 mm. That is wider than the 0.15 you set, because the gap you set is the least the row keeps: the row keeps whole stones and spreads what is left over, and its panel says so in words. The 0.15 is a practice figure: the gap a setter works to is the setter’s, so ask yours. The 0.75 of metal each side of a stone on this 3.00 band is a practice figure too. The stones are only laid on the band: no seat is cut and nothing holds them yet. Then you change the gap in the Row of Stones panel, take the change back with Ctrl+Z, and lay the row again.
About 15 minutes.
Files
- p3-06-start.blend (164 KB): open this one to begin.
- p3-06-finished.blend (184 KB): the result, to compare with yours.
Both were made in Blender 5.2.0.
Before you start
- You have done Part 0, Blender from nothing, and Place stones on a dome and keep the gap you set (P3-02): a Round, a gap and the Stats button. The start file holds a flat band, inside 16.70 (a UK L and a half), 3.00 wide and 1.80 thick, with a curve drawn along its top, in millimetres.
- The add-on is installed: CAD/CAM Jeweller 2.22.0 or later (Preferences > Add-ons shows the version). Its CAD/CAM tab is in the sidebar.
Build it
Step 1. Open the start file and save your copy
WhereThe top bar: the row of words that begins File, Edit.
DoDownload p3-06-start.blend from Files above and open it. Then choose File > Save As and save it under the name below, in a folder of yours. Open an exercise file and keep the start file safe (P0-07) shows how.
Typemy-row.blend
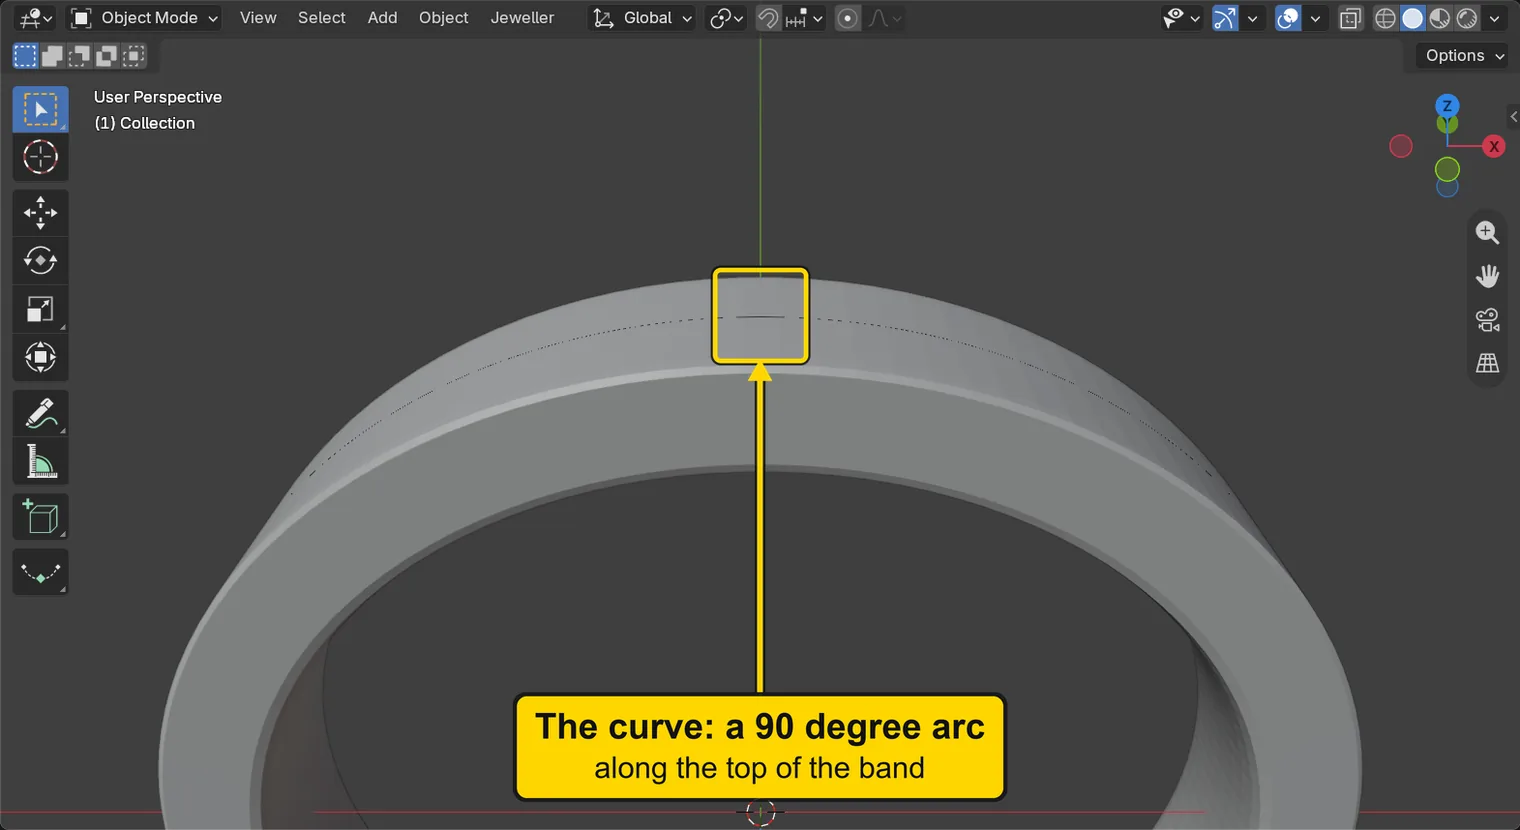
You should seeThe 3D view shows a flat grey ring band, seen from a little above and in front, with a thin dark dotted line along its top, over the top of the ring: a curve. Nothing is selected. The Outliner, the list at the top right of the window, holds the band and a curve called Arc, and the title bar, the strip above File and Edit, begins my-row. The first picture is the 3D view and the second is the title bar.
It worked whenThe title bar, the strip above File and Edit, begins my-row.

Step 2. Click the curve to make it the active object
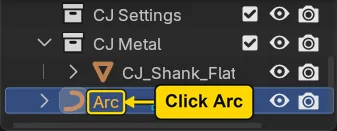
WhereThe Outliner, the list at the top right of the window: click the row Arc.
DoClick Arc in the Outliner, the list at the top right of the window.
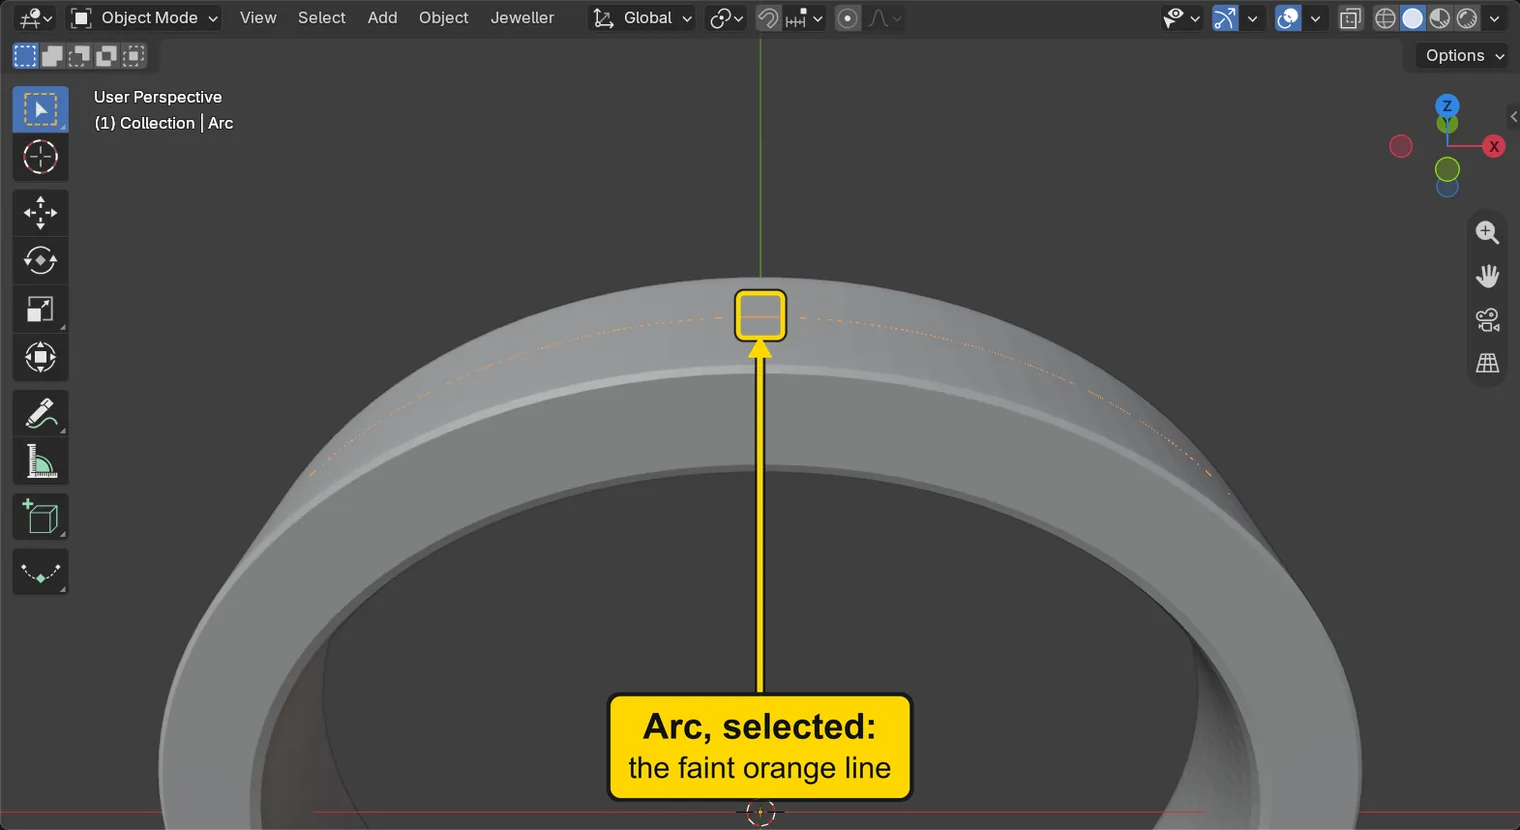
You should seeThe curve has a faint orange dotted line along the band’s top, and the words at the top left of the 3D view end Arc. The active object is the one last clicked. Row of Stones lays its stones along the active curve: its button is grey while no curve is active.
It worked whenThe words at the top left of the 3D view end Arc.
Step 3. Open the Setting section and fold Stone Settings
WhereThe sidebar. If it is shut, press N with the pointer over the 3D view. Click the CAD/CAM tab. In the section bar, the small word buttons at the top of that tab, click Setting. A list at the top of the section names every panel in words: it is not a button. Under the list stands the open panel Stone Settings.
DoClick Setting in the section bar, then click the title of Stone Settings once to fold it, so that the list is short.
You should seeThe section’s panel titles stand close together, one line each, and Pave, Channel, Halo is among them. To fold a panel is to click the words of its title once, so that it shuts up to its title. If a title is out of view, scroll the sidebar with the wheel (or slide two fingers on a touchpad).
It worked whenYou can see the title Pave, Channel, Halo in the sidebar.
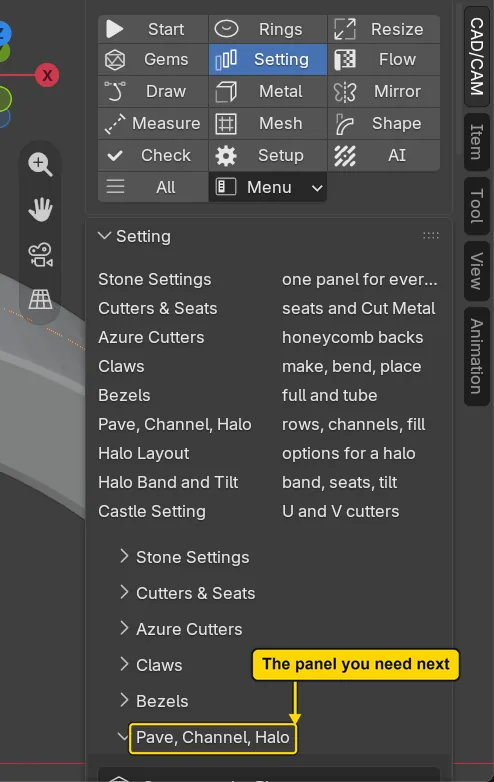
If it goes wrongThe panel is not in the section: the section bar shows another section. Click Setting.
Step 4. Open the Pave, Channel, Halo panel and its starting numbers
WhereThe sidebar, the Setting section: the title of the panel Pave, Channel, Halo, the line with a small arrow beside it. Under its six buttons stands a shut panel, Numbers the Buttons Start From.
DoIf Pave, Channel, Halo is shut (its arrow points right), click its title; if its arrow points down, leave it. Then click the title of Numbers the Buttons Start From and read Size and Gap.
You should seeSix buttons in one column, the first of them Row of Stones, and under them the panel Numbers the Buttons Start From with a box Along a Curve: the lines Shape, Material, Size, Pattern, Graduate, Gap, Start, End, Align and Seat Below, and the two buttons Cutters and Claws. Shape reads Round, Size 1 mm and Gap 0.15 mm. Gap is the space you want between neighbouring stones, edge to edge. It is the least the row keeps: the gap a setter works to is the setter’s, so ask yours. The panel drops a last zero, so it shows 1 mm for 1.00. The panel’s own first sentence says that Row of Stones starts from Size, Gap and Seat Below, and that the rest are for the older Gems Along Curve. It says less than the tool takes: Row of Stones also takes Cutters, Claws and the bead settings from this box.
It worked whenYou can read Size and Gap in the panel Numbers the Buttons Start From.
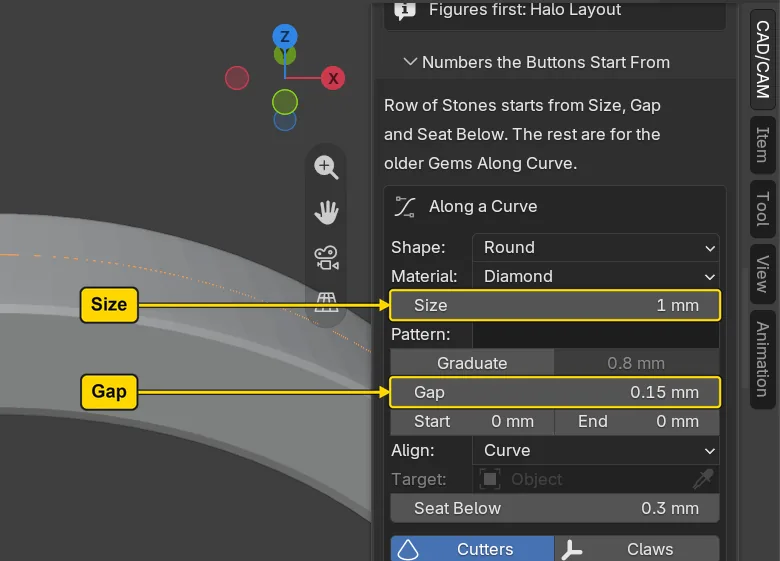
If it goes wrongThe panel title is not there: the section bar shows another section, or Stone Settings is still open. Click Setting, then fold Stone Settings.
Step 5. Type the size and the seat
WhereThe panel Numbers the Buttons Start From: the two fields in the table below.
DoFor each field, click the middle of it once, type the number and press Enter.
You should seeSize reads 1.5 mm (the panel drops the last zero of 1.50) and Seat Below reads 0 mm. Seat Below counts down from the curve to the girdle. At 0 the girdle lies on the curve. The add-on starts it at 0.30, which sinks the stone into the metal, ready for a seat. This exercise cuts no seat, so the stones are laid on the band.
It worked whenSize reads 1.5 mm and Seat Below reads 0 mm.
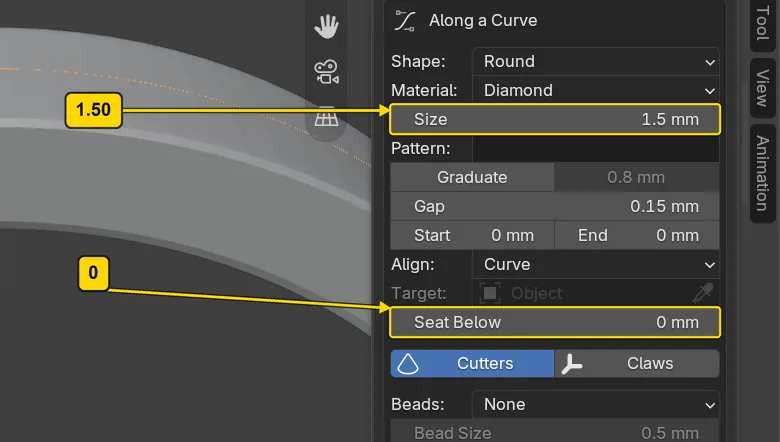
| Field | Type | Why |
|---|---|---|
| Size | 1.50 | a stocked size, the size of this row (the starting 1.00 is stocked too, but smaller) |
| Seat Below | 0 | the stone’s girdle, its widest edge, lies on the curve |
Step 6. Switch Cutters off
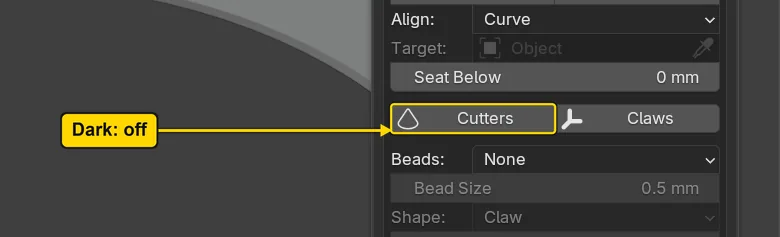
WhereThe panel Numbers the Buttons Start From: the two buttons under Seat Below, Cutters and Claws.
DoClick Cutters so that it goes dark.
You should seeCutters is dark and Claws is dark. Row of Stones reads them from this box: a lit Cutters makes a seat cutter for every stone as it is laid. A cutter is a shape that cuts a seat in the metal later. Seats come in Cut two seats, then share one claw between two stones (P3-08), so none is made here. Leave Beads and the fields under them as they are.
It worked whenCutters and Claws are both dark.
Step 7. Press Row of Stones
WhereThe panel Pave, Channel, Halo: fold Numbers the Buttons Start From by its title, then the first button, Row of Stones.
DoFold Numbers the Buttons Start From, then press Row of Stones with the curve still selected.
You should seeIn the first picture, the six buttons stand in one column, Row of Stones the first of them, at the top. After the press, a row of 10 stones lies along the curve, one on each end of it, each with its size, 1.50, written beside it. The status bar begins “Row of Stones: 10 stones on CJ_Shank_Flat_M” for a moment, then the message fades. CJ_Shank_Flat_M is the band’s whole name: the narrow Outliner shows it cut short as CJ_Shank_Flat. Yellow marks and arrows, and the word Done, may show beside the row. They change its numbers by dragging: leave them alone for now. They are hidden in the second picture. The ends of the arc turn away from you, so the gaps look narrower there. The picture looks straight down at the band: to see it so, click the blue Z ball of the gizmo, the small ball of coloured letters at the top right of the 3D view.
It worked whenA row of 10 small stones lies along the top of the band.
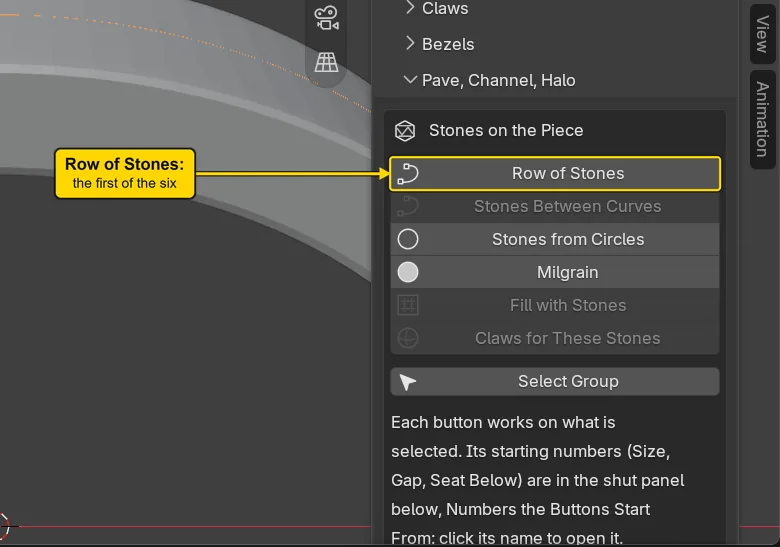
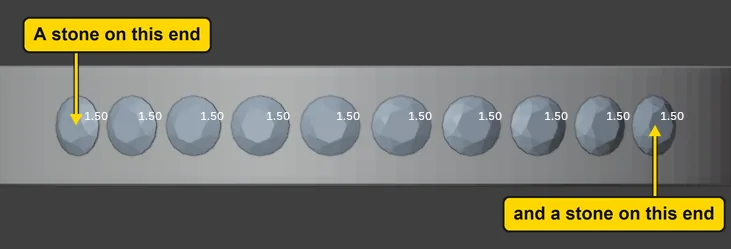
If it goes wrongThe button Row of Stones is grey and nothing is laid: no curve is the active object. Click Arc in the Outliner, then press Row of Stones again.
Step 8. Read what the row says about itself
WhereThe panel Pave, Channel, Halo. Scroll the sidebar down past its Channel and Halo boxes: the shut panels stand under them, and Row of Stones is one of them. It shows only while the row is the active object, and the row is active now. Click its title to open it.
DoOpen Row of Stones and read the lines in its box.
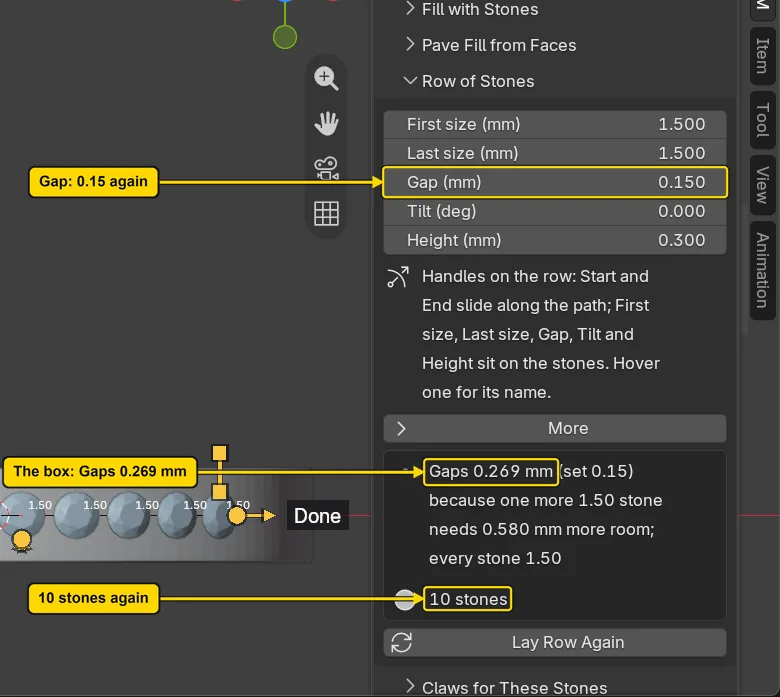
You should seeIts numbers First size (mm), Last size (mm), Gap (mm), Tilt (deg) and Height (mm), a note about the yellow marks, the word More, a box that says how the row closed, the count of stones and the button Lay Row Again. First size and Last size read 1.5 and Gap 0.15, the numbers you set. Height reads 0.3, and Seat Below read 0 a few steps ago: they are one setting counted from two zeros. Seat Below counts down from the curve, and Height counts up from the add-on’s usual seat, 0.30 under the curve. Both put the girdle on the curve: leave it. The box reads: “Gaps 0.269 mm (set 0.15) because one more 1.50 stone needs 0.580 mm more room; every stone 1.50”. In words: the gap you set is the least. 10 stones of 1.50 fit at that gap, one more would need 0.580 mm more room, so the 10 stones are spread along the whole curve and every gap, straight across from girdle to girdle, is 0.269 mm.
It worked whenThe box under the numbers reads like the line above, and its last line counts 10 stones.
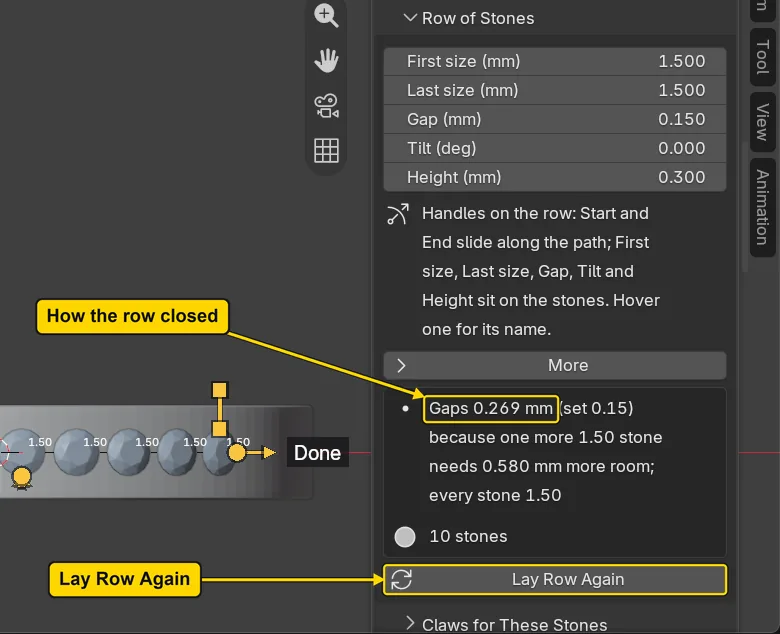
If it goes wrongThe panel Row of Stones is not there: the row is no longer the active object. Click the row Row of Stones in the Outliner, under CJ Gems (scroll the Outliner if it is out of view), or click one stone of the row. Look again.
Step 9. Change the gap
WhereThe panel Row of Stones, the field Gap (mm).
DoClick the middle of Gap (mm), type 0.30 and press Enter.
You should seeThe row lays itself again at once: 9 stones, and the box reads “Gaps 0.489 mm (set 0.30) because one more 1.50 stone needs 0.287 mm more room; every stone 1.50”. A wider gap leaves room for one stone fewer, and the 9 stones spread to 0.489 mm apart.
It worked whenGap (mm) reads 0.3 and the box reads like the line above.
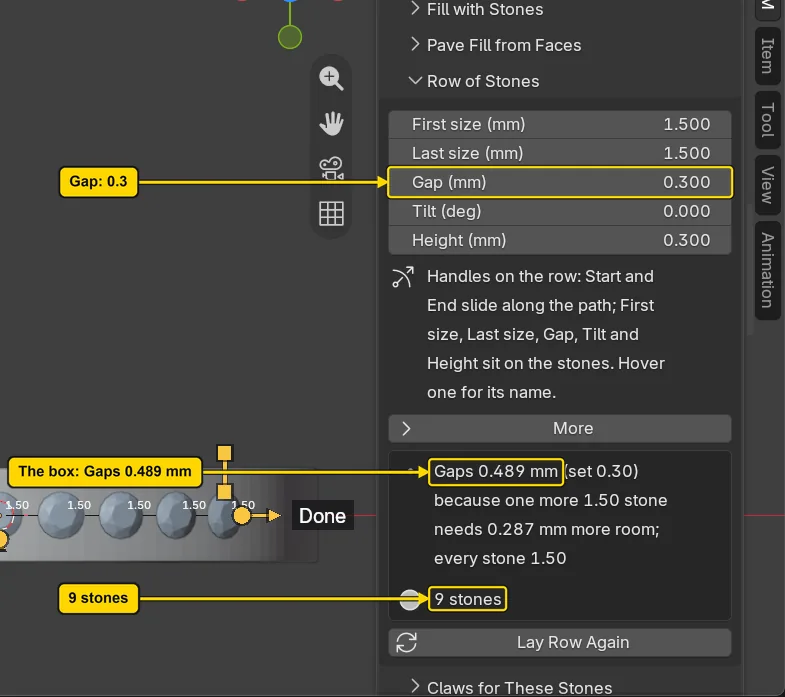
If it goes wrongA number other than Gap (mm) changed: you typed in the wrong field: First size (mm) sits above it. Press Ctrl+Z with the pointer in the 3D view, then click the middle of the field named Gap (mm) and type 0.30 again.
Step 10. Take the change back
WhereThe 3D view.
DoMove the pointer into the 3D view and press Ctrl+Z once.
You should seeThe gap goes back to 0.15 and the row has 10 stones again, as it was: the box reads “Gaps 0.269 mm (set 0.15) because one more 1.50 stone needs 0.580 mm more room; every stone 1.50”.
It worked whenGap (mm) reads 0.15 again.
Step 11. Lay the row again
WhereThe panel Row of Stones, the button Lay Row Again at its foot.
DoPress Lay Row Again.
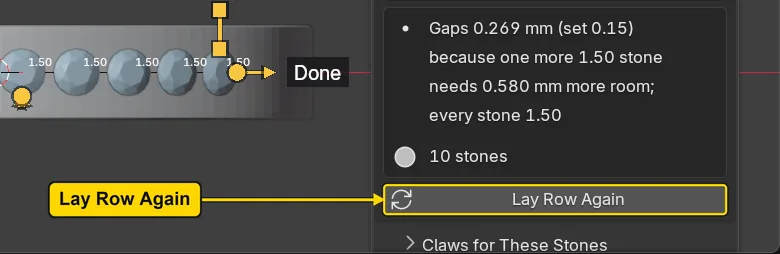
You should seeThe row is laid again from its curve and its numbers. Nothing here has changed, so the stones, the gaps and the box read as before. The button lays the row again from its curve, its band and its numbers: use it when the row seems out of step with them.
It worked whenThe box still reads like the line you read before.
Step 12. Look at the finished row
WhereThe 3D view.
DoLook at the picture. To see your row like this, choose View > Frame All, then orbit a little, turning the view round the band.
You should seeA row of 10 round stones along the top of the band, an even gap between each pair, a stone at each end of the arc, each with its size 1.50 beside it. They lie on the band: no seat is cut.
It worked whenYou see one row of stones along the band.
Step 13. Save your work
WhereThe 3D view: move the pointer over it.
DoPress Ctrl+S.
You should seeBlender writes your copy at once, with no question, because the file already has a name. An asterisk, *, in the title bar marks changes that are not saved, and it goes now. Save your work and get it back (P0-12) says more about saving.
It worked whenThe title bar begins my-row and carries no asterisk.
No picture: the only change is a message on the status bar, and it fades.
Check your result
| What to read | Where | What it should say |
|---|---|---|
| The box under the numbers | The Setting section, the panel Row of Stones, the first line of the box under its numbers | It begins Gaps 0.269 mm (set 0.15), and the foot of the box reads 10 stones |
| The row | The 3D view, looking down on the top of the band | 10 stones in one line along the curve, a stone at each end of it, each Round 1.50 and each with the figure 1.50 beside it, none touching its neighbour |
| The stones | The Outliner, the list at the top right of the window, under CJ Gems: the row Row of Stones, and the small arrow beside it, which lists its stones | 10 stones, whose names begin CJ_Gem_Round_1.50x1.50 |
| The numbers you set | The CAD/CAM tab, Setting section, Pave, Channel, Halo panel, the panel Numbers the Buttons Start From | Size reads 1.5 mm (the panel drops the last zero of 1.50), Gap reads 0.15 mm, Seat Below reads 0 mm |
| The curve | The Outliner, the list at the top right of the window | The row Arc is still there, and the stones lie along it |
Try it yourself
Open the start file again (choose Don’t Save if Blender asks about changes), click Arc in the Outliner and do the steps again with Size 1.80 in place of 1.50: the row holds fewer stones. On this 3.00 band a Round 1.80 leaves 0.60 of metal each side, which is the least metal. Read the line in the Row of Stones box to see how the row closed this time.
What you learned
- Row of Stones lays a stone on each end of the active curve and spaces the rest evenly, so every gap is the same. The Gap you set is the least: the box of its panel reads back the gap it laid.
- Size is the stone’s width. Use a stocked size such as 1.50. The starting numbers of the panel Numbers the Buttons Start From begin at 1.00, a stocked size too, but a smaller one.
- A number changed in the Row of Stones panel changes the row, and Lay Row Again lays it from its curve and its numbers.
Ctrl+Ztakes a change back.