
What you will make
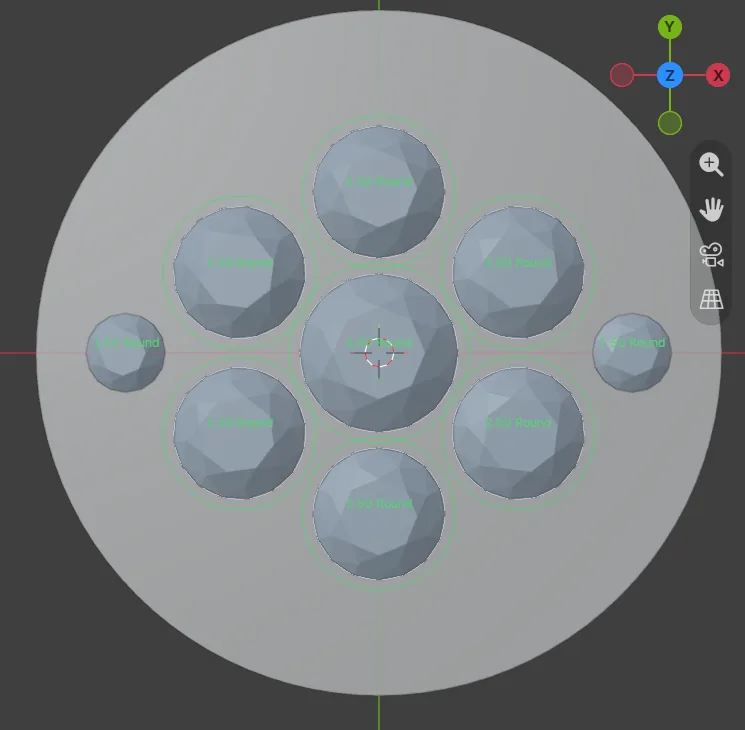
A small flower for an earring: a Round 3.00 in the middle, six Round 2.50 petals round it and a Round 1.50 stone at each side, all laid on a round plate 13 mm across. A Round 3.00 is a round stone 3.00 mm across. You set one petal and one side stone: the add-on makes the others as twins, copies that follow the original. The original is the master. Move any one and the rest move to match. The count of a polar array counts the original too: Count 6 is the original and five twins. A jeweller reaches for twins when the same stone must stand six times round a centre or once on each side: set one, and the others cannot drift. Nothing is cut here: the stones are laid on the plate so that you can see them.
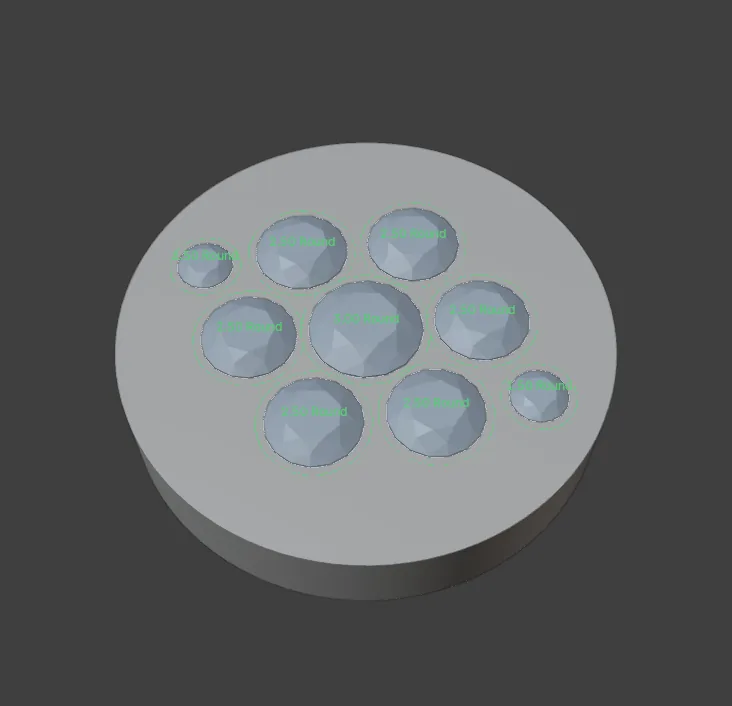
About 20 minutes.
Files
- p3-10-start.blend (108 KB): open this one to begin.
- p3-10-finished.blend (119 KB): the result, to compare with yours.
Both were made in Blender 5.2.0.
Before you start
- You have done Part 0, and you know how to place a stone, read a size and switch the guides on (Place stones on a dome and keep the gap you set, P3-02). The start file holds a plate, three stones and nothing else, in millimetres. The plate is wide enough to leave metal beyond each side stone.
- CAD/CAM Jeweller 2.22.0 or later is installed (Preferences > Add-ons shows the version), and its CAD/CAM tab is in the sidebar.
Build it
Step 1. Open the start file and save your copy
WhereThe top bar: the row of words that begins File, Edit.
DoDownload p3-10-start.blend from Files above and open it. Then choose File > Save As and save it under the name below, in a folder of yours. Open an exercise file and keep the start file safe (P0-07) shows how.
Typemy-flower.blend
You should seeThe 3D view looks straight down at a round plate with a large stone in the middle, a smaller stone above it and a still smaller one to the right. To look straight down at any time, click the blue Z ball of the gizmo, the small ball of coloured letters at the top right of the 3D view. The Outliner, the list at the top right of the window, holds the plate and three stones.
It worked whenThe title bar, the strip above File and Edit, begins my-flower.
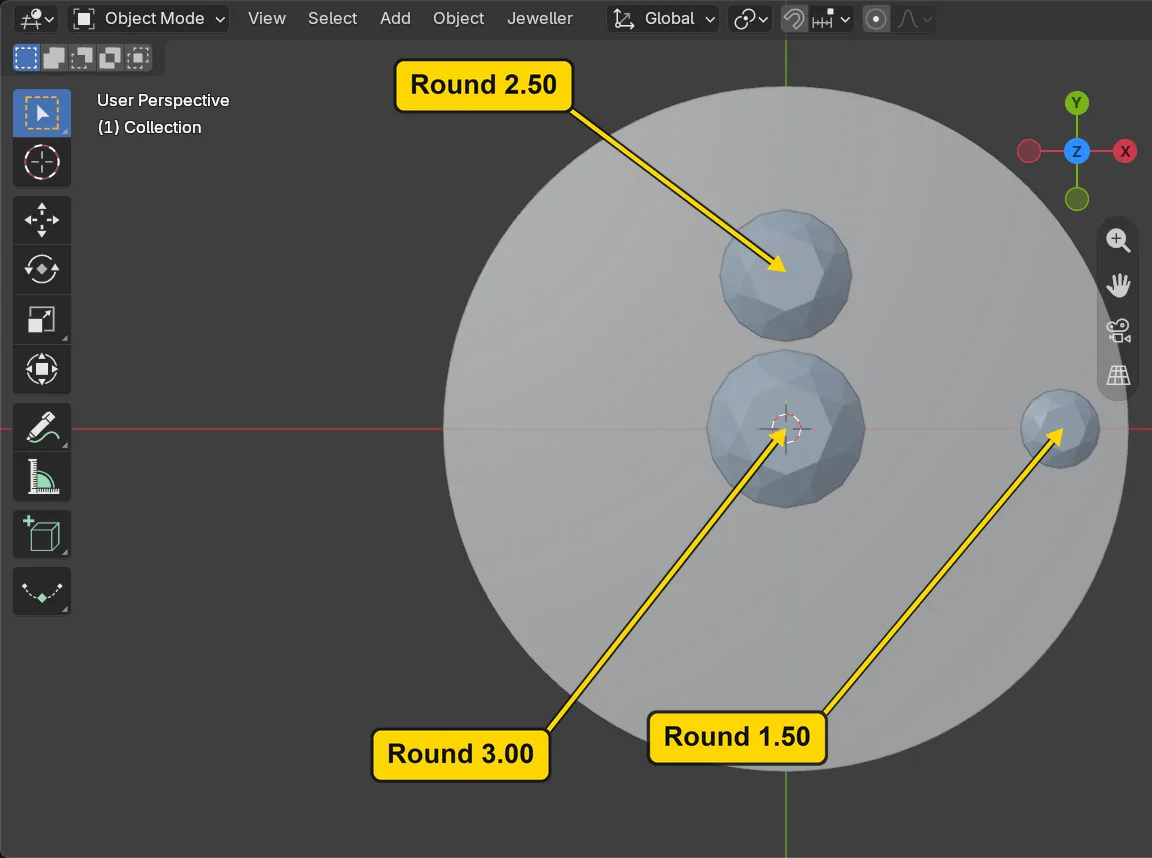
Step 2. Open the Symmetry panel
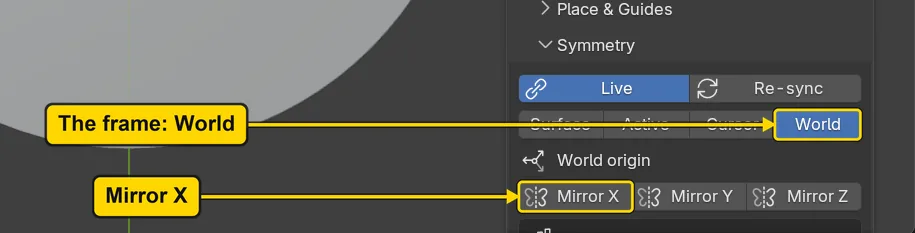
WhereThe sidebar, the CAD/CAM tab. Click Gems in the section bar, the small word buttons at the top. In the Gems panel, click the title of the sub-panel Symmetry to open it, then scroll the sidebar down (turn the mouse wheel, or slide two fingers on the touchpad) until its buttons show.
DoClick the title Symmetry.
You should seeThe sub-panel: a button Live that is lit, a button Re-sync, and a row of four frame buttons, World, Surface, Active and Cursor. A frame is the place the mirror and the turn are measured from, and World is lit: the world origin, where the red and green lines cross. Under the row stand Mirror X, Mirror Y and Mirror Z, a box New polar array and a box This group. With Live lit, copies follow the stone they were made from.
It worked whenThe buttons Mirror X and Polar Array Selected are on the screen.
Step 3. Mirror the side stone
WhereThe 3D view, then the Symmetry sub-panel. Click the Round 1.50 at the right of the plate once.
DoClick the small stone to the right, then press Mirror X in the Symmetry sub-panel.
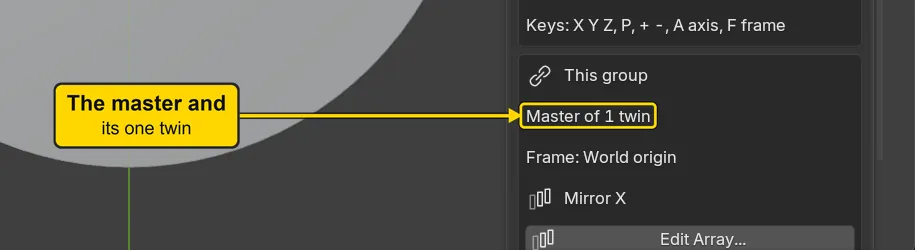
You should seeA second Round 1.50 at the left of the plate, as far from the middle as the first. The frame is World, so Mirror X swaps right and left across the green line, which runs up the screen from above. The box This group says “Master of 1 twin”: the stone you clicked is the master, the new one is its twin.
It worked whenThe box This group says “Master of 1 twin”.
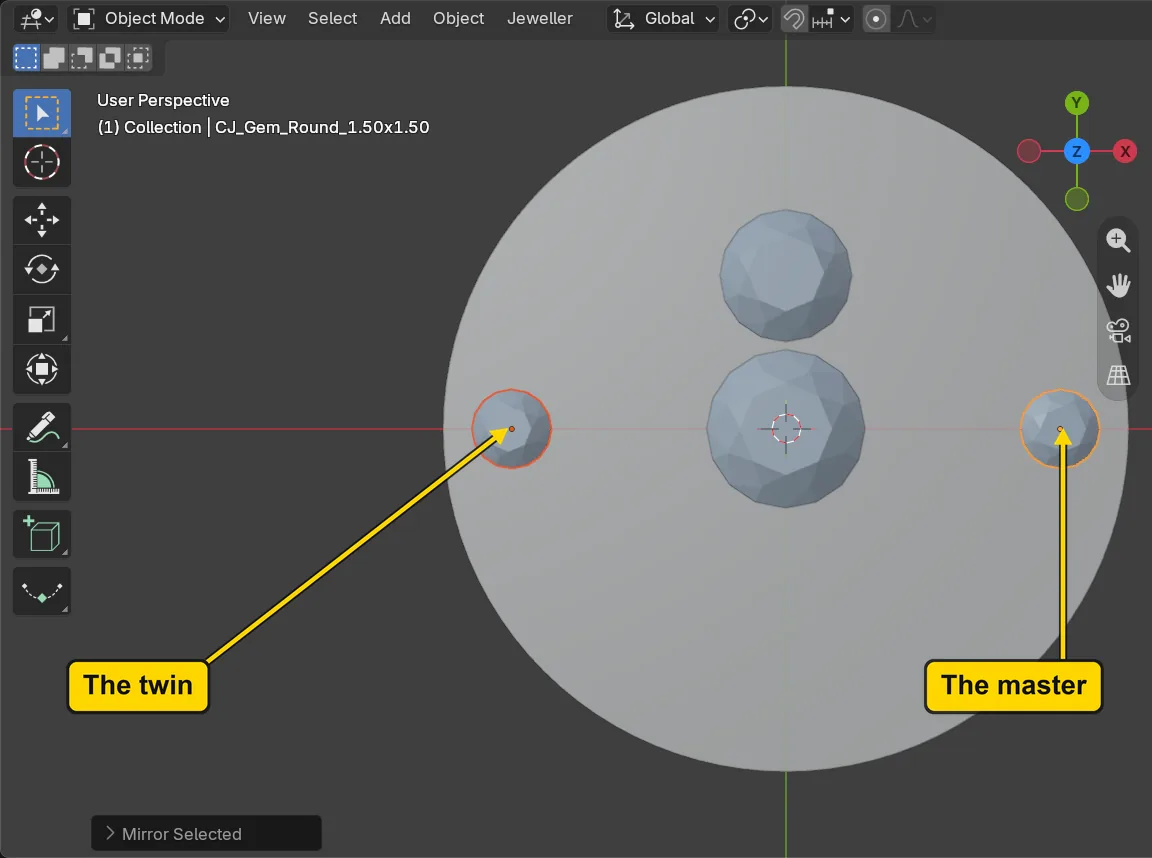
Step 4. Move the twin and watch the master
WhereThe 3D view. Move the pointer off the sidebar and into the dark area.
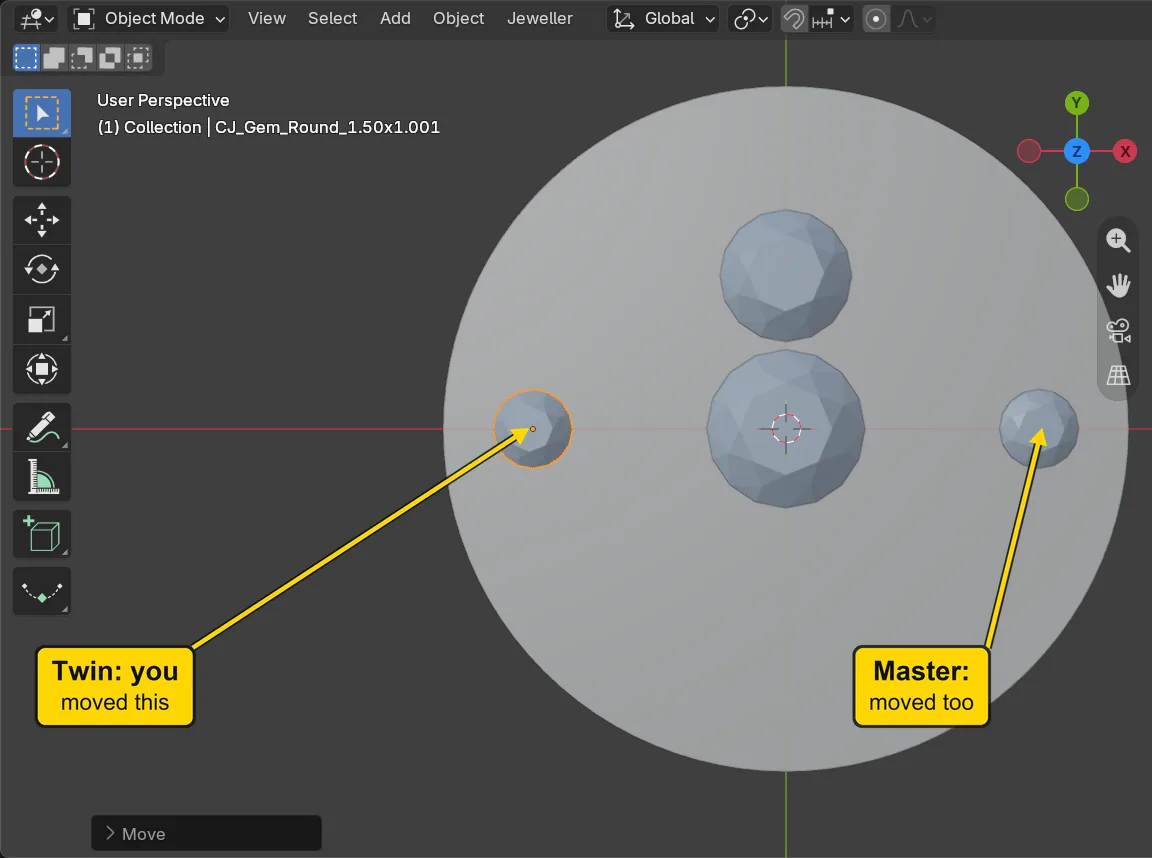
DoClick the new stone at the left, then press G, X, type 0.4 and press Enter.
TypeG, X, 0.4, Enter
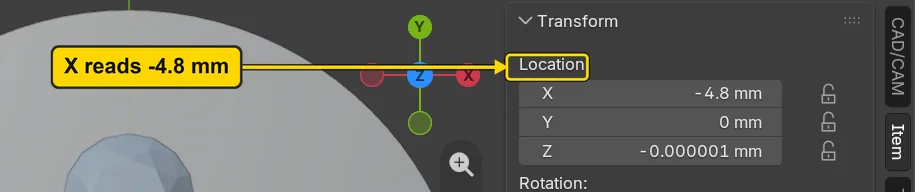
You should seeThe left stone moves 0.4 mm to the right, towards the middle, and the master at the right moves 0.4 mm to the left. The two stand 4.8 mm from the middle now. Click the Item tab, in the strip of tabs at the right edge of the sidebar: Location reads X -4.8 mm for the stone you moved. Click the CAD/CAM tab to come back. A twin is not a loose copy: whichever of the two you move, the other moves to match.
It worked whenThe Item tab reads X -4.8 mm for the left stone, and the right stone stands 4.8 mm from the middle.
If it goes wrongNothing moves: The pointer is still over the sidebar. Move it over the 3D view and press the key again.
Step 5. Pick a petal and the centre stone
WhereThe 3D view.
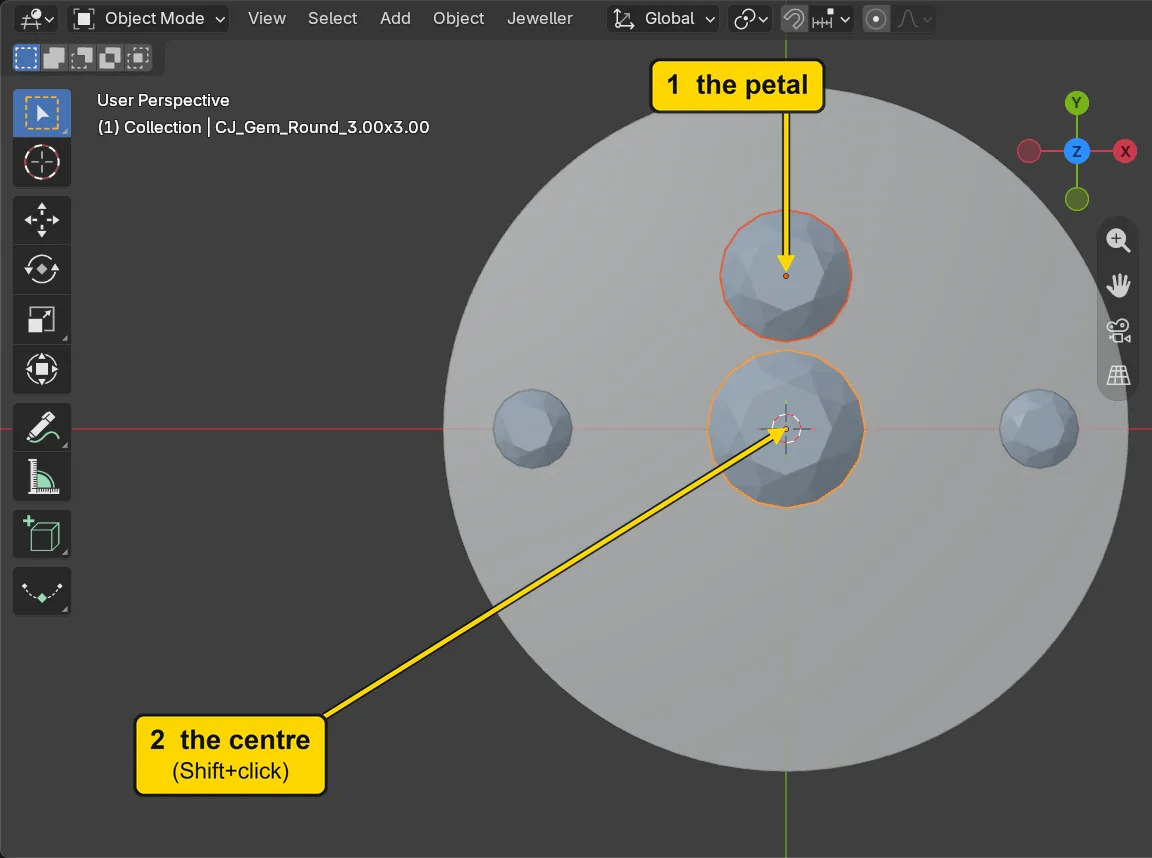
DoClick the Round 2.50 above the centre, then hold Shift and click the Round 3.00 in the middle.
You should seeBoth stones orange, the middle one a lighter orange: it is the active stone, the last one you clicked. The petal is what the array copies. The active stone is the centre the copies turn round, and it is left out of the copies.
It worked whenThe words at the top left of the 3D view name the Round 3.00.
Step 6. Choose the Active frame
WhereThe Symmetry sub-panel: the row of frame buttons.
DoClick Active.
You should seeThe line under the row now names the Round 3.00, “CJ_Gem_Round_3.00x3.00”, with “(origin, local axes)” under it: the frame is the middle of that stone. In the box New polar array the fields read Count 6, Angle, degrees 360 and Axis Z. They are the add-on’s starting numbers, and you leave them.
It worked whenThe frame row has Active lit.
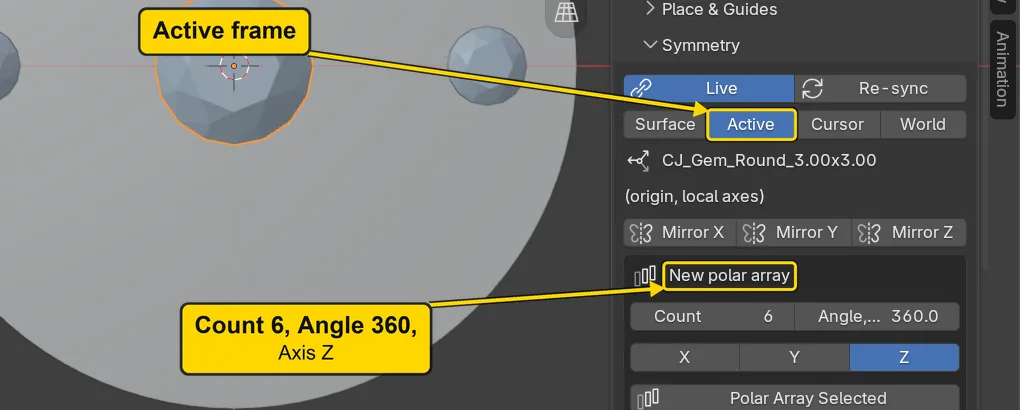
Step 7. Press Polar Array Selected
WhereThe Symmetry sub-panel, the box New polar array.
DoPress Polar Array Selected.
You should seeFive more petals, evenly round the centre stone: six petals in all, the one you set and five twins. Count 6 counts the original too. The petal you clicked is the master. The box This group still reads “The active item is not in a group”, because the active stone is the centre stone, and it is not copied.
It worked whenSix petals stand round the centre stone.
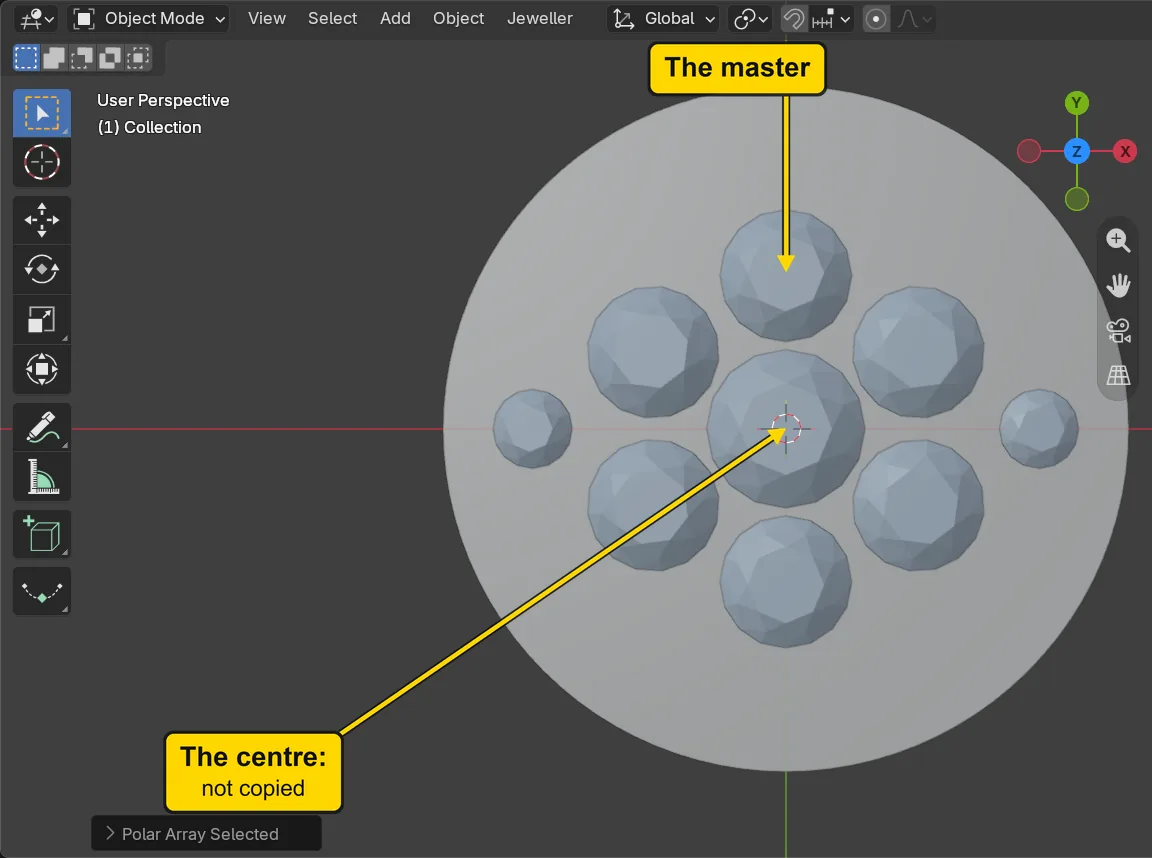
Step 8. Nudge one petal outward
WhereThe 3D view. Move the pointer off the sidebar and into the dark area.
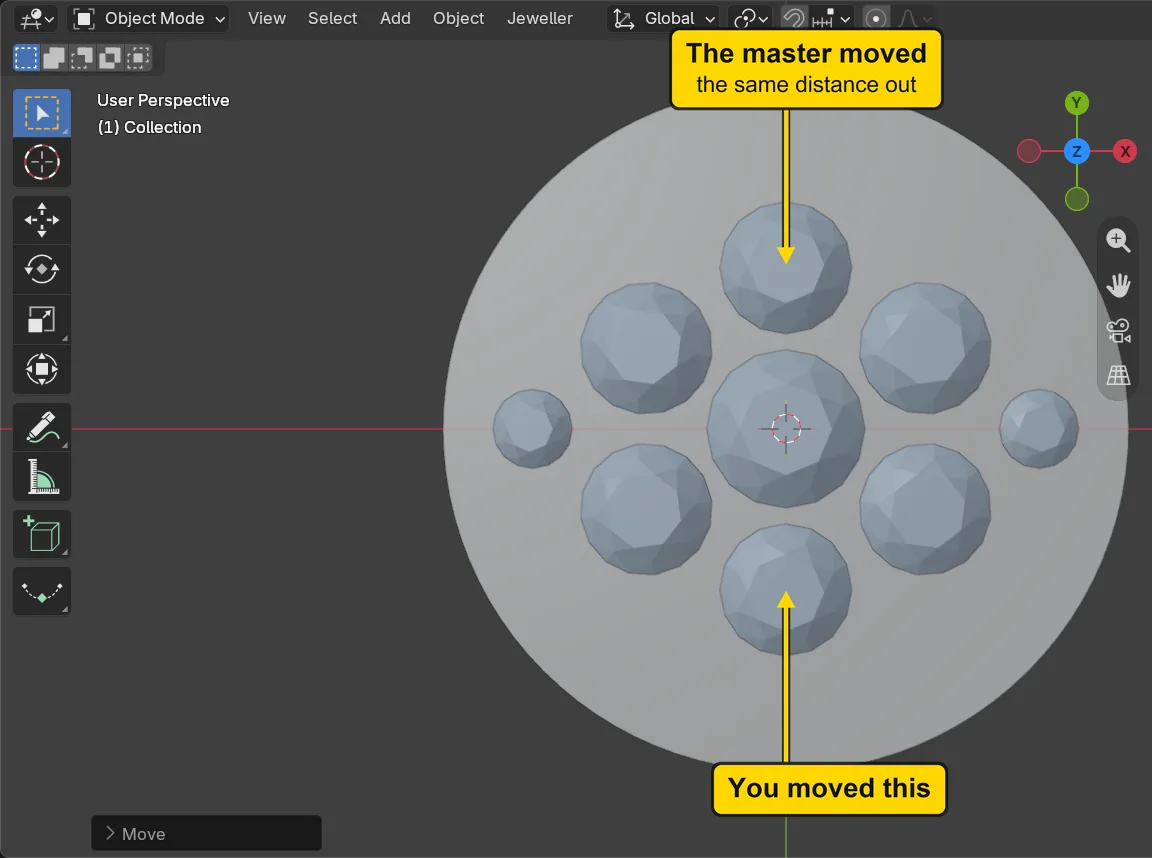
DoClick the petal at the bottom, then press G, Y, type -0.15 and press Enter.
TypeG, Y, -0.15, Enter
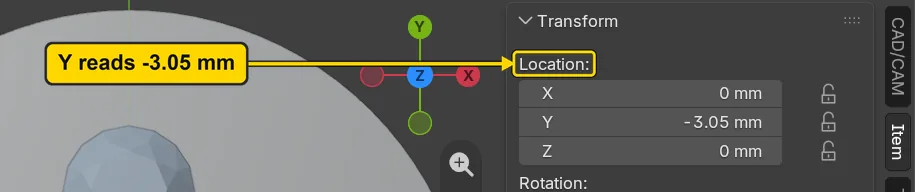
You should seeThe petal moves 0.15 mm down and the other five move outward with it: all six now stand 3.05 mm from the middle of the centre stone. The master and every twin stay in step. The box This group now names the petal you clicked as a twin of the master and reads “Polar 6 about Z, 360 deg”. The gap between two petals is 3.05 less 2.50, the width of a petal: 0.55 mm. The gap from a petal to the centre stone is 3.05 less 1.50 (half of 3.00) less 1.25 (half of 2.50): 0.30 mm. To read the distance, click the Item tab, in the strip of tabs at the right edge of the sidebar: Location reads Y -3.05 mm for the petal at the bottom. Click the CAD/CAM tab to come back.
It worked whenThe Item tab reads Y -3.05 mm for the petal at the bottom.
If it goes wrongNothing moves: The pointer is still over the sidebar. Move it over the 3D view and press the key again.
Step 9. Switch the guides on
WhereThe sub-panel Place & Guides, under Symmetry in the Gems panel: click its title to open it, and scroll to the box Spacing.
DoPress the small round arrow beside Show Guides.
You should seeA ring round every stone. Guides are marks the add-on draws round each stone: green means clear, amber means closer than the Spacing number plus 0.05 mm, and red means two stones overlap. Spacing reads 0.2 mm (the panel drops the trailing zero), the add-on’s starting number. All nine rings are green.
It worked whenShow Guides is lit and every ring is green.
Step 10. Add a seventh petal with the plus button
WhereThe Symmetry sub-panel, the box This group. Scroll the sidebar down to it. Select a petal first: click any petal in the 3D view.
DoClick a petal, then press the small + button at the right of the line Count 6.
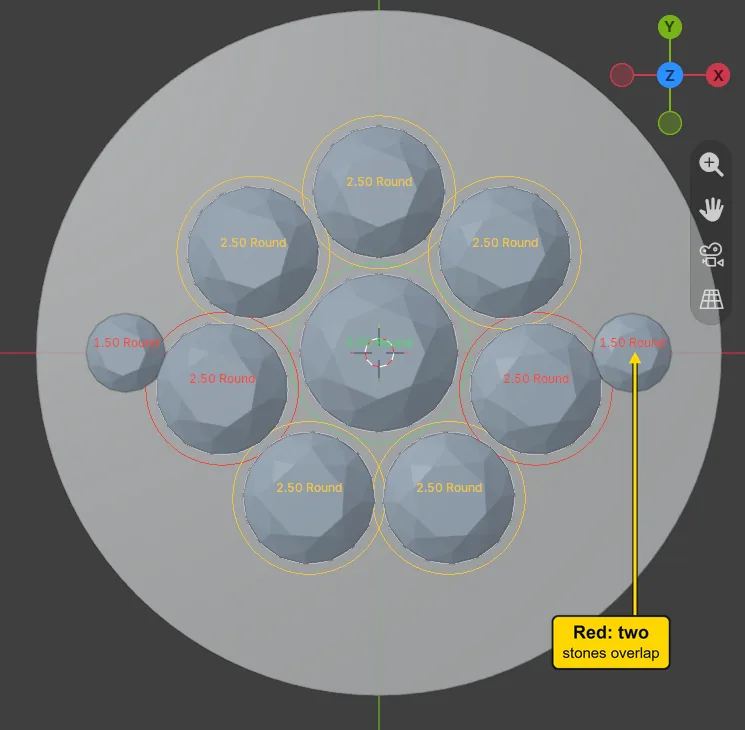
You should seeOne more petal: 5 rings turn amber and 4 turn red. The line now reads Count 7. The seven petals stand 0.15 mm apart, less than the 0.20 of Spacing, so their rings turn amber. Two of them come down on the two side stones, so those four rings turn red: red means two stones overlap. Seven petals do not fit here, with the side stones in place and the Spacing at 0.20.
It worked whenThe line under the buttons reads Count 7 and some rings are red.
Step 11. Open Edit Array
WhereThe Symmetry sub-panel, the box This group: the button Edit Array… under the count. Click any petal first.
DoClick a petal, then press Edit Array….
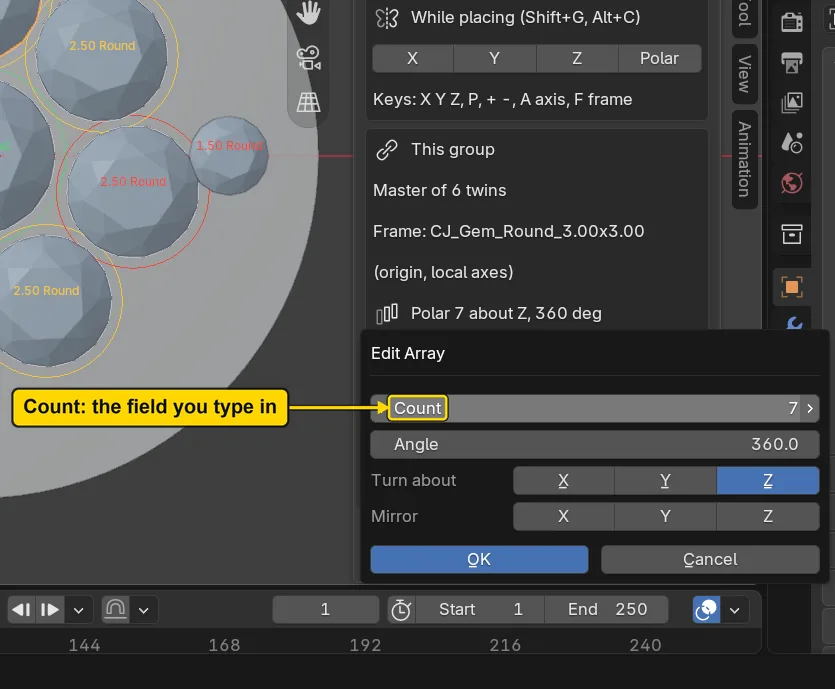
You should seeA window over the sidebar, with the field Count among its rows. Edit Array… is the way to type a count, an angle or an axis. Leave every row but Count as it is. Cancel at its foot shuts the window and changes nothing.
It worked whenA window with the field Count stands open over the sidebar.
Step 12. Type 6 and press OK
WhereThe Edit Array window, the field Count.
DoClick the middle of the Count field, type 6, press Enter, then press OK.
Type6
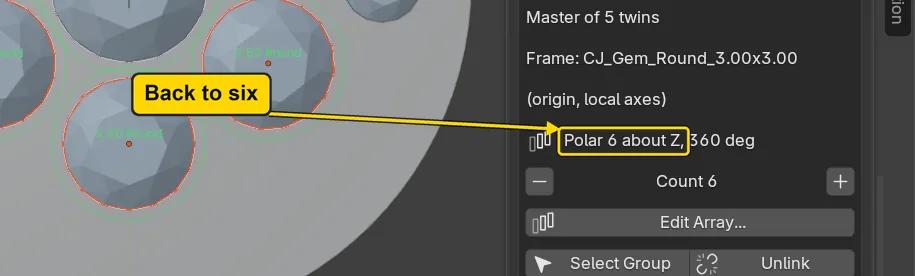
You should seeThe window shut and six petals again, every ring green. The twins are made again in the same frame, and the master stays where it is.
It worked whenThe line under the buttons reads Count 6 and every ring is green.
Step 13. Save your work
WhereThe 3D view: move the pointer over it.
DoPress Ctrl+S.
You should seeBlender writes your copy at once, with no question, because the file already has a name. An asterisk, *, in the title bar marks changes that are not saved, and it goes now. Save your work and get it back (P0-12) says more about saving.
It worked whenThe title bar begins my-flower and carries no asterisk.
No picture: the only change is a message on the status bar, and it fades.
Check your result
| What to read | Where | What it should say |
|---|---|---|
| The petals | The Symmetry sub-panel, the box This group (with a petal selected) | A line “Polar 6 about Z, 360 deg” and “Count 6” |
| The side stones | The Item tab of the sidebar, Location, with a side stone selected (step 4 shows the left one) | X reads 4.8 mm on the right-hand stone and -4.8 mm on the left-hand one |
| The guides | The 3D view, the rings round the stones | Every ring is green |
| The petals’ distance | The Item tab of the sidebar, Location, with the petal at the bottom selected (step 8) | Y reads -3.05 mm: every petal stands 3.05 mm from the middle |
| The gaps, worked from that number | Step 8: 3.05 less 2.50, the width of a petal, and 3.05 less 1.50 less 1.25 | 0.55 mm between two petals and 0.30 mm from a petal to the centre stone |
Try it yourself
Open your copy, click one petal and press Edit Array…. Type 5 in Count and press OK: five petals stand round the centre stone, 72 degrees apart. Then press Edit Array… again and put 6 back.
What you learned
- Mirror X and Polar Array Selected make twins of a stone: you set the master, the twins follow it. The frame says what the mirror and the turn are measured from: World or the stone you made Active.
- A polar array’s Count counts the original too. The small + button beside Count adds one twin, and Edit Array… types the count, the angle or the axis.
- Seven petals of this size do not fit with the two side stones in place and the Spacing at 0.20: the rings turn amber and then red. Look at the rings before you add a stone.
Next: Keep twins tidy