
What you will make
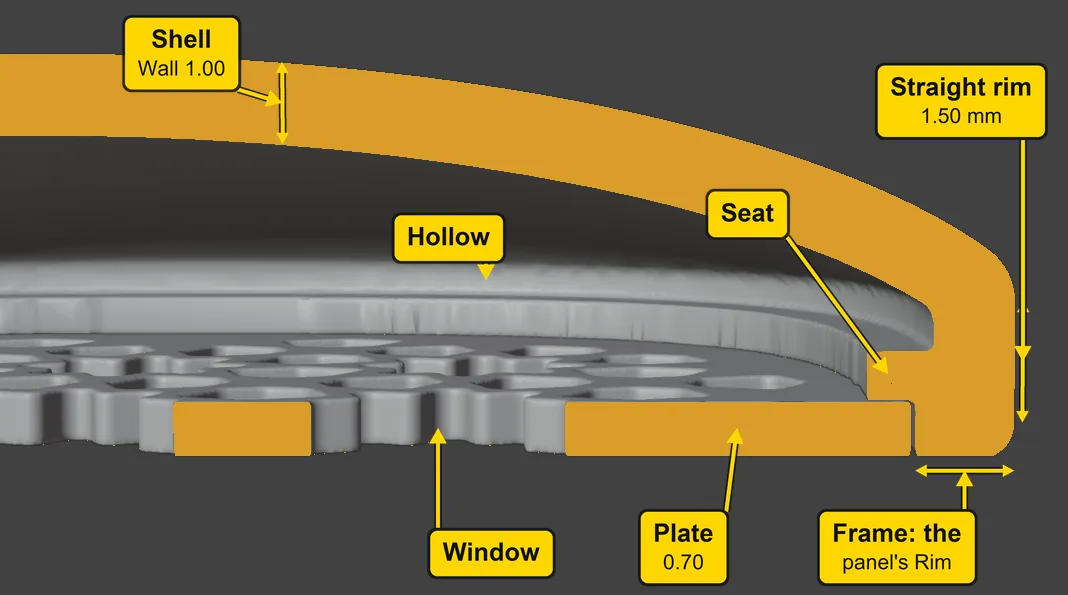
A soft cushion 24 mm across and 5 mm thick with a hollow back and a pierced lid, called a back plate. 29.62 g of solid metal comes down to 13.07 g in 18ct yellow gold, and 65 windows, the holes in the plate, take out more weight. A jeweller fits one when a solid pendant is too heavy to wear or too dear to cast. From the front it looks just as full. The back is where the work shows.
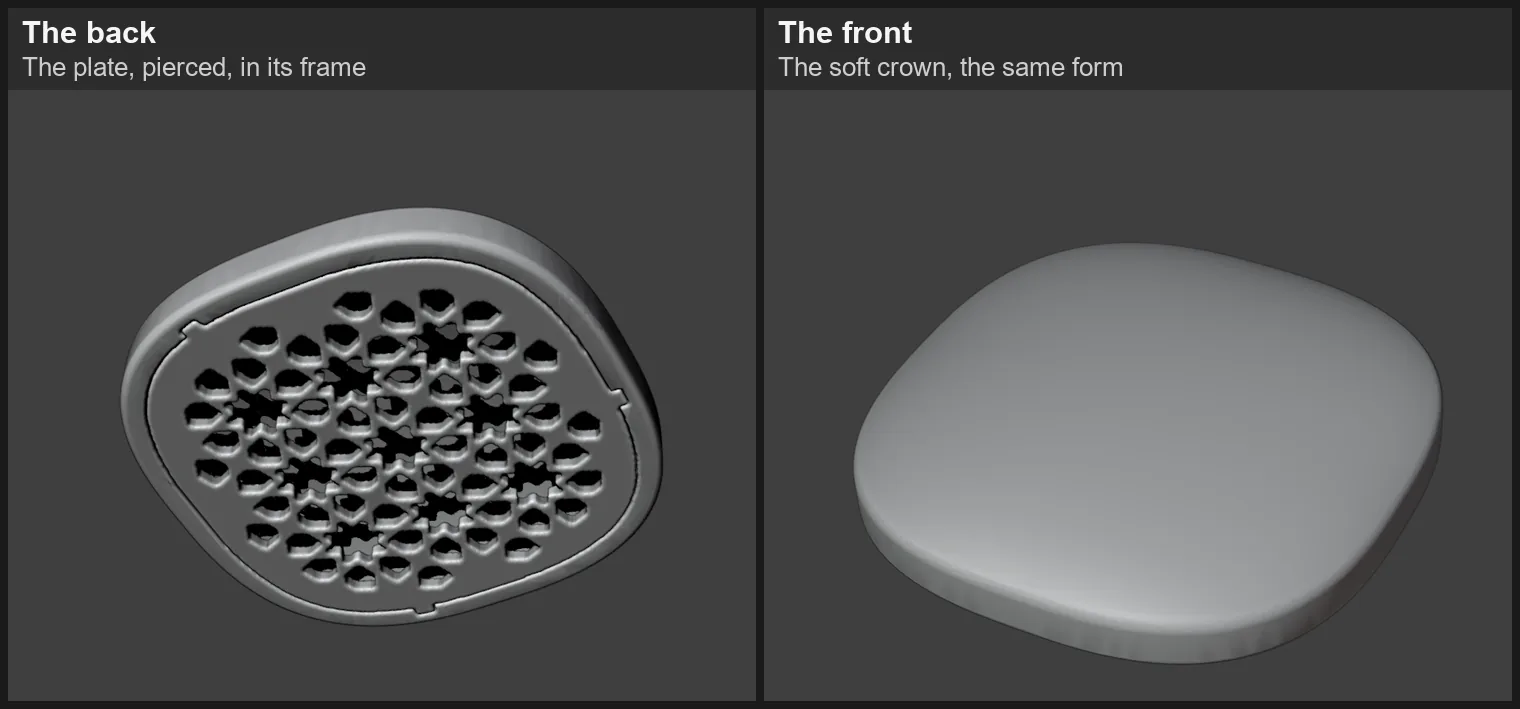
About 25 minutes.
Files
- p10-09-start.blend (674 KB): open this one to begin.
- p10-09-finished.blend (4.68 MB): the result, to compare with yours.
Both were made in Blender 5.2.0.
Before you start
- You have done Part 0, Blender from nothing.
- P10-08, Hollow a solid to an even wall, uses this same cushion and helps. You can do this page without it.
- The add-on is installed, and its CAD/CAM tab is in the sidebar. The start file is already in millimetres.
- Steps marked Meet the refusal break something on purpose: the red box is safe and the piece is not harmed.
Build it
Step 1. Open the start file, and save your own copy
WhereBlender’s top menu bar, File > Open, then File > Save As.
DoOpen p10-09-start.blend. Then save it under a name of your own, so that the start file stays clean.
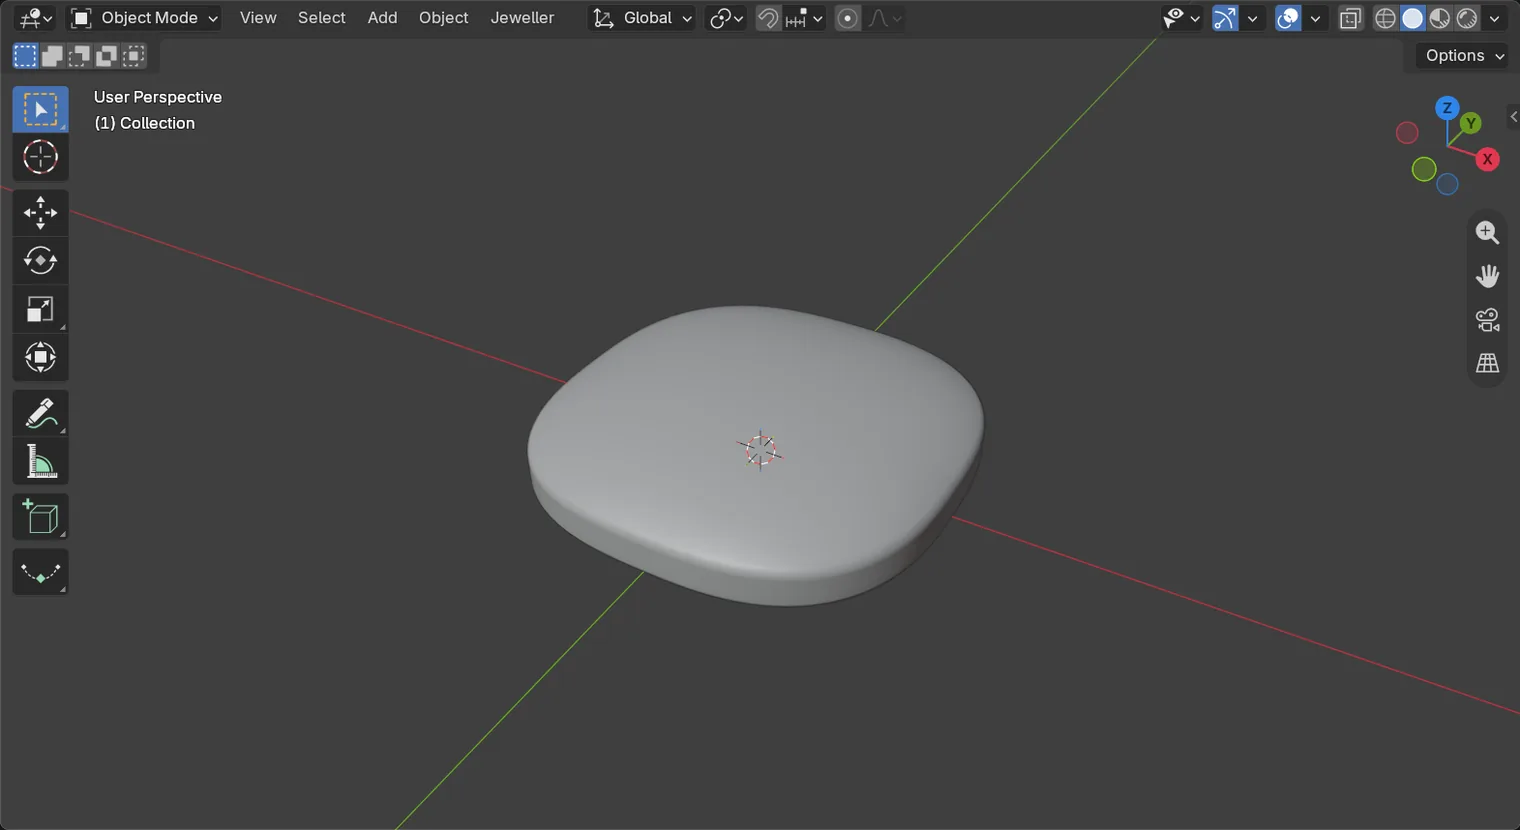
You should seeOne soft cushion, 24 mm across and 5 mm thick: a closed solid with a smooth crown, a straight rim of about 1.50 mm and a flat back. Nothing is selected.
It worked whenThe cushion is the only thing in the 3D view.
Step 2. Find the Back Plate panel
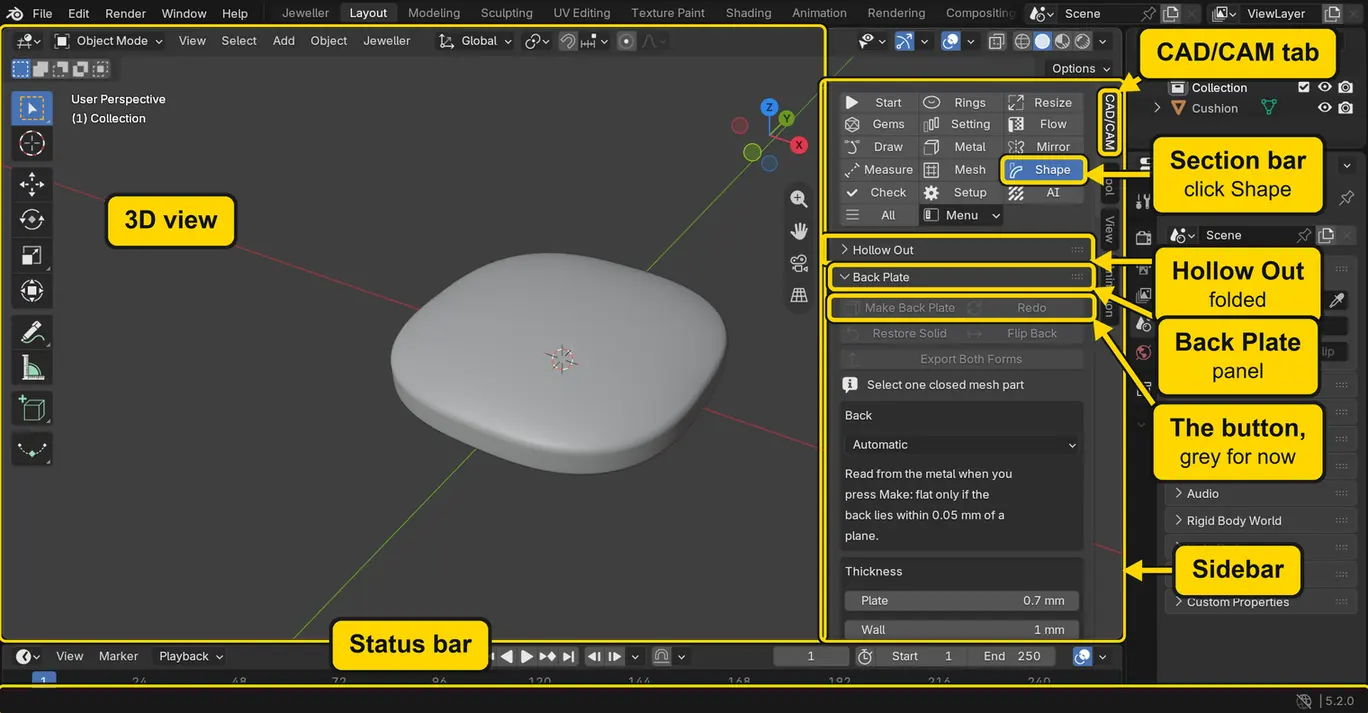
WhereThe sidebar at the right of the 3D view (press N with the pointer over the 3D view if it is shut), the CAD/CAM tab, the section bar at its top.
DoClick Shape. Then click the words Hollow Out at the head of the first panel, to fold it out of the way.
You should seeBack Plate stands at the top, with Make Back Plate grey and the words “Select one closed mesh part” under the buttons.
It worked whenYou can read Make Back Plate without scrolling.
Step 3. Select the cushion
WhereThe 3D view.
DoClick once on the cushion.
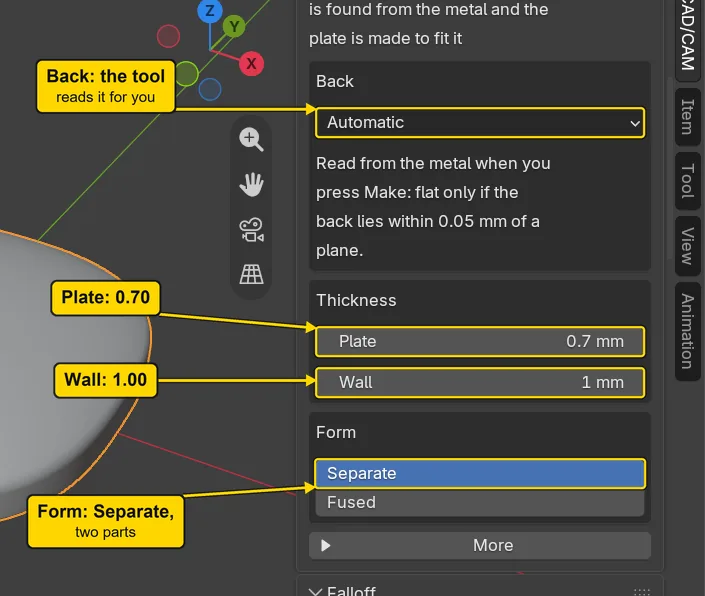
You should seeAn orange line round the cushion. Make Back Plate is no longer grey, and the panel’s line now begins “Press Make Back Plate”. Scroll down to see the settings marked in the picture.
It worked whenThe words at the top left of the 3D view end in Cushion.
Step 4. Meet the refusal: a piece hollowed first
WhereThe Hollow Out panel, above Back Plate.
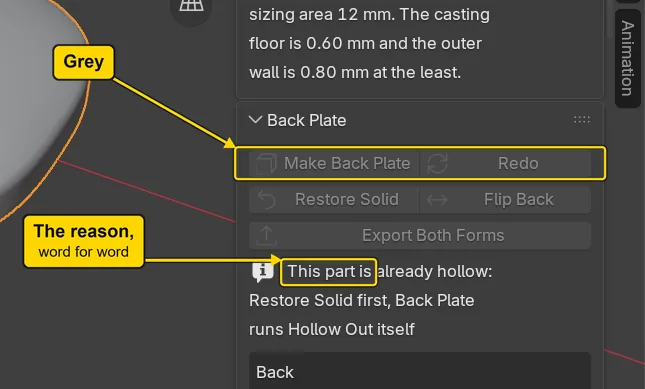
DoTo meet this refusal on purpose, click the words Hollow Out at the panel’s head to open it, then press its Hollow Out button and wait about 20 s. Scroll down to Back Plate.
You should seeMake Back Plate is grey again, and the panel says why: “This part is already hollow: Restore Solid first, Back Plate runs Hollow Out itself.”
It worked whenYou have read that line.
Step 5. Put the solid back
WhereThe Hollow Out panel, its second row of buttons. Scroll back up.
DoPress Restore Solid.
You should seeThe Hollow Out panel reads “Solid restored: Cushion is as it was before Hollow Out”, and Make Back Plate is no longer grey.
It worked whenThe Back Plate panel reads “Press Make Back Plate” again.
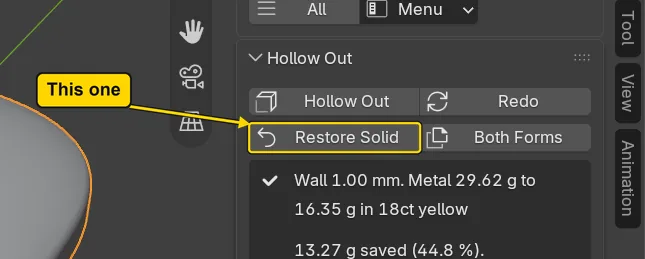
If it goes wrongThe Restore Solid in the Back Plate panel is grey: that one is for a piece Back Plate has worked on, and its tooltip says “Select a part that Back Plate has worked on”. Use the one in the Hollow Out panel.
Step 6. Press Make Back Plate
WhereThe Back Plate panel. Click the words Hollow Out first, to fold that panel again.
DoPress Make Back Plate. Blender stands still for half a minute or more: it has not hung, so wait.
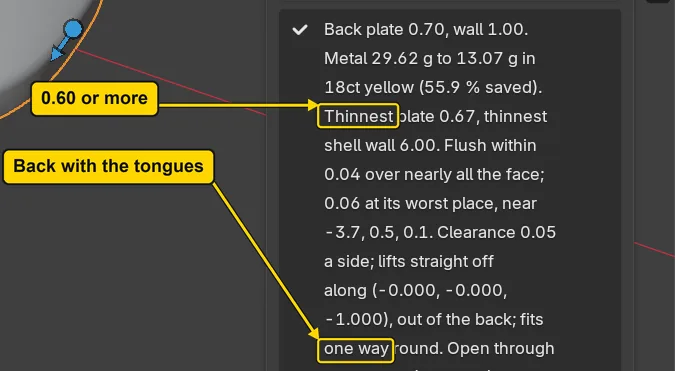
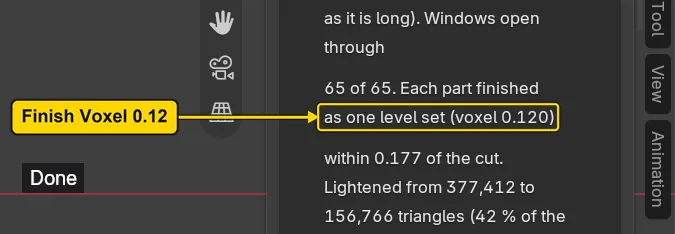
You should seeHere it took 82 s; a quicker machine takes about half a minute. From above the cushion looks the same. Under the buttons there is now a long sentence: the first picture marks its start, the second its end, lower in the panel. The table says what each mark is and what you should want it to read.
It worked whenThe sentence ends “Took”, and how long.
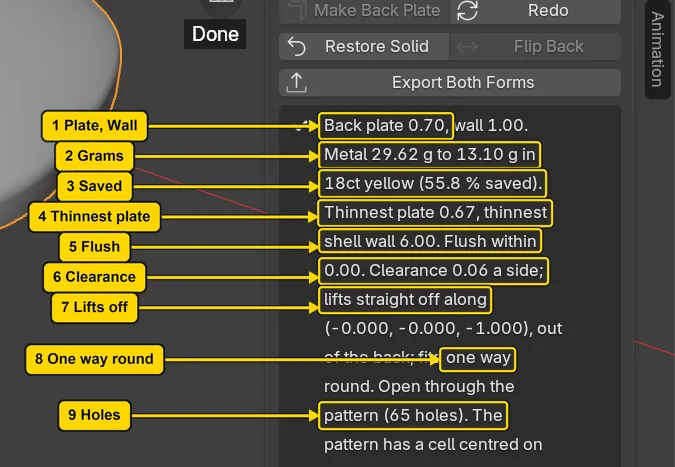
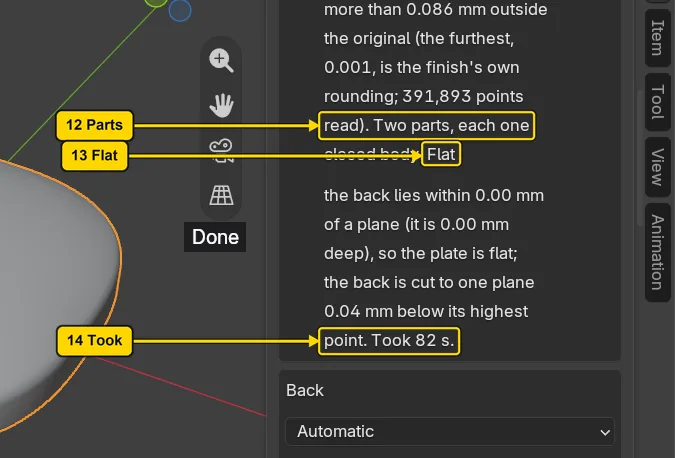
| Mark | On the panel | What it is | What to want |
|---|---|---|---|
| 1 | “Back plate 0.70, wall 1.00” | The two numbers you asked for: Plate is the lid’s thickness, Wall the shell’s | Plate 0.60 to 0.80, the range in the Plate tooltip. Wall 1.00 starts well; under 0.60 is refused |
| 2 | “Metal 29.62 g to 13.10 g in 18ct yellow” | The solid piece, then body and plate together, weighed from their meshes | The second figure well under the first. This is the first press: the copy you make at step 14 reads a little differently |
| 3 | “(55.8 % saved)“ | What came off | On this cushion, over half |
| 4 | “Thinnest plate 0.67, thinnest shell wall 6.00” | The thinnest place in the plate, from its inner face to the piece’s outer surface: the thickness that 99.9 % of that face has at least, so a speck of mesh cannot read 0.00. The figure after it is the body’s | 0.60 or more for both: the bench rule. Under it the sentence adds “is under the casting floor of 0.60 mm”. Read these figures every time |
| 5 | “Flush within 0.00” | How far the plate’s outer face lies from the piece’s own back, over nearly all of it. Where some places lie further, the sentence goes on: “over nearly all the face”, then the worst figure and where it stands | As near nought as you can get. It grows with Finish Voxel |
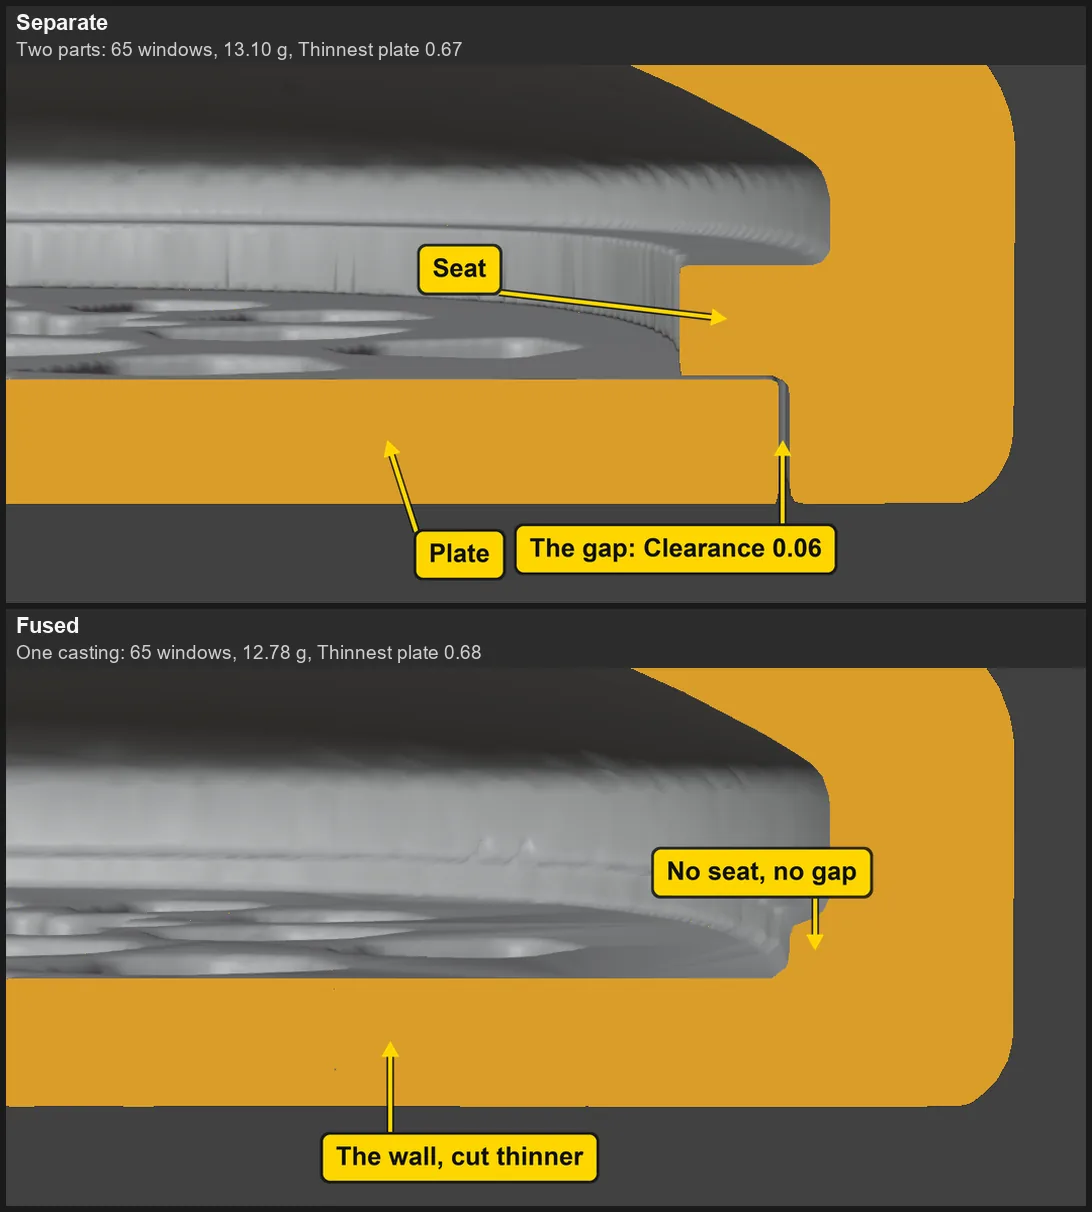
| 6 | “Clearance 0.06 a side” | The gap measured between plate and opening, on each side. The add-on starts at 0.05, under More | Near 0.05. It is yours to change after a first cast |
| 7 | “lifts straight off along (-0.000, -0.000, -1.000), out of the back” | The way the plate comes out, as a direction in space. Here it is straight down | One figure near 1, two near 0, on a piece lying square. Any other reading: see row 8 of the eight things, at the foot of this page |
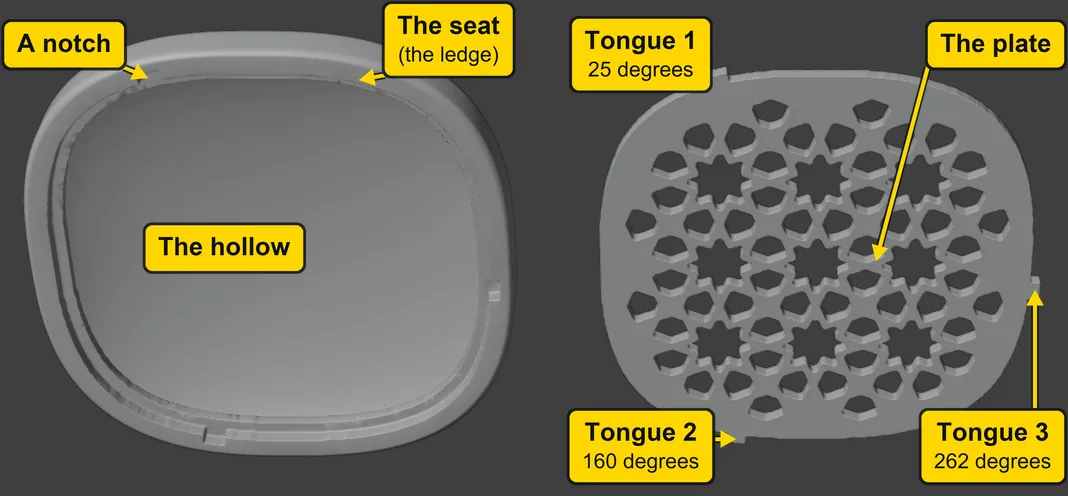
| 8 | “fits one way round” | The three tongues, the small tabs that step 7 shows, stand unevenly, so the plate goes in one way only | There with Tongues. Gone with Joint None: step 11 |
| 9 | “Open through the pattern (65 holes)“ | How many windows, the holes in the plate, there are. The sentence after it says where the pattern sits on the opening | More than none. Fewer on a smaller opening or at a larger Cell |
| 10 | “Windows open through: 65 of 65” (not marked: it stands between the two pictures, so scroll down to it) | A straight line from the hollow through each window must leave without meeting metal | The two figures the same |
| 11 | “Each part finished as one level set (voxel 0.050): within 0.086 of the cut” (not marked: it stands between the two pictures) | The tool’s last act rebuilds each part as one clean skin. The voxel is how fine, and the other figure how far that skin lies from the cut at the worst place. Two sentences follow, “Lightened” and “Inside the piece”: they say how far the surface was thinned and that no point stands outside the original | Leave it for a file you will cast. Step 14 makes it coarser, for a light file |
| 12 | “Two parts, each one closed body” | Both meshes are whole: each is a mesh with no gaps | Exactly these words. Fused reads “One casting, one shell” |
| 13 | “Flat: the back lies within 0.00 mm of a plane (it is 0.00 mm deep), so the plate is flat” | Which plate the add-on chose: Flat, or Follow the back on a curved back. It may add how far it cut the back to get one plane: 0.04 mm here, so the piece stands that much thinner | Leave the box headed Back on Automatic |
| 14 | “Took”, then the time | The time for that press: in seconds, or in minutes and seconds past two minutes | Yours will differ a little. The grams will not |
Step 7. Look at the back
WhereThe 3D view, the small coloured axes at its top right, then the View menu in its bar.
DoClick the faint ball opposite the blue Z ball, to look from underneath. The cushion is still selected, so choose View > Frame Selected.
You should seeThe pierced plate in its frame. The picture moves the plate aside so that you can see what fits what: three tongues on the plate’s edge, three notches in the frame, and the seat, a ledge the plate rests on (the panel says Ledge).
It worked whenYou can see the plate’s windows, and the fine line round the plate where it meets the frame.
Step 8. Make it Fused, and take that back
WhereThe box headed Form in the Back Plate panel, then the top row.
DoFor a trial, press Fused, then Redo, and wait. Then, with the pointer over the 3D view, press Ctrl+Z twice.
You should seeAfter Redo the sentence reads “One casting, one shell”. Compare it with the words at the top of the picture: 65 windows, 12.78 g. Fused has fewer windows, because its pattern stands inside an outline a little further in. After Ctrl+Z twice Separate is lit and the plate is back, with no wait.
It worked whenThe sentence reads “Two parts, each one closed body” again.
Step 9. Open More and find Rim
WhereThe Back Plate panel, the button More under the box headed Form.
DoPress More. Then scroll down to the box headed Frame and Ledge.
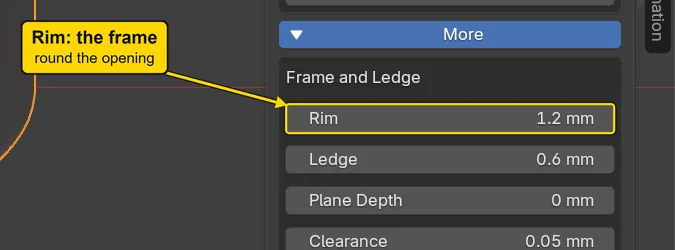
You should seeMore settings open below the foot of the panel. In the box headed Frame and Ledge, Rim is the width of the plain frame round the opening, and Ledge is the seat, the ledge the plate rests on.
It worked whenYou can read Rim in its field.
Step 10. See what the Rim does
WhereThe Back Plate panel: Rim in the box headed Frame and Ledge, and Redo in the top row.
DoFor a trial, follow the table: click the middle of the number in Rim, type it, press Enter, scroll up and press Redo, and wait. Scroll back down for the next number.
You should seeThe pictures below. The outside never moves. The frame round the opening grows, the windows fall, the grams rise and the tongues grow longer.
It worked whenRim reads 1.2 mm in its field.
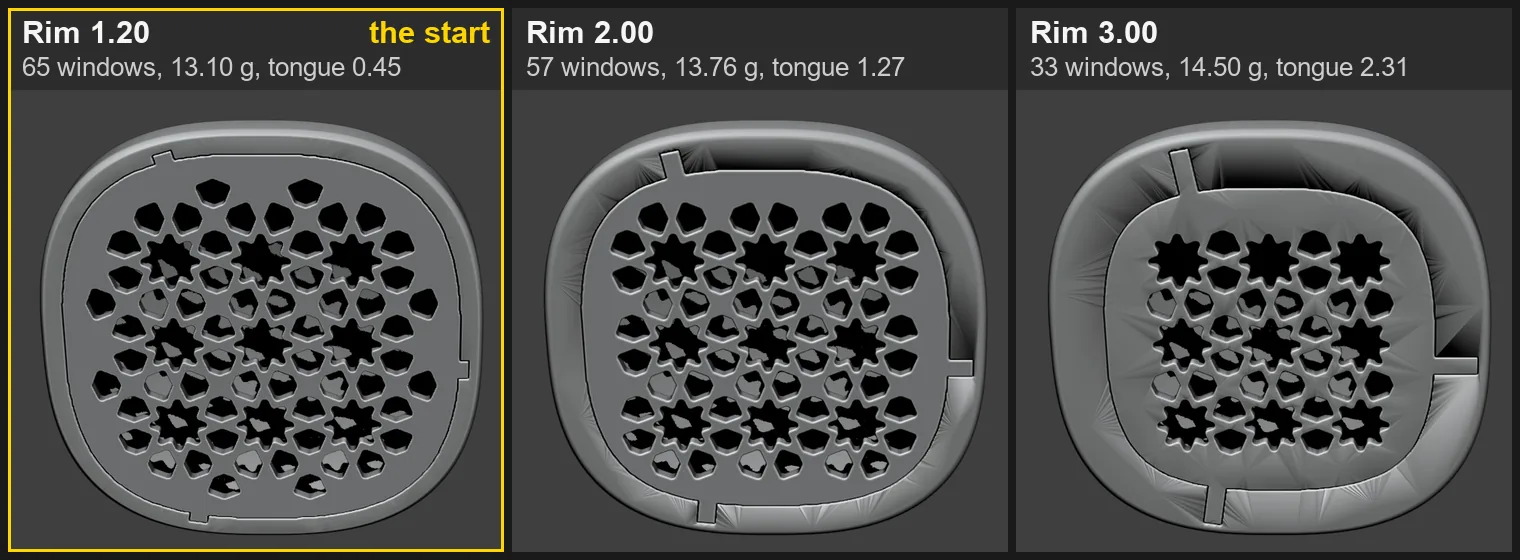
| Type in Rim | Then | The sentence reads |
|---|---|---|
| 2.00 | press Redo, and wait | 57 holes |
| 3.00 | press Redo, and wait | 33 holes |
| 1.20 | nothing: leave Redo alone | still 33 holes, until your next press |
Step 11. Change the plate and the joint: Redo
WhereThe box headed Thickness, then Joint: in the box headed Frame and Ledge, then the top row.
DoFollow the table from the top, and wait for the new sentence.
You should seeAnother trial. The sentence begins “Back plate 0.90”, and “Thinnest plate” reads 0.87. The words “fits one way round” have gone from it.
It worked whenThe sentence reads “lifts straight off along”, then goes straight on to “Open through the pattern”.
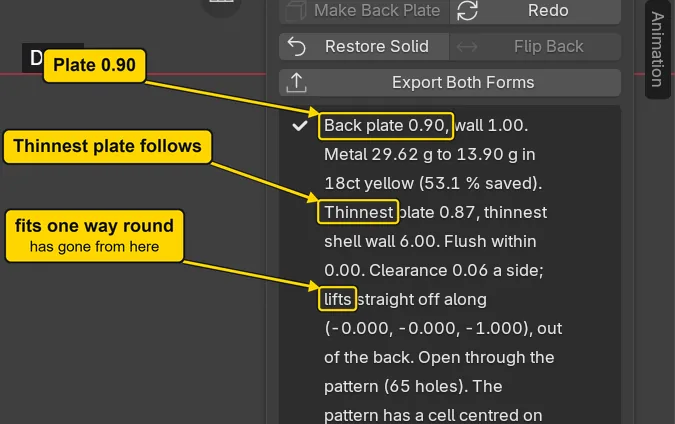
| In | Do |
|---|---|
| Plate | click the middle of the number, type 0.90, press Enter |
| Joint: | click the menu beside it and pick None |
| the top row | press Redo, and wait |
If it goes wrongThe red box says “A wall of 0.50 mm is under the casting floor”, and the plate has gone: a refused Redo takes the plate away, and Redo goes grey. Your solid is unharmed. Press Esc, type a good number, and press Make Back Plate.
Step 12. Put the solid back, and compare
WhereThe top of the Back Plate panel.
DoPress Restore Solid.
You should seeThe plate has gone, and the panel reads “Solid restored: Cushion is as it was before Back Plate”.
It worked whenThe panel reads “Solid restored”, and the sidebar’s Item tab reads Z 5 mm again. Then click the CAD/CAM tab to come back.
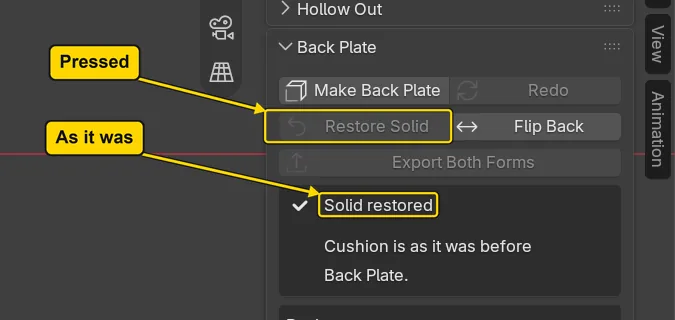
Step 13. Flip Back on, and off again
WhereThe top of the Back Plate panel, beside Restore Solid.
DoPress Flip Back, and read the box headed Back. Then press Flip Back again.
You should seeAt the first press a new line stands in the box headed Back: “The other side of the piece is the back.” At the second it goes.
It worked whenThe line has gone from the box headed Back.
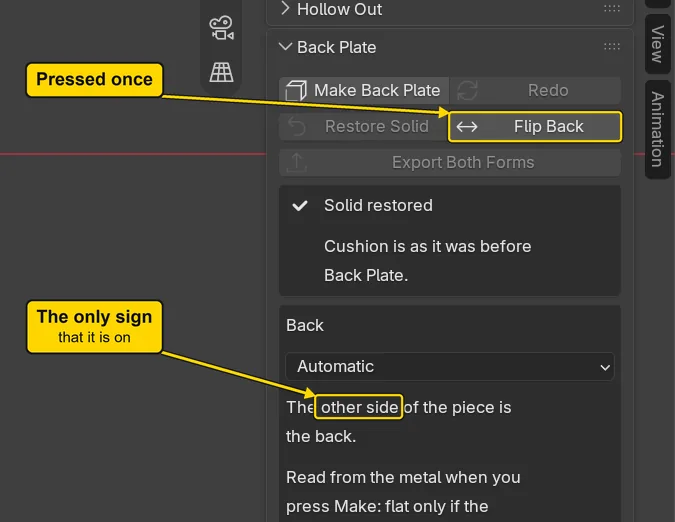
Step 14. Make the copy you keep
WhereThe box headed Thickness, Joint:, Finish Voxel in the box headed Pattern, then the top row.
DoFollow the table from the top, and wait for the sentence.
You should seeThe sentence still reads “Metal 29.62 g”, the same solid as at the first press, then 13.07 g, a little off the first press’s 13.10 g. It reads “voxel 0.120” and “Thinnest plate 0.67”, and “fits one way round” is back.
It worked whenThe sentence reads “Two parts, each one closed body”, and Thinnest plate is 0.60 or more.
| In | Do |
|---|---|
| Plate | click the middle of the number, type 0.70, press Enter |
| Joint: | click the menu beside it and pick Tongues |
| Finish Voxel | click the middle of the number, type 0.12, press Enter |
| the top row | press Make Back Plate, and wait |
Step 15. Save your copy
WhereBlender’s window, with the pointer over the 3D view.
DoPress Ctrl+S.
No picture: nothing on the screen changes.
Check your result
| What to read | Where | What it should say |
|---|---|---|
| The grams | Back Plate panel, the sentence | “Metal 29.62 g to 13.07 g in 18ct yellow (55.9 % saved)“ |
| The thinnest plate | The same sentence | “Thinnest plate 0.67”: 0.60 or more |
| The windows | The same sentence | “Windows open through: 65 of 65” |
| The parts | The same sentence | “Two parts, each one closed body” |
| The joint | The same sentence; and Tongue 1, Tongue 2 and Tongue 3 under More | “fits one way round”. 25, 160 and 262 degrees |
| The outside | The sidebar’s Item tab, Dimensions, with the cushion selected and not the plate | X 24 mm, Y 24 mm, Z 4.96 mm: the press cut the back flat by 0.04 mm |
| The file | Your saved copy, in a file window | About 5 MB |
Try it yourself
Open your saved copy and look at the back, as in step 7. Click the plate: the panel’s line begins “This is a back plate”, and Redo is grey. Press G, Z, type -9, press Enter: it lifts straight off, and you see the hollow, the seat and the notches. Press Ctrl+Z twice to put it back. Then, under More, type 2.40 in Cell and press Redo: the windows grow fewer, and each one larger.
The eight things a piece of your own must be
Come back to this table for a piece of your own: the start file passes all eight. The panel says the first five before you press, under its buttons. The last three you only learn by pressing. A refused press leaves your solid as it was, though a refused Redo takes the plate away.
| The piece must be | If not, the screen says, word for word | What to do |
|---|---|---|
| 1. A mesh, active, in Object Mode | “Select one closed mesh part.” In Edit Mode: “Leave Edit Mode first” | Click the piece. Press Tab to leave Edit Mode, where you work on one piece’s own faces, edges and points |
| 2. The metal, not a stone | “This is a stone, a cutter or a claw: select the metal part” | Click the metal |
| 3. Not live, with no modifiers | “Make Real first: this part is a live form.” Or: “This part has live modifiers (Bevel): apply them first” | Press Make Real on a live form. Apply a modifier in Blender’s Modifiers tab |
| 4. Closed | “This mesh has 40 open edges: run Mesh Cleanup first” | Press the Mesh Cleanup button the panel offers beside that line |
| 5. Solid, not hollow | “This part is already hollow: Restore Solid first, Back Plate runs Hollow Out itself” | Steps 4 and 5 walk you through this one |
| 6. Thick out to the rim’s inner line, with a straight rim of 1.5 or more | On a dome 24 across with a knife edge, at the press: “The metal behind the opening is only 1.04 mm thick: Hollow Out needs twice the wall (2.15 mm) and room for the plate. Use a thinner wall or a plane nearer the back.” | Give the piece a straight rim. The sentence’s own offer does not cure a knife edge: Wall 0.60 is refused too, needing 1.35 mm. A flat disc 2.00 thick is refused the same way: it needs more than 2.15 mm |
| 7. Wide enough for a cell: about 10 across at Cell 1.60 | On a disc 6 across, at the press: “Pattern Builder placed no cell inside the plate at 0.80 mm from its edge (cell 1.60, rib 0.40): make the cell smaller or the plate larger. (105 cells tried: 104 outside, 1 too near the edge, 0 too small.)” A rib is the bar of metal between two holes | A larger piece, or a smaller Cell under More |
| 8. One clear thinnest direction, or a stone on the front | No refusal, and that is the trap. The add-on takes the thinnest direction as the back, then the flatter of its two sides, and says nothing. Only the sentence shows which: “lifts straight off along (-0.000, -0.000, -1.000)“ | Read that line. A back lying square reads two figures near 0 and one near 1. If it names the wrong side, press Flip Back |
What you learned
- A back plate wants a solid piece, thick out to a straight rim. The panel says most of what it refuses, in words.
- Separate is two parts, for the bench and for production. Fused is one casting, for a prototype. Redo makes it again with the numbers in the panel, and
Ctrl+Ztakes that back with no wait. - Read “Thinnest plate” yourself: 0.60 or more. The panel will not warn you. Restore Solid gives back the very same mesh.