
What you will make
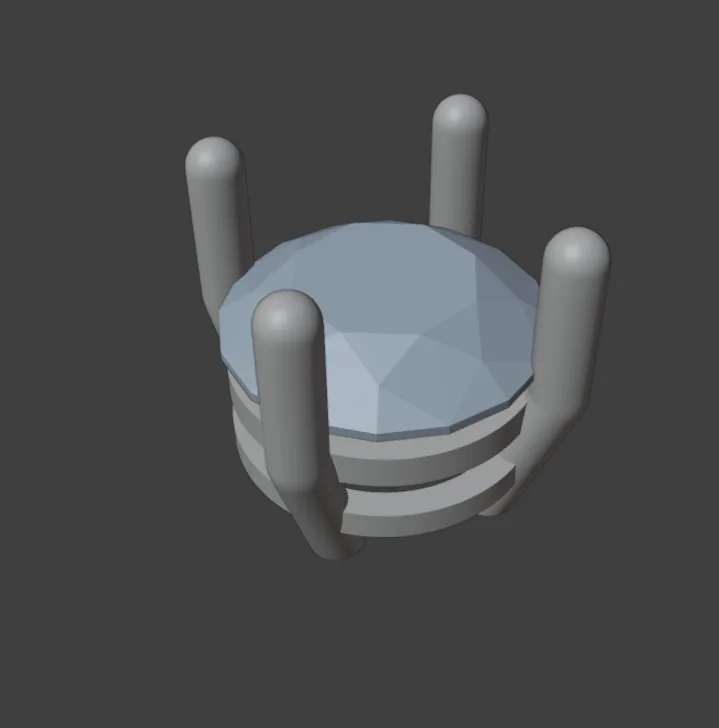
A Round 6.50 stone in a head of four claws that stand along the 3D view’s own directions, one at the top, bottom, left and right when you look straight down, where the head you start from has them on the diagonals. You get there by going up to six claws and to four pairs, then back to four, and by turning the whole set of claws about the stone. Those directions belong to the 3D view and are no rule for a ring. On a ring a jeweller turns the set to put a claw, or the gap between two claws, where the shank meets the head, over the shoulders or between them: that is the one reason to turn a set. The claws keep the bench’s numbers throughout: 2 mm over the table and one diameter, 1.15 mm, from foot to tip.
About 10 minutes.
Files
- p4-05-start.blend (228 KB): open this one to begin.
- p4-05-finished.blend (235 KB): the result, to compare with yours.
Both were made in Blender 5.2.0.
Before you start
- You have done Part 0, Blender from nothing, Drag a number on the model (P4-02), Move the rails by their cross (P4-03) and Go down a level: lean, bend, rail sizes (P4-04): a head’s pink marks, its handles, change a number when you drag them, a label with the number shows while the pointer rests on one, and the level button on the model chooses which marks show.
- CAD/CAM Jeweller 2.22.0 or later (Preferences > Add-ons shows the version). The start file holds a Round 6.50 stone, a round stone 6.50 mm across, in a head of four claws, in millimetres.
Build it
Step 1. Open the start file and save your copy
WhereThe top bar: the row of words that begins File, Edit.
DoDownload p4-05-start.blend from Files above and open it. Then choose File > Save As and save it under the name below, in a folder of yours. Open an exercise file and keep the start file safe (P0-07) shows how.
Typemy-claws.blend
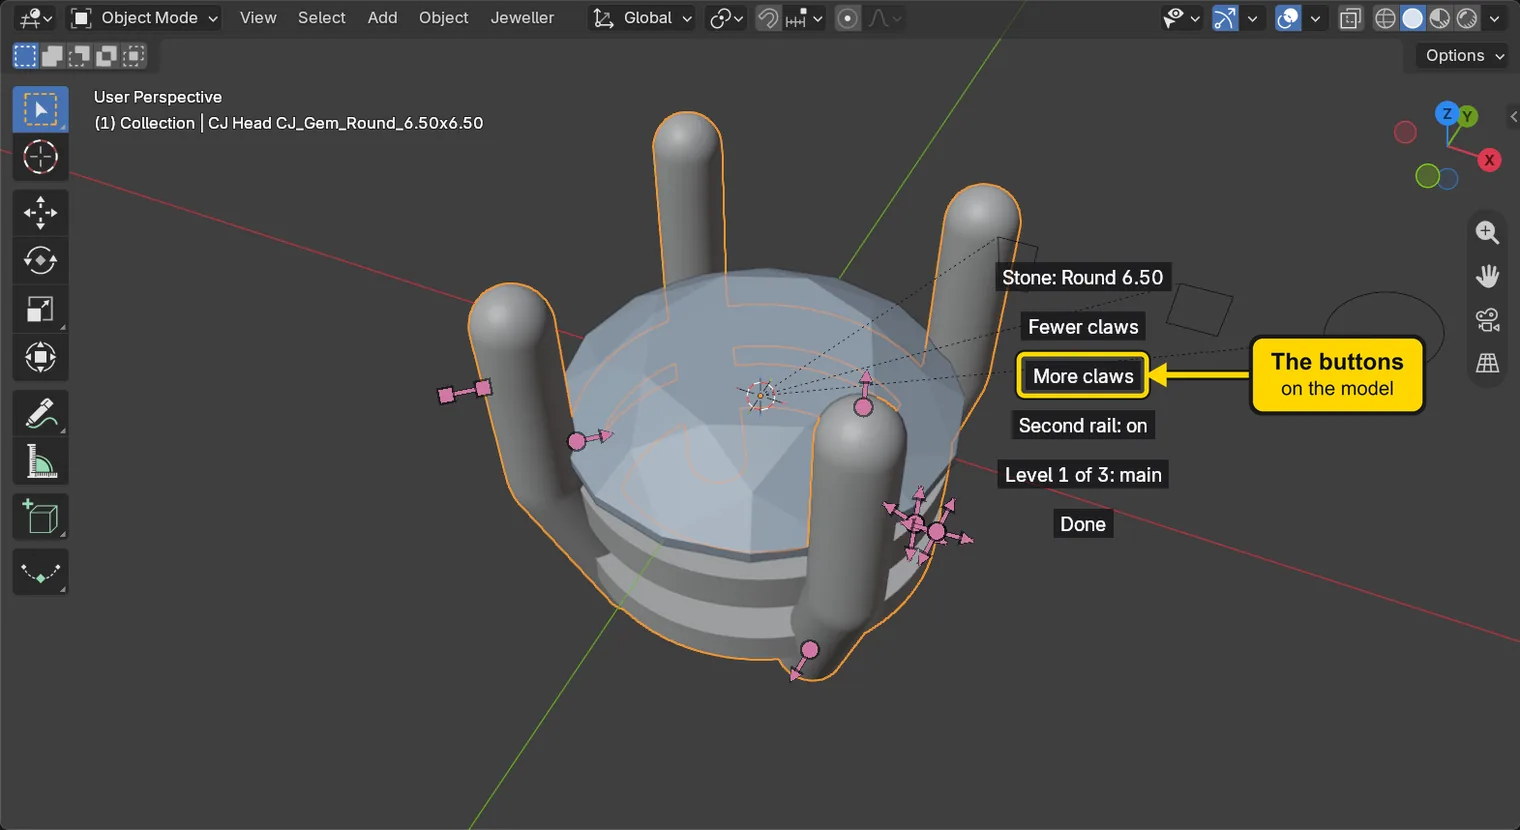
You should seeThe 3D view shows a pale round stone held by four tall claws, seen from above and in front. The head has small pink marks on it, its handles, and to its right the buttons on the model, words you can click: Stone: Round 6.50, Fewer claws, More claws, Second rail: on, Level 1 of 3: main and Done. The title bar, the strip above File and Edit, begins my-claws. The first picture is the 3D view and the second is the title bar.
It worked whenThe title bar, the strip above File and Edit, begins my-claws.

Step 2. Press More claws: six claws
WhereThe 3D view. The buttons on the model, the words to the right of the head.
DoClick the button More claws once.
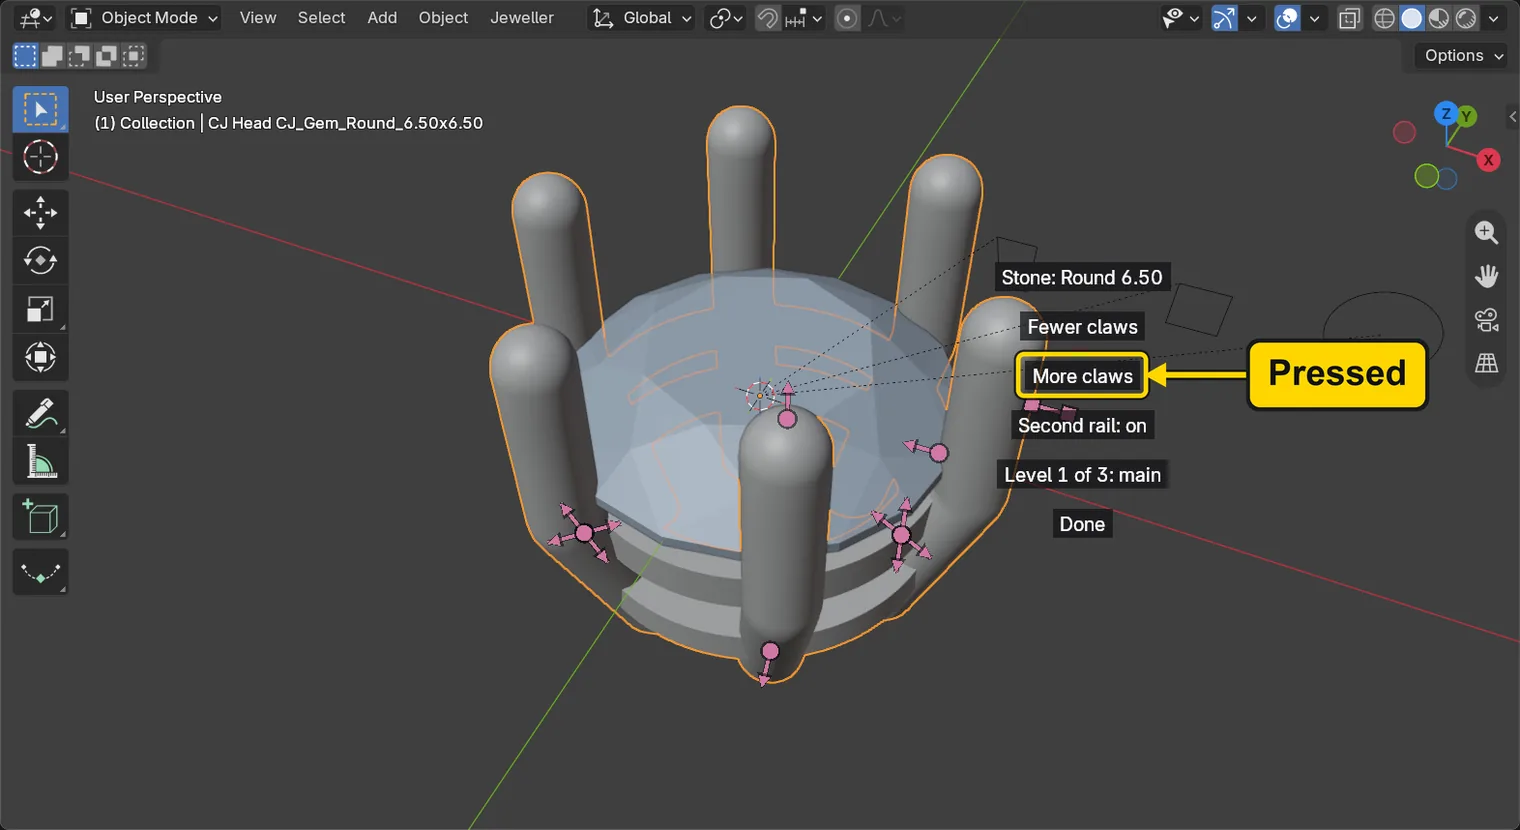
You should seeSix claws stand round the stone in place of four. Each press is one step along a short row, four claws, six claws, four pairs, and the head makes itself again at once. The head is live: it follows the press.
It worked whenYou count six claws round the stone: some stand behind it, so follow them round.
If it goes wrongThe head shows no pink marks and no buttons on the model: you clicked off the head, and the stone is selected, not the head. Click a claw, at a point clear of every pink mark, and they come back.
Step 3. Press More claws again: four pairs
WhereThe 3D view, the same buttons on the model.
DoClick More claws once more.
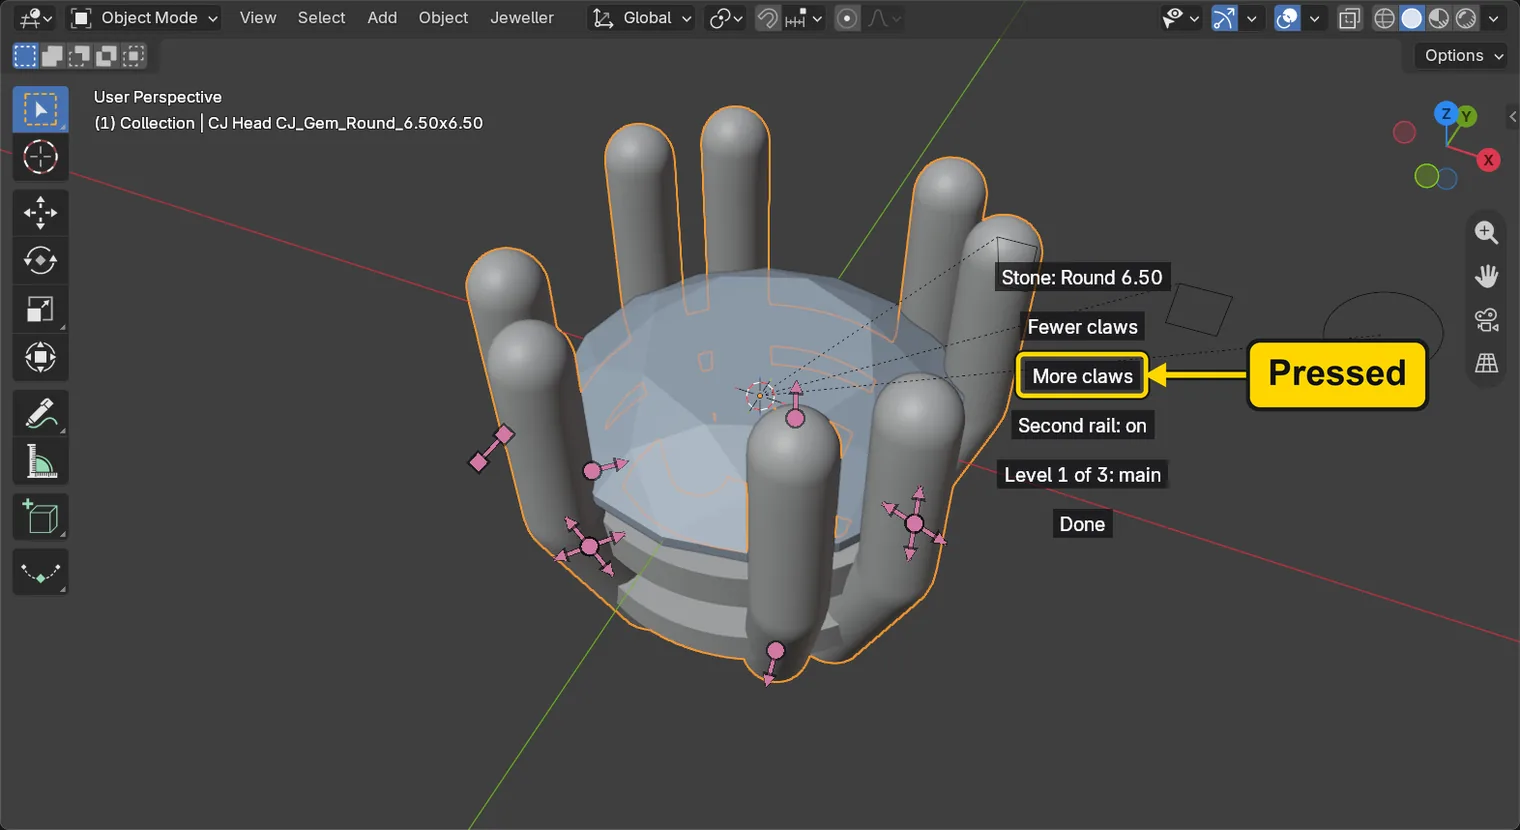
You should seeEight claws in four pairs: each of the four places has two claws side by side. Each pair is two claws a little apart: Gap in a pair sets how far. Eight claws on a Round 6.50 is a drill to show the buttons: a bench uses pairs of claws on much larger stones.
It worked whenYou count four pairs, eight claws.
Step 4. Press the level button
WhereThe 3D view, the button that reads Level 1 of 3: main.
DoClick Level 1 of 3: main once.
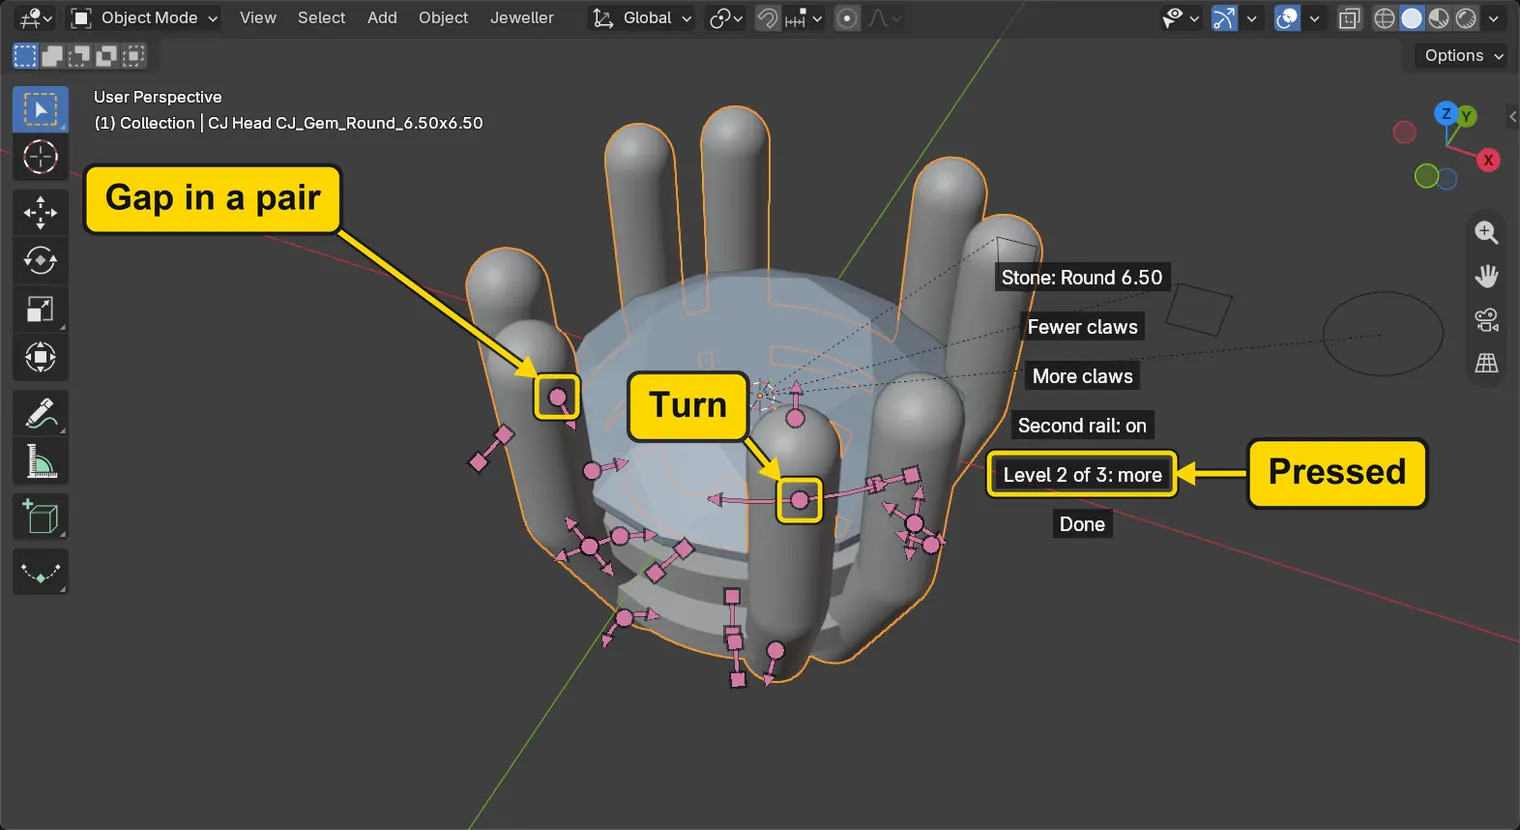
You should seeMore pink marks on the head, and the button now reads “Level 2 of 3: more”. Level 1 holds the main marks. Level 2 holds every number of the head, and with it Gap in a pair, a short arrow between the two claws of a pair, and Turn, a curved mark over the stone.
It worked whenThe button reads “Level 2 of 3: more”, and a curved mark stands over the stone.
Step 5. Open More and find the two numbers
WhereThe sidebar: the CAD/CAM tab, the Setting section, the Head Builder panel. Press N with the pointer over the 3D view if the sidebar is shut. Scroll the sidebar down to the word More.
DoClick the word More at the foot of the panel, then scroll down to the rows Turn (degrees) and Gap in a pair.
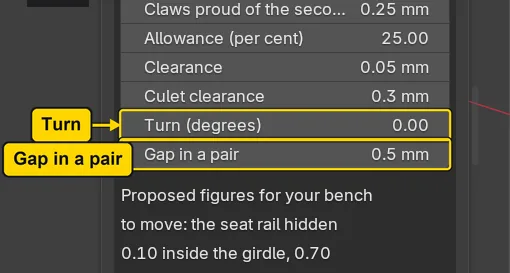
You should seeThe rows Turn (degrees), which reads 0, and Gap in a pair, which reads 0.5 mm. Both numbers belong to the head, and the marks on the model are another way to set them. Under the rows the panel prints a note, “Proposed figures for your bench”: it is the add-on’s own advice, and this page leaves it alone.
It worked whenBoth rows stand on the screen, reading 0 and 0.5 mm.
Step 6. Drag Gap in a pair
WhereThe 3D view, the short arrow between the two claws of a pair. Press and drag as in Drag a number on the model (P4-02), step 4.
DoRest the pointer on the arrow until its label reads “Gap in a pair”. Press on it, drag a short way along it, and let go.
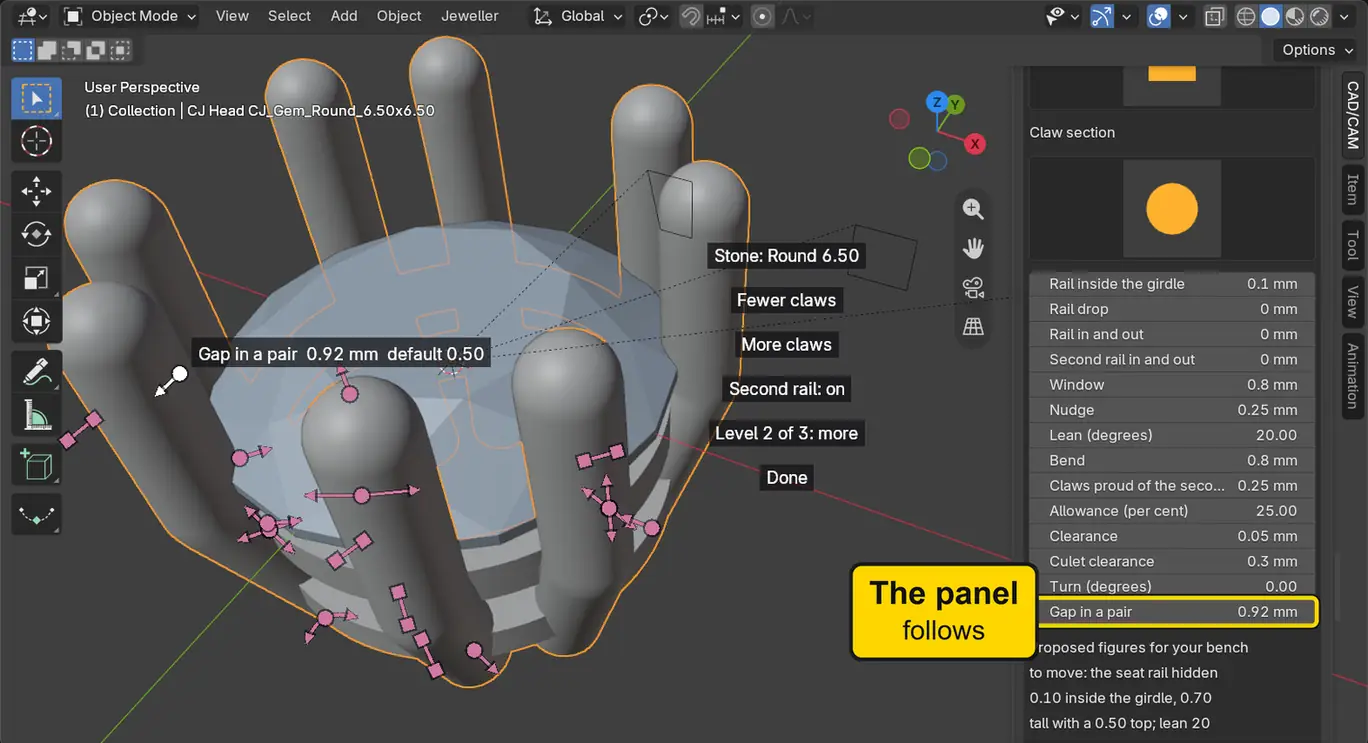
You should seeThe two claws of every pair move apart. The label begins “Gap in a pair” and gives your number (the picture’s is 0.92 mm), and Gap in a pair in the panel reads the same. A drag gives your own number, not the picture’s.
It worked whenGap in a pair in the panel is larger than 0.5 mm, and the label beside the mark gives the same number.
If it goes wrongGap in a pair reads 2.00 mm and the pairs stand far apart: the drag was long, and 2.00 is the end of the handle’s run. Drag a shorter way, or type the number in the panel.
If it goes wrongAnother number changed: you pressed on another handle: press Ctrl+Z once, as in Take the drag back with Ctrl+Z (P4-02, step 5), rest the pointer first, read the label, and try again.
Step 7. Drag Turn with Ctrl held
WhereThe 3D view, the curved mark over the stone. Press and drag as in Drag a number on the model (P4-02), step 4.
DoRest the pointer on the curve until its label reads “Turn”. Hold Ctrl, press on it, drag a little way round the stone, let go, then let go of Ctrl.
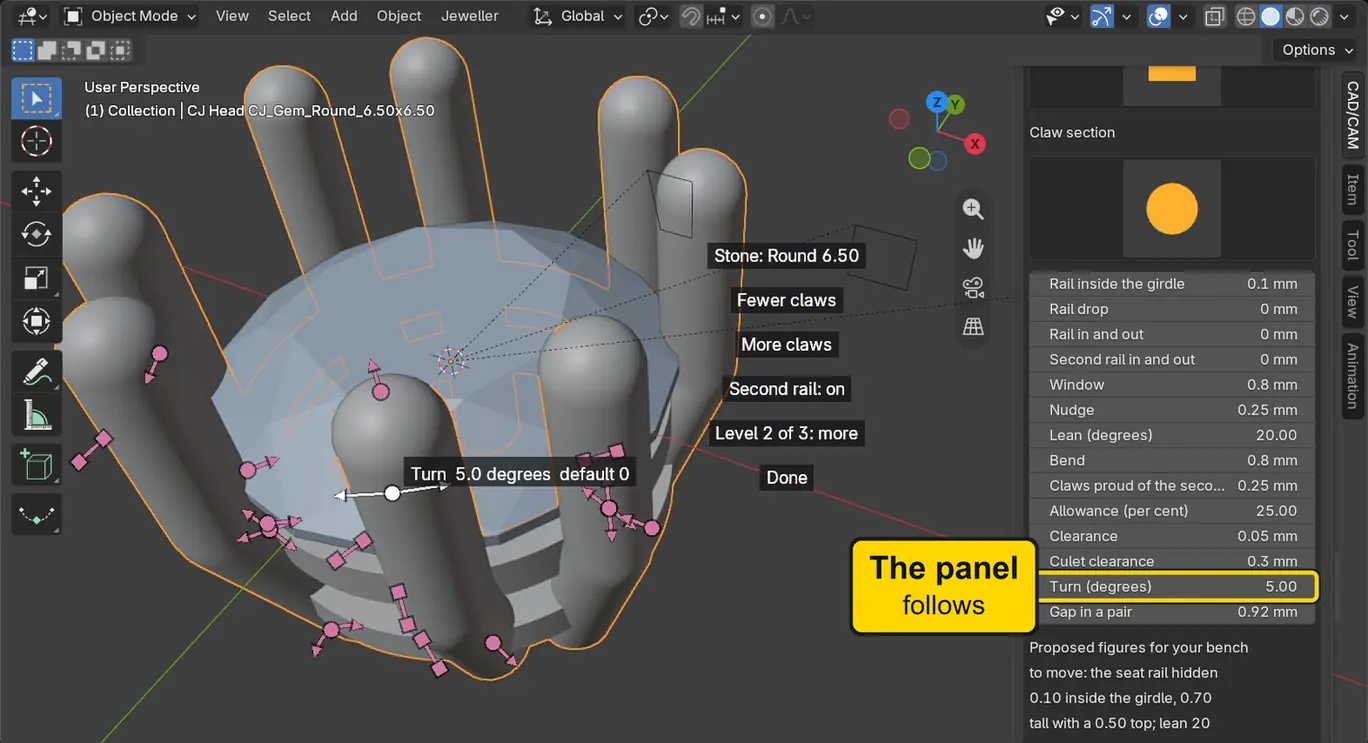
You should seeThe whole set of claws turns about the stone, and the label reads your number of degrees (the picture’s reads “Turn 5.0 degrees default 0”). Turn (degrees) in the panel reads the same. Ctrl holds the number to whole steps of 5 degrees, so a drag cannot land between them.
It worked whenTurn (degrees) in the panel is no longer 0: it is a whole number of steps of 5, and the label beside the mark gives the same number. Yours will differ from the picture’s 5.
If it goes wrongAnother number changed: you pressed on another handle: press Ctrl+Z once, as in P4-02, step 5, rest the pointer first, read the label, and try again.
Step 8. Press Fewer claws: six claws again
WhereThe 3D view, the buttons on the model.
DoClick the button Fewer claws once.
You should seeSix claws stand round the stone again, in place of four pairs. The turn stays as you left it: the claws are turned. Fewer claws goes back one step along the row, four pairs, six claws, four claws.
It worked whenYou count six claws, turned.
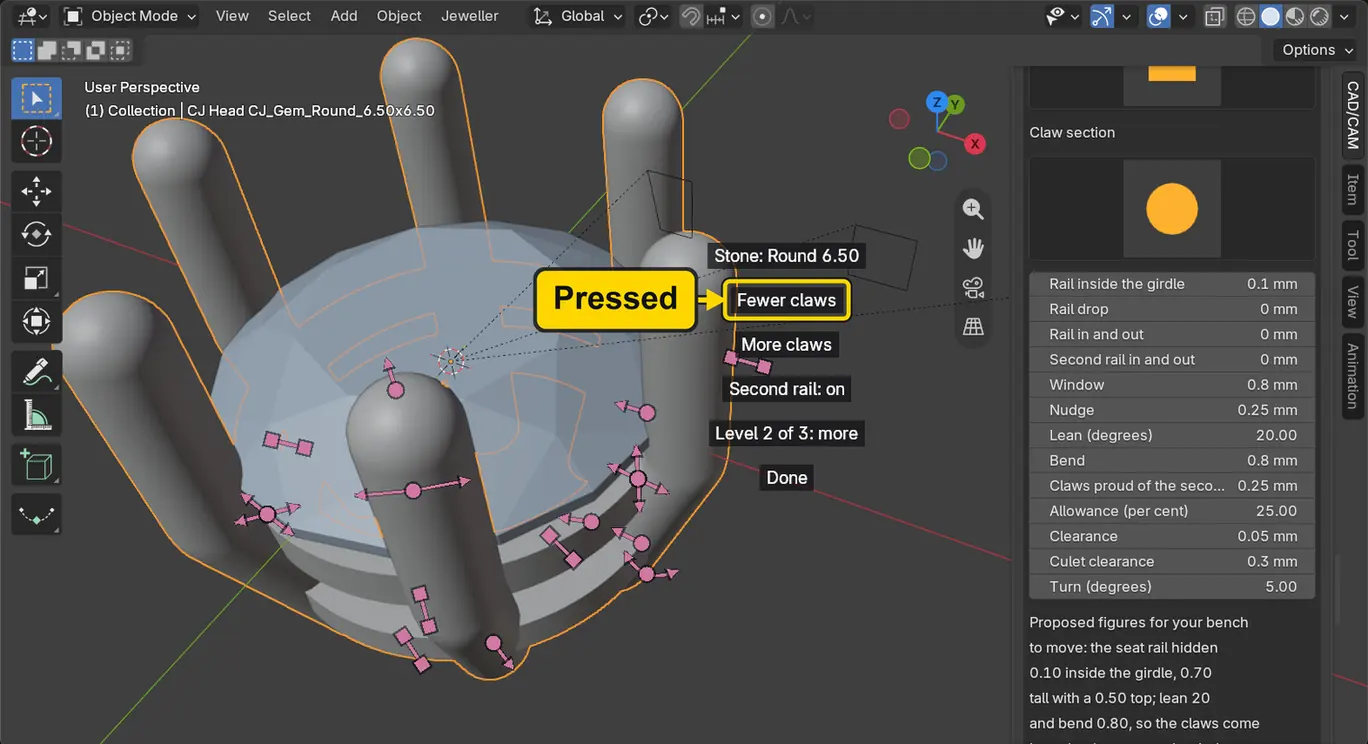
Step 9. Press Fewer claws again: four claws
WhereThe 3D view, the same buttons on the model.
DoClick Fewer claws once more.
You should seeFour claws stand round the stone, turned the same way. Four claws is the fewest the button goes to.
It worked whenYou count four claws, turned.
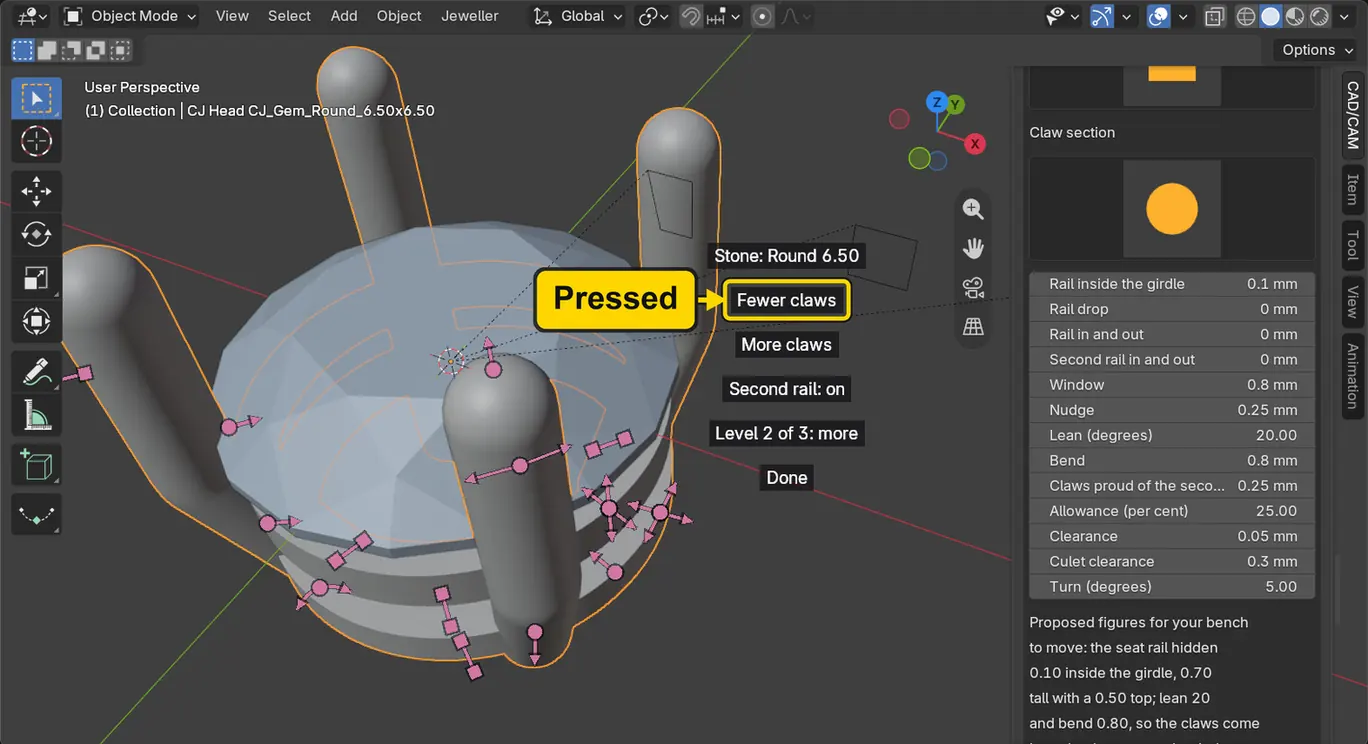
Step 10. Press Fewer claws once more, at four
WhereThe 3D view, the same buttons on the model.
DoClick Fewer claws once.
You should seeNothing changes. The head still has four claws, and the buttons on the model have not changed. This is the fewest the head has, and More claws stops in the same way at four pairs.
It worked whenYou still count four claws.
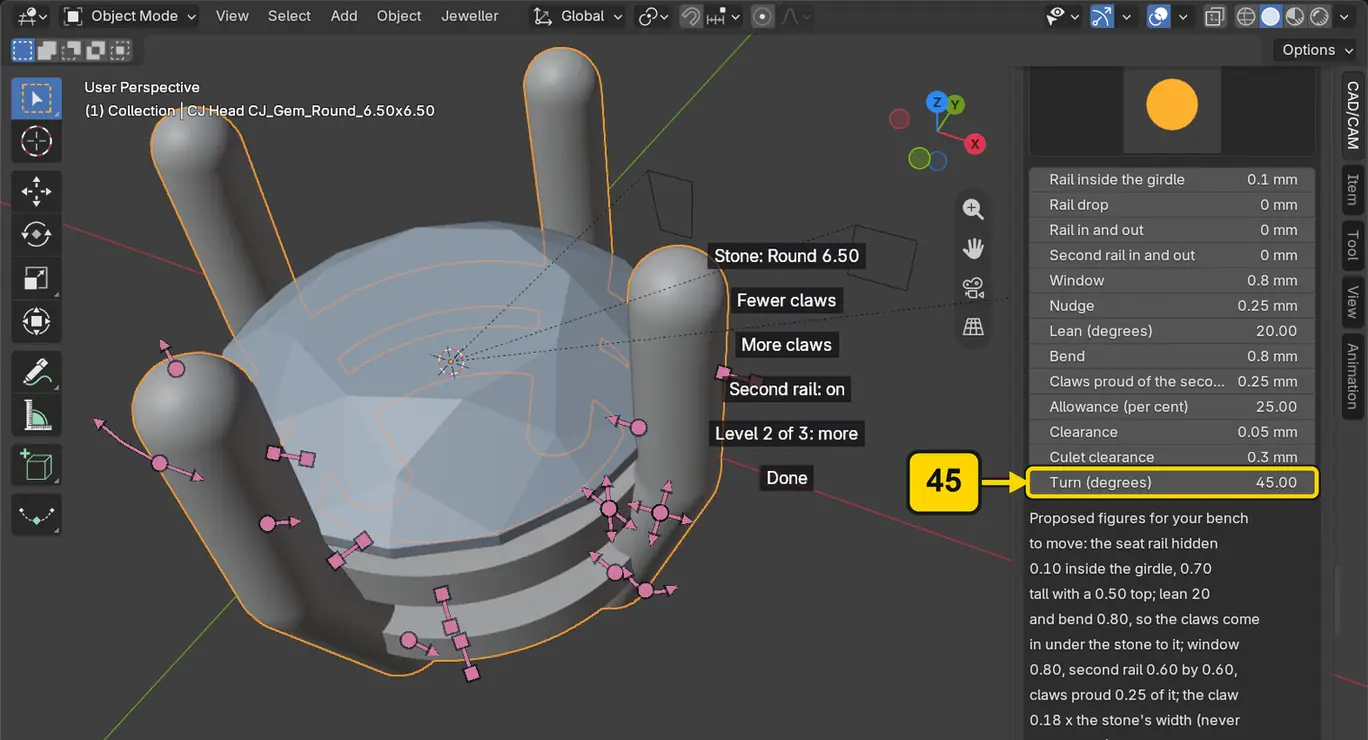
Step 11. Type the turn: 45 degrees
WhereThe sidebar, the Head Builder panel, the row Turn (degrees) in More.
DoClick the middle of Turn (degrees) once, type the number, and press Enter.
Type45
You should seeThe four claws stand along the 3D view’s own directions: one toward the top, bottom, left and right when you look straight down (the next step does). A turn of 45 degrees takes each claw from a diagonal to one of those, and the Turn mark on the model rests at the same place. Typing gives an exact number where a drag lands near it. The directions are the 3D view’s own, no rule for a ring: on a ring you choose the turn to suit where the shank meets the head.
It worked whenTurn (degrees) reads 45.
Step 12. Look straight down on the head
WhereThe 3D view: move the pointer over it.
DoLook at the picture. To look straight down yourself, click the blue Z ball on the small coloured axes at the top right of the 3D view.
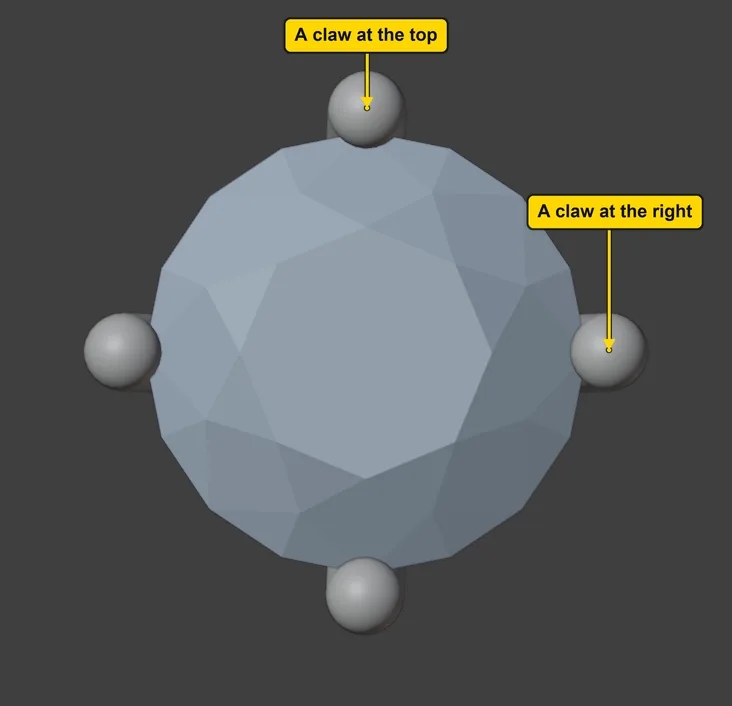
You should seeFrom above you see the stone and four claws, one at the top, bottom, left and right of it, and no rail. The rails are under the stone. The picture hides the handles.
It worked whenYou see one claw at the top, bottom, left and right of the stone.
Step 13. Save your work
WhereThe 3D view: move the pointer over it.
DoPress Ctrl+S.
You should seeBlender writes your copy at once, with no question, because the file already has a name. An asterisk, *, in the title bar marks changes that are not saved, and it goes now. Save your work and get it back (P0-12) says more about saving.
It worked whenThe title bar begins my-claws and carries no asterisk.
No picture: the only change is a message on the status bar, and it fades.
Check your result
| What to read | Where | What it should say |
|---|---|---|
| The claws | The 3D view, looking straight down (the blue Z ball of the small coloured axes, at the top right of the 3D view) | Four claws, one at the top, bottom, left and right of the stone: the set is turned 45 degrees from where it began |
| Turn | The CAD/CAM tab, Setting section, Head Builder panel, More, Turn (degrees) | It reads 45 |
| The Turn handle | Rest the pointer on the curved mark round the stone | Its label reads “Turn 45.0 degrees default 0” |
| The level button | The buttons on the model, under Fewer claws and More claws | It reads “Level 2 of 3: more” |
| Over the table | The Head Builder panel, under the Claws and Rail pictures | It reads 2 mm: the bench’s number, as it began |
Try it yourself
Open your copy again, and press More claws once to get six claws. Then drag Turn and see where the six claws go. Press More claws again to get the four pairs, and drag Gap in a pair slowly to its far end: you will see where it stops.
What you learned
- Four buttons on the model change the head: Fewer claws and More claws step through four claws, six claws and four pairs, and the level button shows the next set of handles.
- Gap in a pair only exists while the claws are in pairs. Turn turns the whole set about the stone, in degrees, and the panel’s More rows read what the handles read.
- The head is live, so every press makes it again with the same bench numbers: 2 mm over the table and one claw diameter.