
What you will make
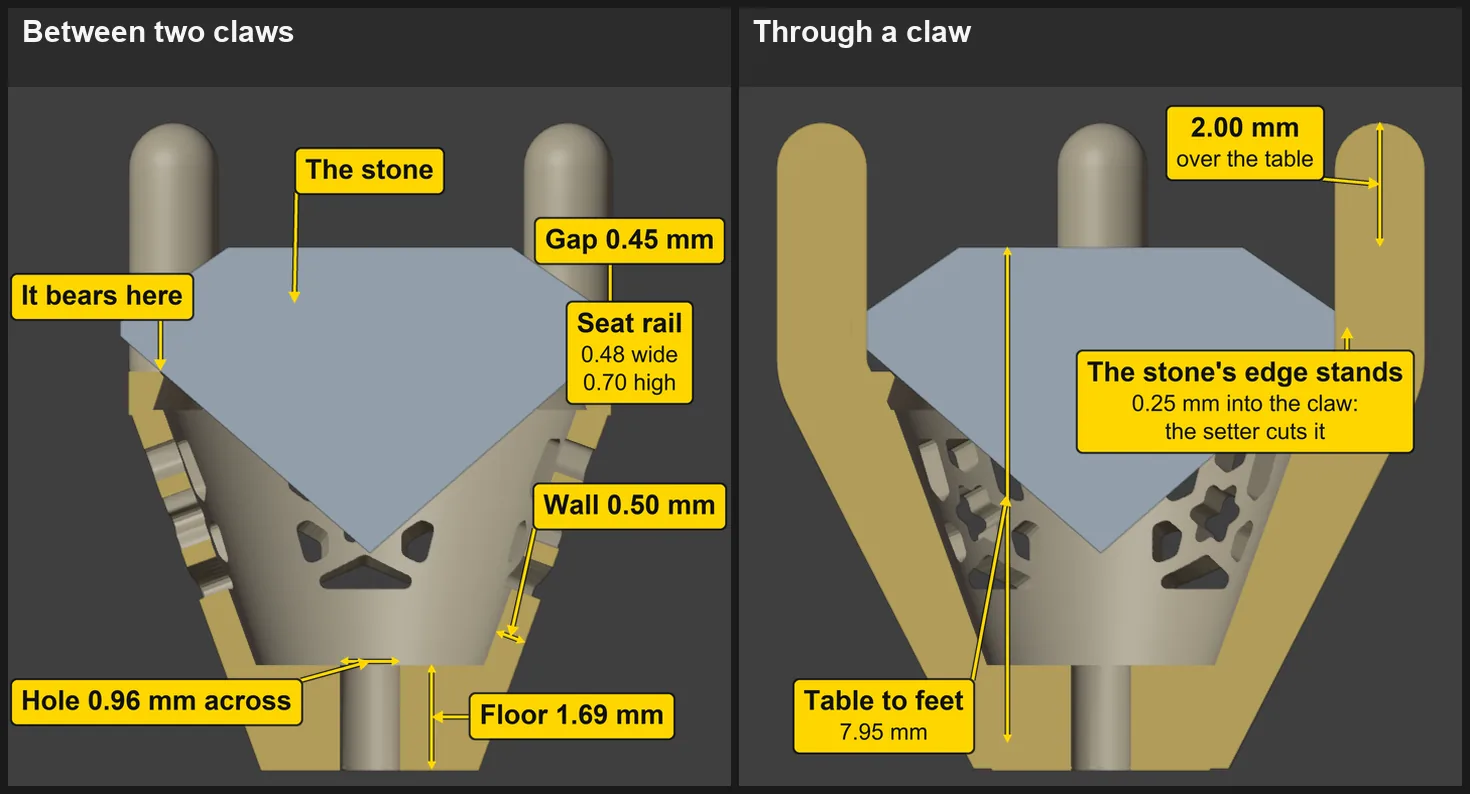
A pierced cup under a round stone 8.00 mm across: four claws, a seat rail, and a wall that runs down from the rail to a small foot at 20 degrees from the stone’s axis, closed by a floor with a small hole, and cut with a star pattern (7 openings to a side). It is all one closed body, a mesh with no gaps, that weighs 1.64 g in 18ct yellow gold. A jeweller picks a cup to let light reach the stone from below and to carry a pattern you can see from the side. It ends in four loose feet, ready to go into a shank, the ring’s band.
The wall is 0.50 thick and its ribs are 0.25, with frames of 0.25 at the claws and 0.40 at the rails. The stone bears on the seat rail and the claws, not on the wall, so this page treats the wall as pattern metal. It is finer than the 0.80 a bench wants where metal carries a load, and than the 0.60 least. No caster has passed this file: show yours before you cast it. Your caster is the person who casts the piece in metal, and will look at the thin points, the ribs and the wall. No caster yet? Treat these files as practice, not as files to send.
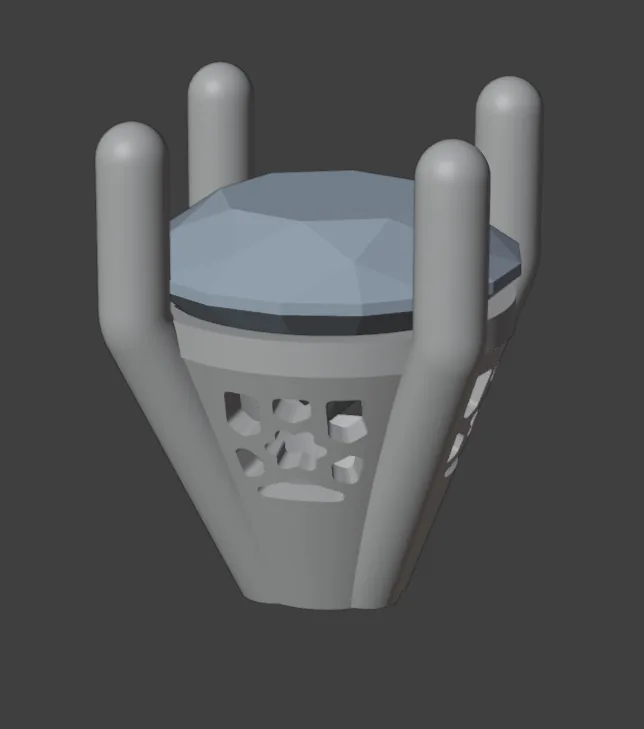
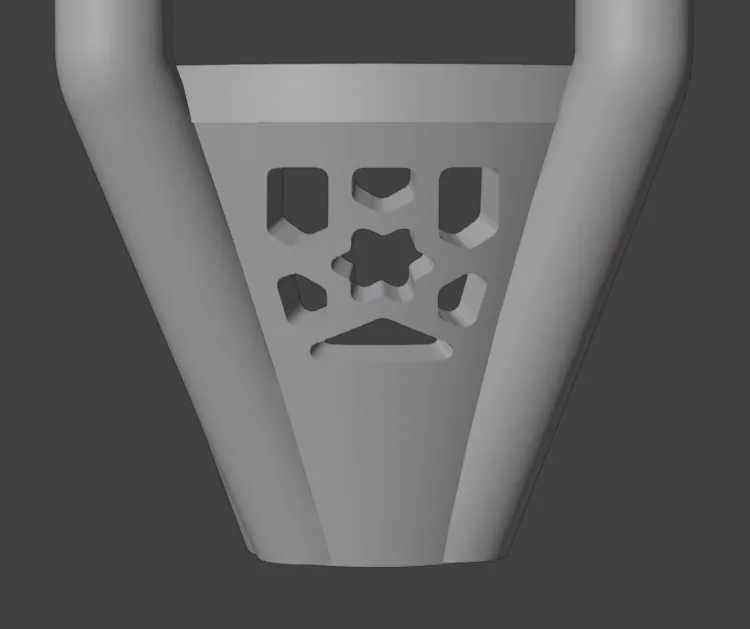
About 25 minutes.
Files
- p10-07-start.blend (103 KB): open this one to begin.
- p10-07-finished.blend (1.09 MB): the result, to compare with yours.
Both were made in Blender 5.2.0.
Before you start
- You have done Part 0, Blender from nothing.
- You have met the box at the bottom left of the 3D view, in Pierce a plate from an outline (P10-01). This page reminds you where it is.
- The add-on, CAD/CAM Jeweller 2.22.0 or later (Preferences > Add-ons shows the version), is installed, and its CAD/CAM tab is in the sidebar. Put the downloaded files in one folder you can find again. The start file is already in millimetres.
Build it
Step 1. Open the start file, and save your own copy
WhereBlender’s top menu bar, File > Open, then File > Save As.
DoOpen p10-07-start.blend. Then choose File > Save As and give it a name of your own, so that the start file stays clean.
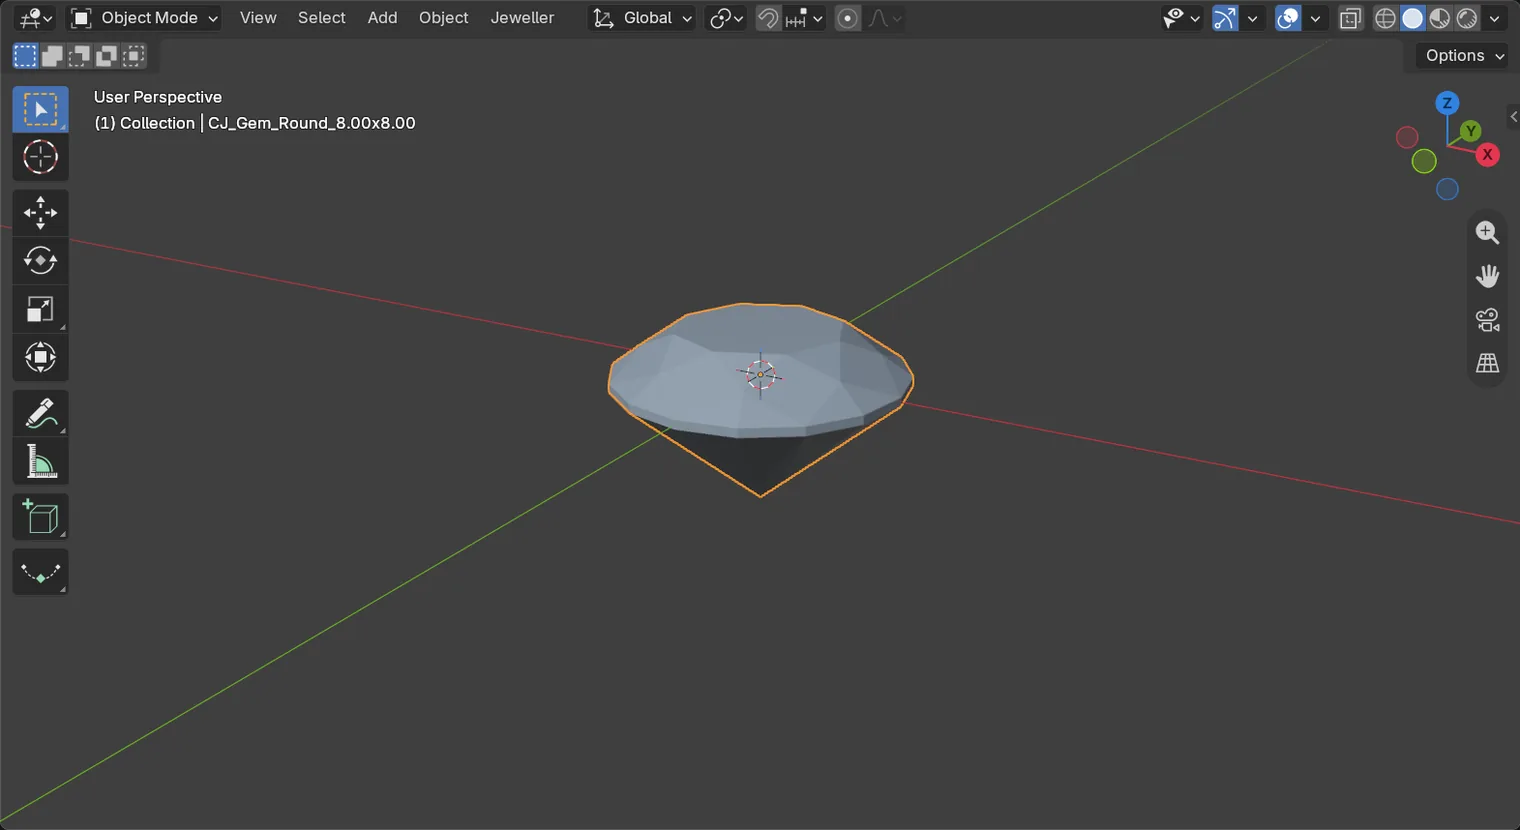
You should seeOne round stone, 8.00 mm across, at the middle of the grid, in a pale blue-grey of its own. Its orange outline means it is already selected. It was made in the Gems section, and it is drawn with few facets: it stands in for the real stone.
It worked whenThe stone is the only thing in the 3D view.
Step 2. Find the three sections
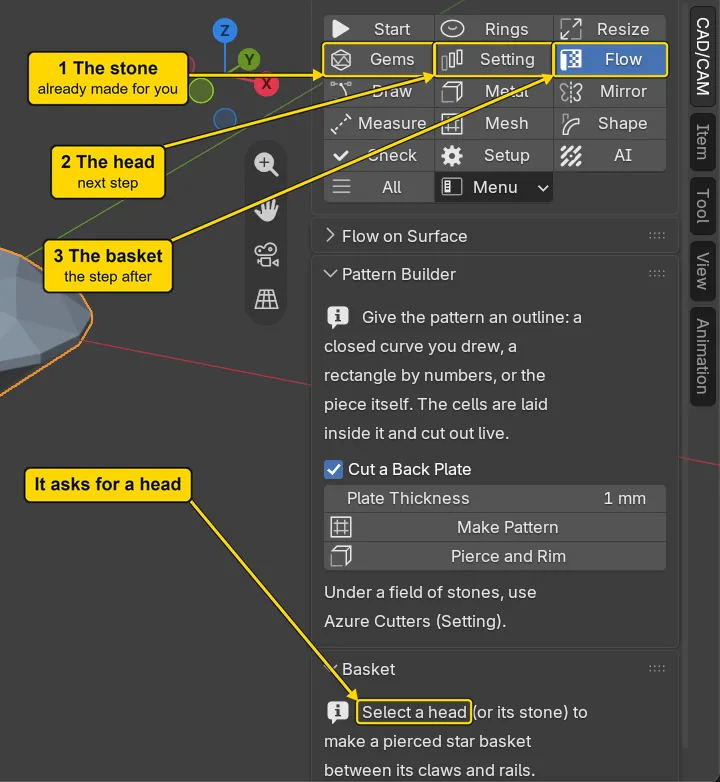
WhereThe sidebar at the right of the 3D view (press N with the pointer over the 3D view if it is shut), the CAD/CAM tab.
DoClick Flow in the section bar, the small word buttons. Then click the words Flow on Surface once to fold that panel: it shuts up to its title.
You should seeThe Basket panel, and in it only this line: “Select a head (or its stone) to make a pierced star basket between its claws and rails.” A stone alone is not enough yet: step 3 makes the head.
It worked whenYou can read that line without scrolling.
Step 3. Make the head
WhereThe section bar, then the Head Builder panel.
DoClick Setting, then press Make 1 Head (marked 1), with the stone still selected.
You should seeFour claws and two rails appear round the stone. The small drawing under Claws in the panel shows them as four small bumps on its ring. Three small outlines also appear beside the head, joined to it by dotted lines: they are the cross-sections of the claw and of the two rails, which the head is built from. Leave them. Leave Claw at 1.5 mm, which is 1.45 shown to one place, and Over the table at 2 mm: the table is the flat top of the stone, and this add-on’s rule for production stands the claws 2.00 above it. The cup will change that number in step 5, and step 11 puts it back.
It worked whenThe words at the top left of the 3D view end in “CJ Head CJ_Gem_Round_8.00x8.00”.
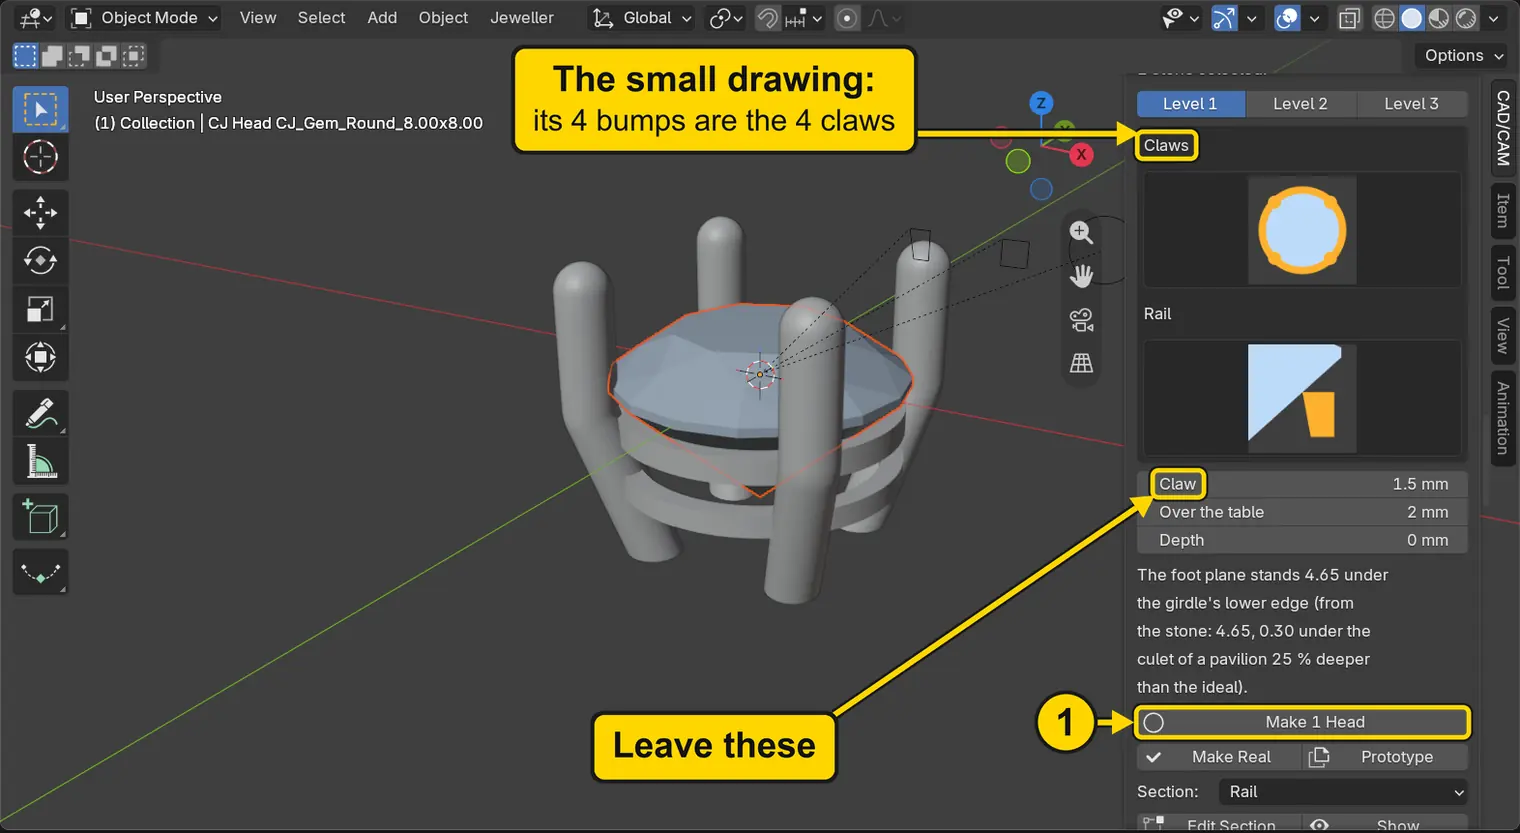
If it goes wrongThe button reads Make Heads and the panel says Select the stones: nothing is selected. Click the stone in the 3D view.
Step 4. Meet the Shape of a basket
WhereThe section bar, then the Basket panel.
DoClick Flow. Read the two choices above Make Basket: Cup and Tall head. Do not press yet.
You should seeCup is lit: it is the default. Cup angle reads 20 under it, the lean of the cup’s wall in degrees from the stone’s axis, from 12 to 24. The panel’s own words say what each Shape is. Cup: the wall runs from under the seat rail down to a small foot, closed by a floor with a hole, and the press sets the head’s numbers for it. Tall head: the wall between the seat rail and the second rail, as the add-on made it before the cup.
It worked whenYou can read Cup, Tall head and Cup angle without scrolling.
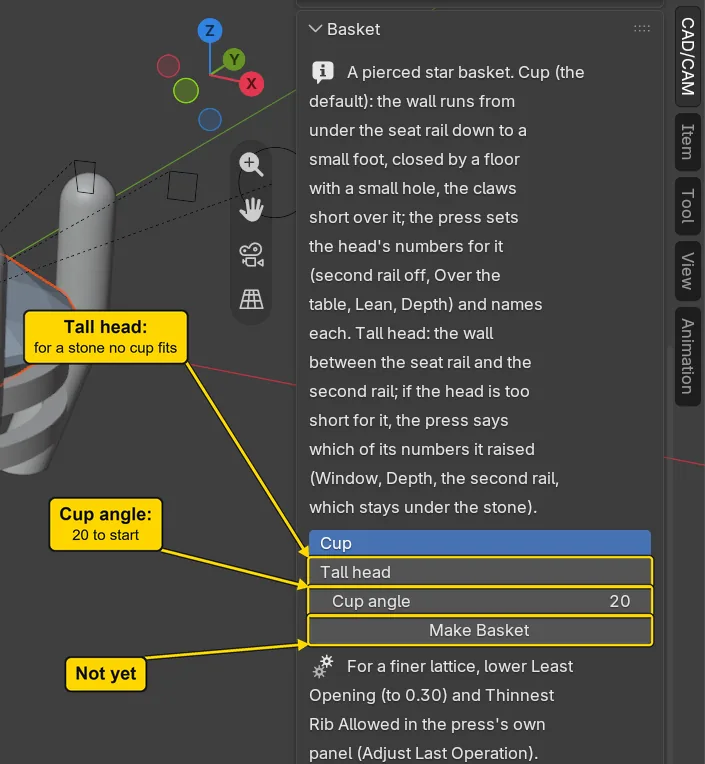
Step 5. Press Make Basket: the cup
WhereThe Basket panel, with Cup lit.
DoPress Make Basket. The press takes about a minute.
You should seeThe head’s claws shorten and lean, the second rail goes, and a pierced cup fills the head under the stone. The sentence opens: “Head: Second rail off, Over the table 2.00 to 0.40, Lean 20 to 27, Depth 0.00 to 6.53, for the cup.” In plain words: the cup sets the head’s numbers itself, and says which it changed. Then it describes the cup: “A cup of 20 degrees from the rim (r 3.87) to a foot of r 1.90, 5.96 deep, closed by a floor 1.26 thick with a 0.96 hole; the claws stand 0.40 over the table and lean 27 degrees.” The blue marks and the word “Done” on the model are handles: they change the basket’s numbers by dragging, so leave them alone for now.
It worked whenThe sentence goes on to “7 openings a side”, and “One body, closed”.
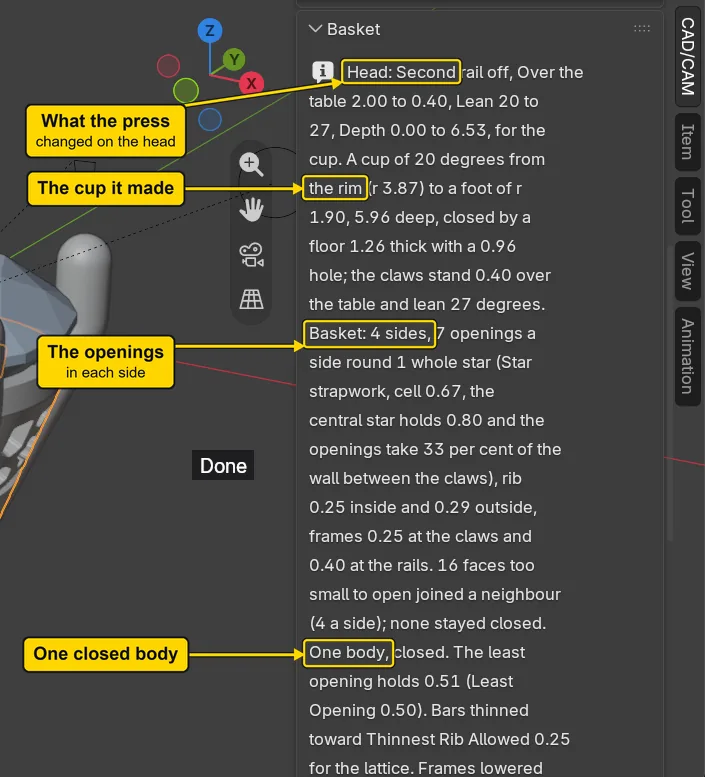
Step 6. Learn the words on the model
WhereThe 3D view.
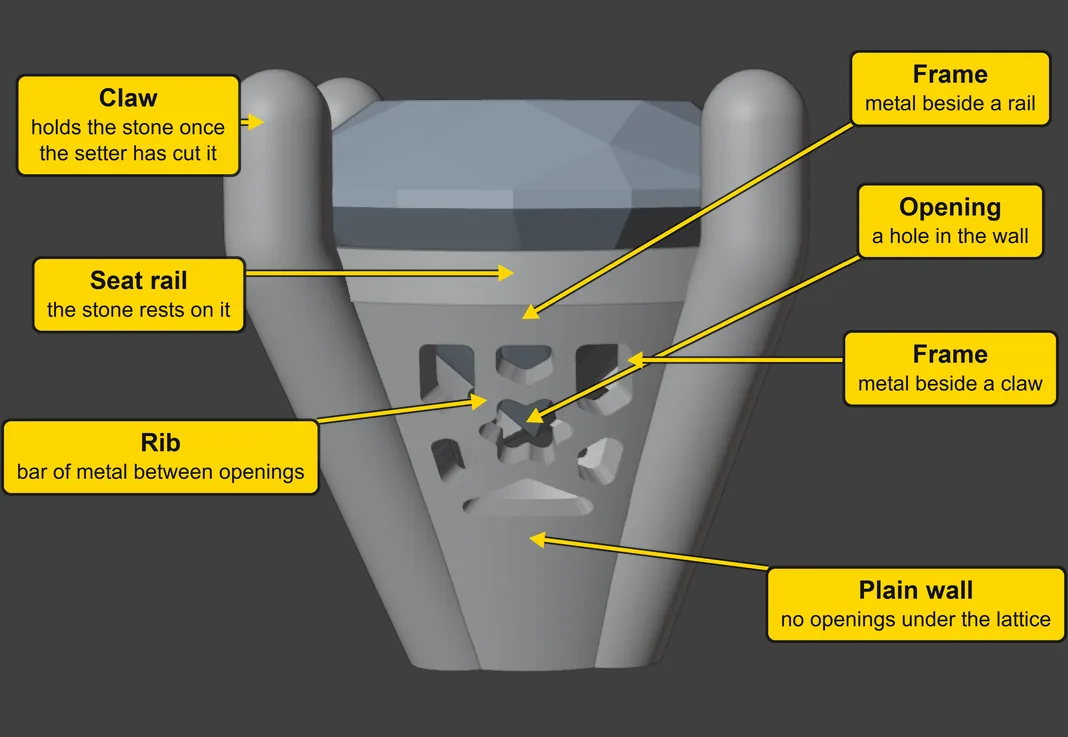
DoClick the green ball with no letter on the small coloured axes at the top right of the 3D view: you look at the cup from the front.
You should seeThe parts named in the picture. Now read the sentence again with these words. “frames 0.25 at the claws and 0.40 at the rails”: the metal left beside the claws and the rails. “rib 0.25 inside”: a rib, the bar of metal between two openings, at its thinnest. “7 openings a side”: 7 holes in each of the 4 sides. “16 faces too small to open joined a neighbour”: a face too small to hold a hole of its own is joined to the one beside it across a rib, and the two make one opening.
It worked whenYou can point to a claw, a rail, an opening, a rib and a frame on your own model.
Step 7. Take the cup back with Ctrl+Z
WhereThe 3D view, with the pointer over it.
DoPress Ctrl+Z once.
You should seeThe basket has gone and the head is as it was: one Ctrl+Z undoes the basket and every number the press set. Use it when you want another Shape or another look, and keep the head’s numbers from before.
It worked whenMake Basket (marked 1) is back on the panel, and the head’s Over the table is back to 2.00.
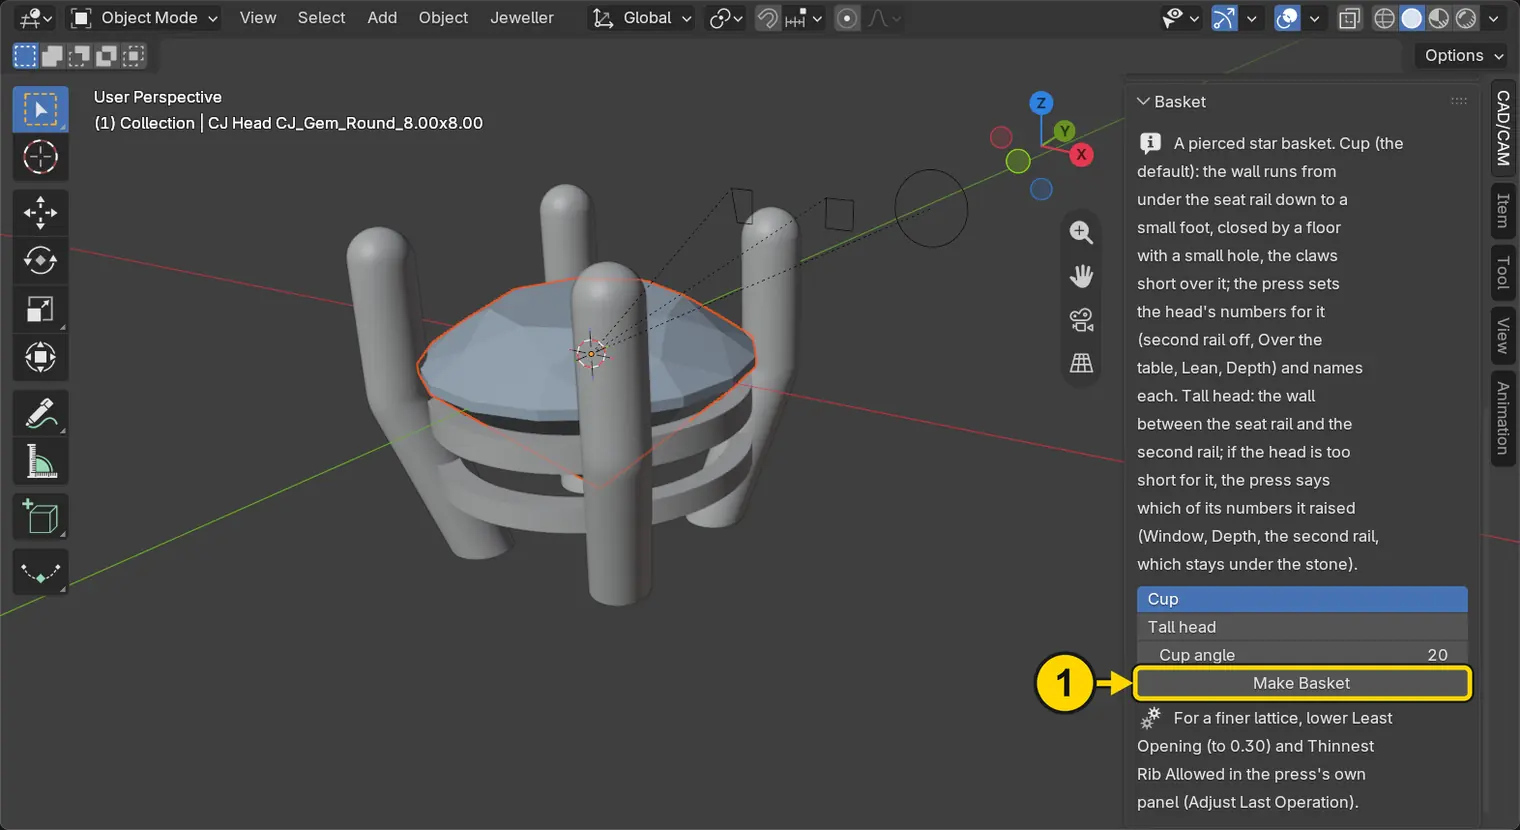
Step 8. Press Make Basket again, and open the box
WhereThe Basket panel, then the bottom left corner of the 3D view: Blender’s Adjust Last Operation box, from here the box at the bottom left. It is shut, and reads Make Basket.
DoPress Make Basket with Cup lit. Then click the words Make Basket on that box.
You should seeThe same cup as in step 5. The box opens upwards, with seven rows. It holds this press’s own settings, and it lasts only until your next press: Shape and Cup angle come first, then Pattern, Rib, Cell, Thinnest Rib Allowed and Least Opening, the smallest hole the basket may keep.
It worked whenShape reads “Cup”, Pattern reads “Star” and Least Opening reads “0.5 mm”.
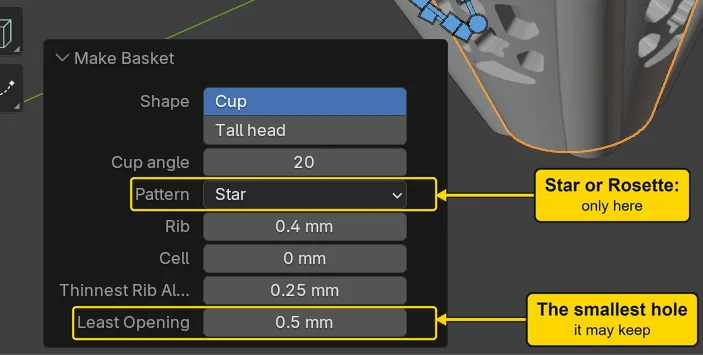
Step 9. Compare Star, Rosette and Tall head
WhereThe box. Pattern is a drop-down: click it and choose. Cup and Tall head are buttons in the Shape row: click one.
DoMake each change in the table below, in order, and look at the wall each time. Each change takes up to a minute. The last one puts the box back to Cup and Star, the add-on’s own start.
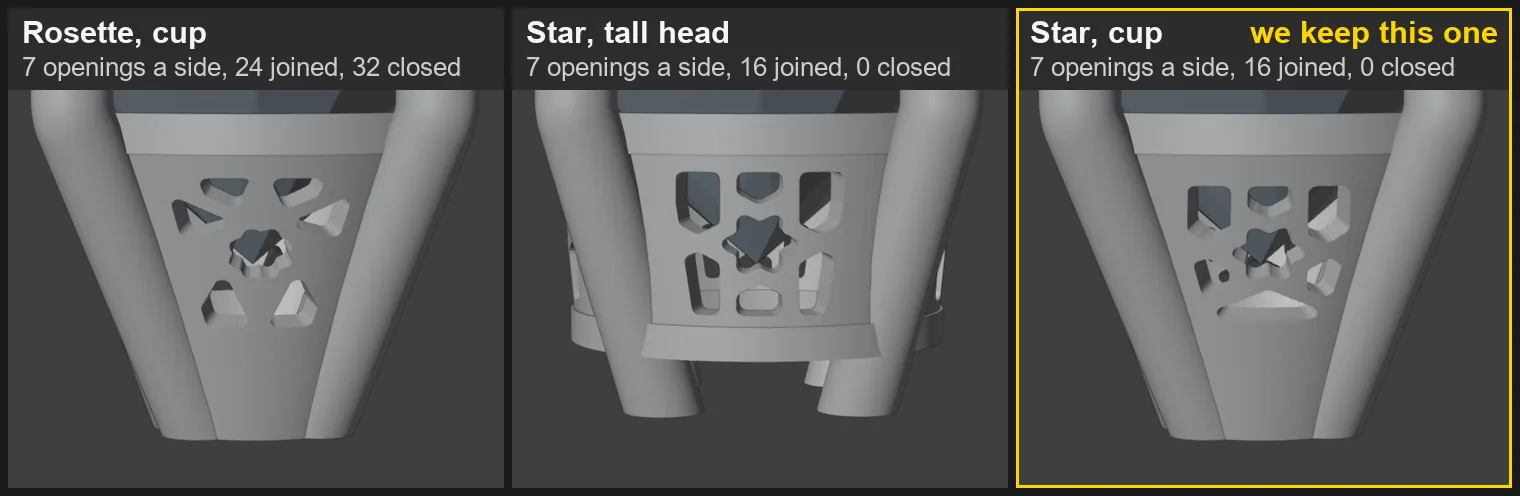
You should seeThe sentence’s count changes, as in the sheet below. Star is what the add-on starts with: it is the first row of the table. The Rosette reads 7 openings a side as well, but with 24 faces joined and 32 left closed, where the Star leaves none closed. The Tall head is the other Shape: the wall stands between the head’s two rails, as the add-on made it before the cup, and it reads 7 openings a side here. The page goes on with the Cup and Star.
| In the box | The sentence reads |
|---|---|
| Cup and Star, as it opens | “7 openings a side, 16 joined, 0 closed” |
| Choose Rosette | “7 openings a side, 24 joined, 32 closed” |
| Choose Star, then Tall head | “7 openings a side, 16 joined, 0 closed” |
| Choose Cup | “7 openings a side, 16 joined, 0 closed” |
It worked whenShape reads “Cup” and Pattern reads “Star”.
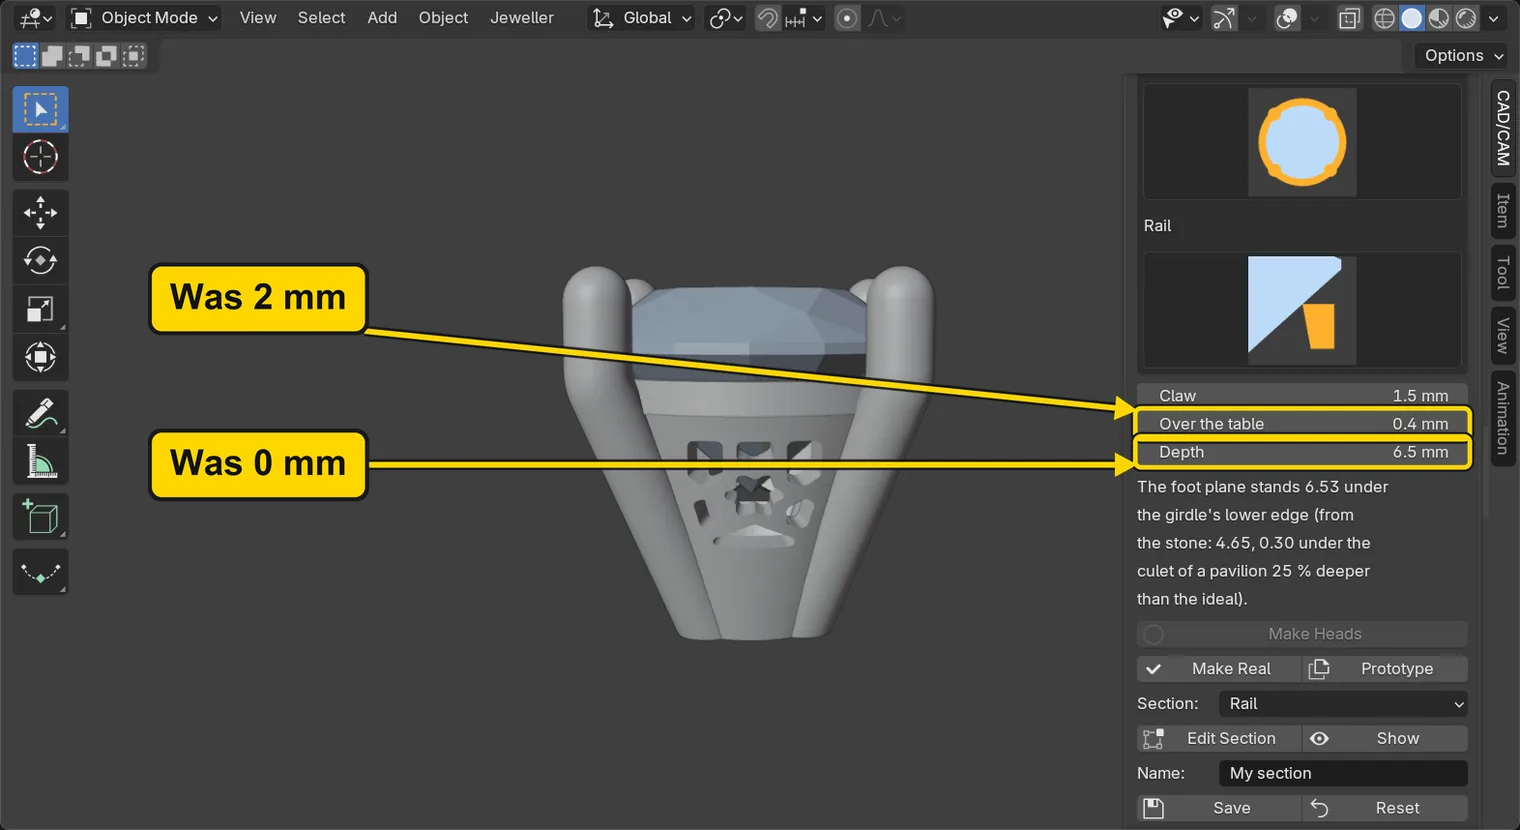
Step 10. Select the head, and read what the press changed
WhereThe 3D view, then Setting, the Head Builder panel.
DoClick one claw, the head’s own piece. Then click Setting and scroll the panel until you can read Over the table and Depth.
You should seeOver the table reads 0.4 mm (it was 2 mm) and Depth reads 6.5 mm (it was 0: the press chose the depth that stands the cup’s foot). The panel shows one place, where the sentence in step 5 gave 0.40 and 6.53. That sentence named two more: Lean went from 20 to 27, and the second rail went. The panel’s own line under the numbers says where the foot plane stands now.
It worked whenOver the table reads 0.4 mm.
Step 11. Stand the claws 2.00 over the table
WhereSetting, the Head Builder panel.
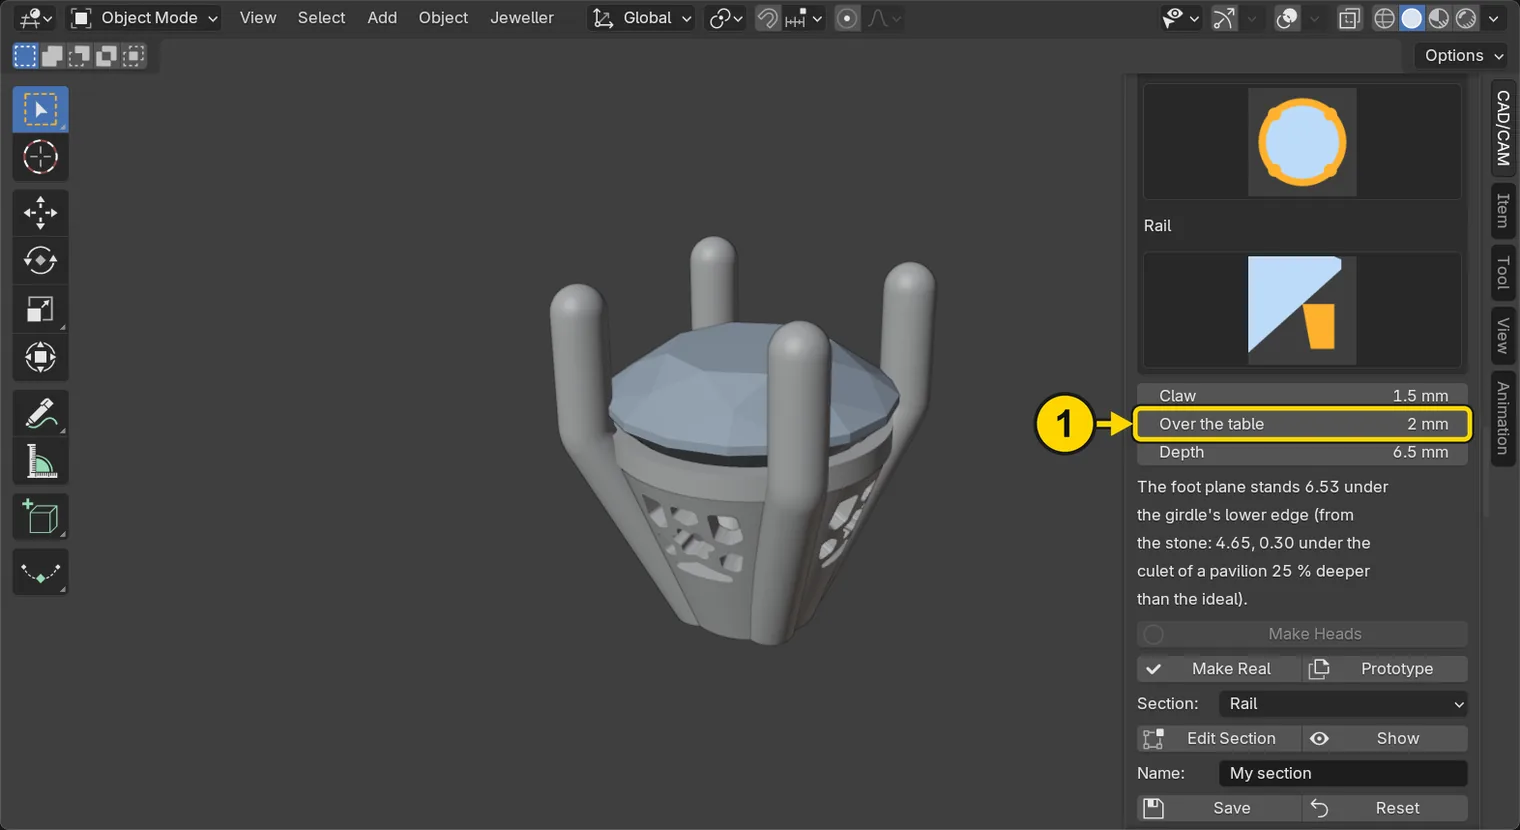
DoClick Setting. Click the middle of Over the table (marked 1) once, type the number, press Enter.
Type2.00
You should seeThe claws grow taller, to the height the bench wants, and the basket follows the head by itself. The cup keeps its wall and its foot: only the claws change. The head is still selected, so the panel shows its numbers. The claws stay as round as they are thick, 1.45 each way.
It worked whenOver the table reads “2 mm”.
Step 12. Press Rebuild Basket, to meet its box
WhereThe 3D view, then the Basket panel: click Flow. With the basket selected, the panel shows Rebuild Basket and Make Basket Real.
DoThis step only shows a second box: you may skip it. Click the cup’s wall below its openings, press Rebuild Basket, then open the box at the bottom left if it is shut.
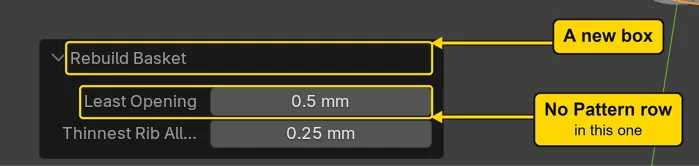
You should seeThe wall is laid again, the same: the claws’ change in the last step had laid it again by itself. The box has changed: it holds only Least Opening and Thinnest Rib Allowed, with no Shape or Pattern row. Press Rebuild Basket when the panel asks for it, after the stone, its cut or the rails have changed.
It worked whenThe box is headed Rebuild Basket, and has no Pattern row.
Step 13. Press Make Basket Real
WhereThe 3D view, then the Basket panel: click Flow, then look under the cup’s sentence.
DoClick the cup’s wall, below its openings, to select the basket. Then press Make Basket Real. It takes a minute or more.
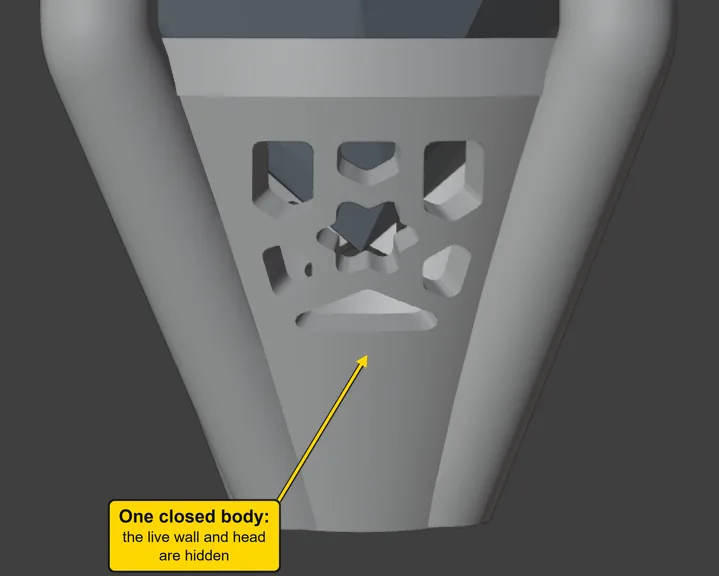
You should seeThe press joins claws, seat rail and cup into one new object, and hides the live wall and the live head, the ones a number can still change: they stay in the file. What still shows is the stone, the new metal, a thin line round the stone and two small outlines beside it. The next step hides those.
It worked whenThe words at the top left of the 3D view end in “CJ Basket Head”. The status bar says “Basket made real” as well, but its message fades: those words stay.
If it goes wrongMake Basket Real is not on the panel: you clicked away from the basket. Press Ctrl+Z once: the selection comes back, and the button with it.
Step 14. Hide what stays showing
WhereThe 3D view. To look straight down, click the blue Z ball on the small coloured axes at the top right of the 3D view, and keep the pointer over the stone.
DoHold Shift and click the middle of the stone. Then press Shift+H.
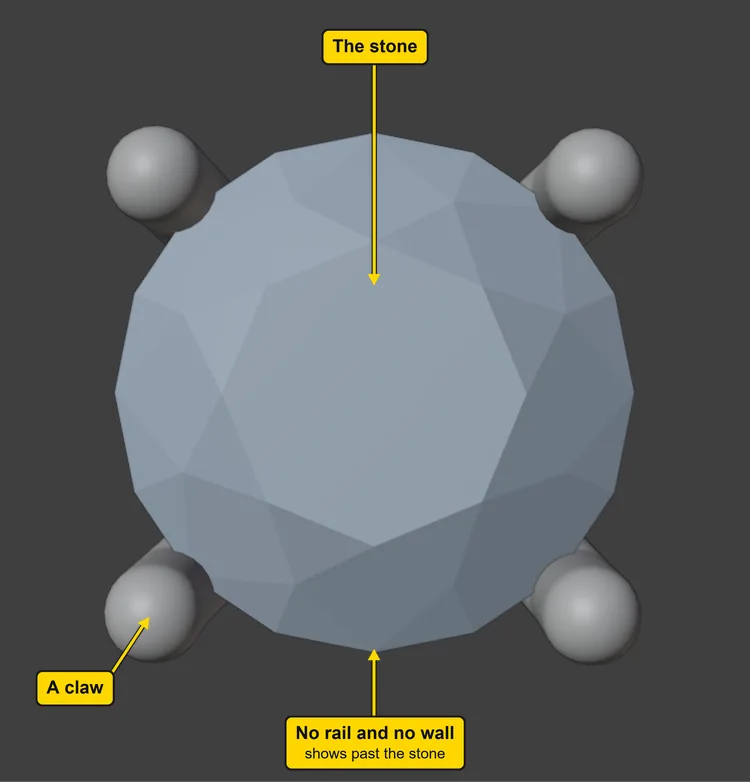
You should seeShift+click adds the stone to the metal, so both are selected. Shift+H hides everything that is not selected: the two small outlines go, and stay in the file. The wall and the head went with the last press. A thin line round the stone stays: it does no harm. From up here you see what a bench looks for: only the stone and the claws.
It worked whenYou cannot see the rail or the wall past the stone’s edge.
If it goes wrongThe click picks up CJ Head instead of the stone: you clicked from an angle, with a claw behind the stone in the line of the click. Look from straight above and click again.
If it goes wrongYou hid too much, or the wrong things: press Alt+H. Everything comes back, and you can start this step again.
Step 15. Last look: Shade Auto Smooth on the metal alone
WhereThe 3D view, back to the front (click the green ball with no letter), then the Object menu in the bar at the top of the 3D view.
DoClick a claw, so that only the metal is selected. Then click Object, then click Shade Auto Smooth.
You should seeMake Basket Real left the metal looking soft and melted. That look goes: the claws read round, the openings stay crisp, and the stone keeps its facets. This changes the drawing, not the metal.
It worked whenThe words at the top left of the 3D view end in “CJ Basket Head”, and the window edges look sharp, as in the picture.
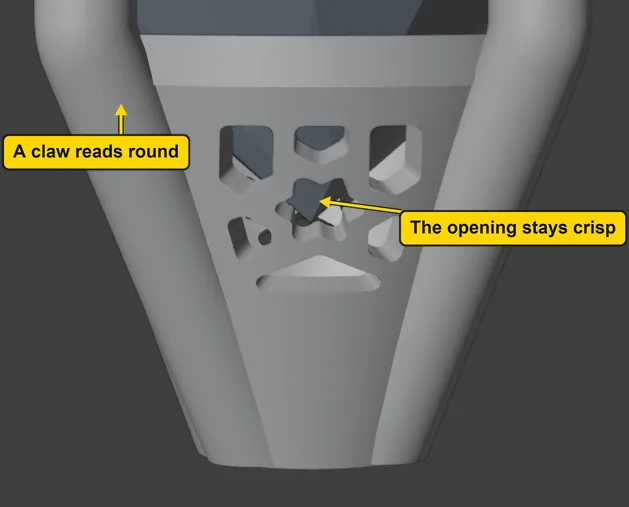
If it goes wrongThe stone has gone soft too: it was selected as well. Press Ctrl+Z once, click a claw alone, and choose Shade Auto Smooth again.
Step 16. Read its weight
WhereThe section bar, then the Reports & Checks panel.
DoClick Check in the section bar, scroll down to the block headed Weight, tick Selected Only and press Report Weight.
You should seeThe Weight Report window opens over the screen. It names one part, “CJ Basket Head”, in 18ct yellow, 105.86 mm3. Read only the line “TOTAL”: the others are for cost and casting, later. Then press Esc with the pointer over the 3D view.
It worked whenThe line “TOTAL” reads “1.64 g”, and Esc shuts the window.
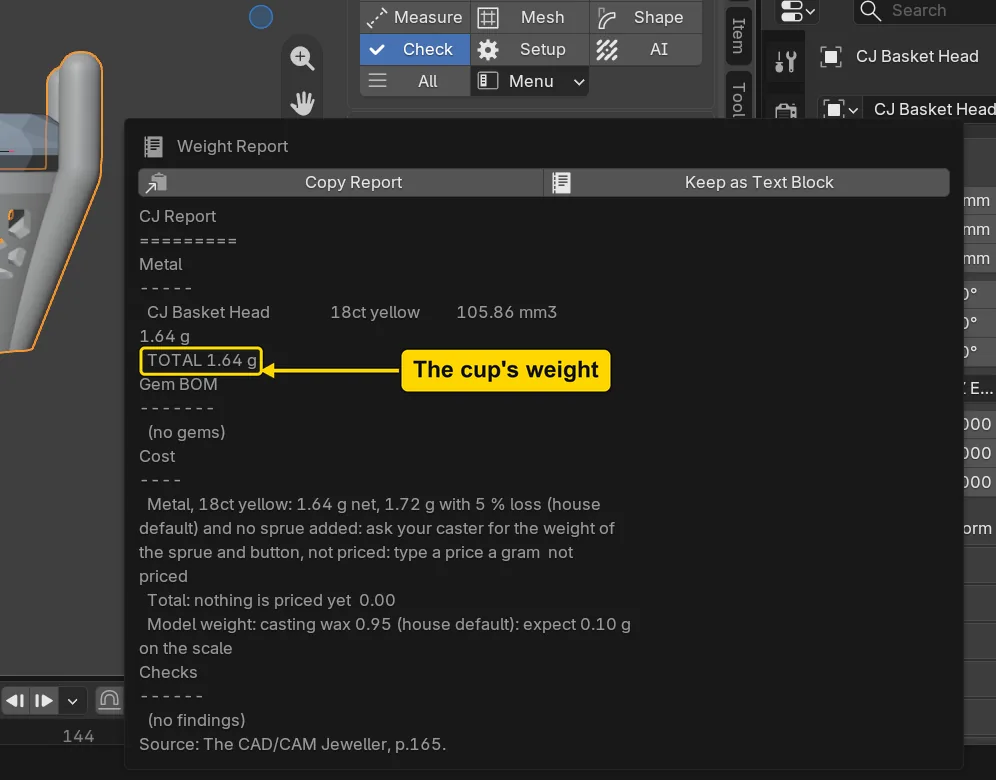
If it goes wrongThe window says “(no metal objects)”: nothing is selected, though the words at the top left still name the metal. Press Esc, click a claw, and press Report Weight again.
Step 17. Save your copy with Ctrl+S
WhereThe 3D view, with the pointer over it.
DoPress Ctrl+S. It saves the copy you named at step 1.
No picture: nothing on the screen changes.
Check your result
| What to read | Where | What it should say |
|---|---|---|
| Its weight | The Weight Report window: Check section, Reports & Checks, Report Weight, with Selected Only ticked and the metal selected | “TOTAL 1.64 g”, from 105.86 mm3 |
| Its size | The Item tab on the sidebar’s edge, Dimensions, with the metal selected | X 7.79 mm, Y 7.79 mm, Z 10.38 mm: Z runs from the claws’ feet to their tips |
| What shows | The 3D view | The stone in its own colour and the one metal body. The wall and the head are hidden, and stay in the file |
Try it yourself
Open the start file as in step 1, do steps 2 to 8, then in the box choose Rosette in place of Star: 7 openings a side, 24 joined. Or choose Tall head in the box, with Star: the wall stands between the two rails, and it reads 7 openings a side.
What you learned
- A basket takes three sections: the stone in Gems, the head in Setting, the basket in Flow.
- Make Basket’s first choice is its Shape. Cup, the default, sets the head’s numbers itself and says which. Tall head keeps the head’s second rail, and is the choice for a stone where no cup fits.
- Star or Rosette and Least Opening are only in the box at the bottom left: 0.50 is the add-on’s starting number, and it lasts only until your next press.
- After Make Basket Real, hide what stays showing, then use Shade Auto Smooth on the metal alone.