
What you will do
You will install Blender, add CAD/CAM Jeweller to it from its zip file, answer the add-on’s one-time Set Up window, and finish with the add-on’s CAD/CAM tab open. You need to know nothing about Blender for this: every press is shown.
About 10 minutes.
Files
No exercise file. You need the add-on’s zip: the download email from the add-on’s page holds a button that gives it. Do not unzip it: Blender reads the zip itself.
Before you start
- A computer that runs Blender 5.2: What you need says more.
- The add-on’s zip, as it came, in your Downloads folder. The file’s name begins cadcam_jeweller and ends .zip, and the numbers in between may differ from the pictures.
- These pages were made on Windows. On a Mac, Cmd stands for Ctrl and Option for Alt. They have not been run on a Mac or on Linux. The pictures show Blender’s words at 1.5 times their usual size, so yours may look smaller, and your folders will have other names.
Build it
Step 1. Install Blender
WhereYour web browser, at blender.org.
DoIn your browser, open https://www.blender.org/download/releases/5-2/ and press Download Blender 5.2 LTS. Run the installer it gives you, keeping what it suggests. Blender’s main page may offer you a newer number: these pages were made on 5.2. Then start Blender.
You should seeBlender’s window opens, with a box in its middle headed Quick Setup.
It worked whenBlender’s window stands open.
No picture: this happens in your web browser, before any window of Blender’s, and a web page changes. The next step shows what you should have.
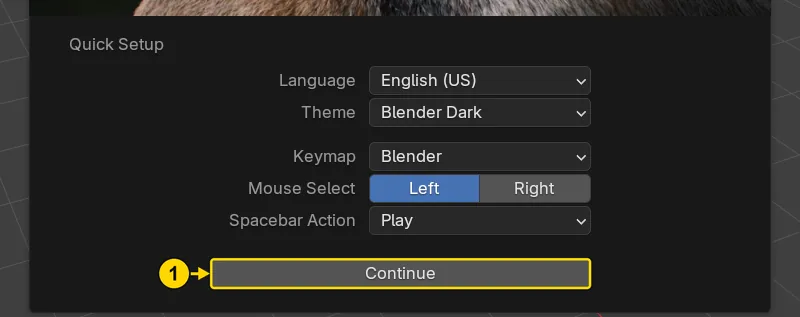
Step 2. Answer Blender’s first question
WhereThe box in the middle of Blender’s window. It only comes the first time Blender starts.
DoLeave everything in it as it is, and press Continue (marked 1).
You should seeThe box changes: a list of new files and places to start. Leave Mouse Select on Left, because every click in this workbook expects it.
It worked whenThe box now shows a list headed New File.
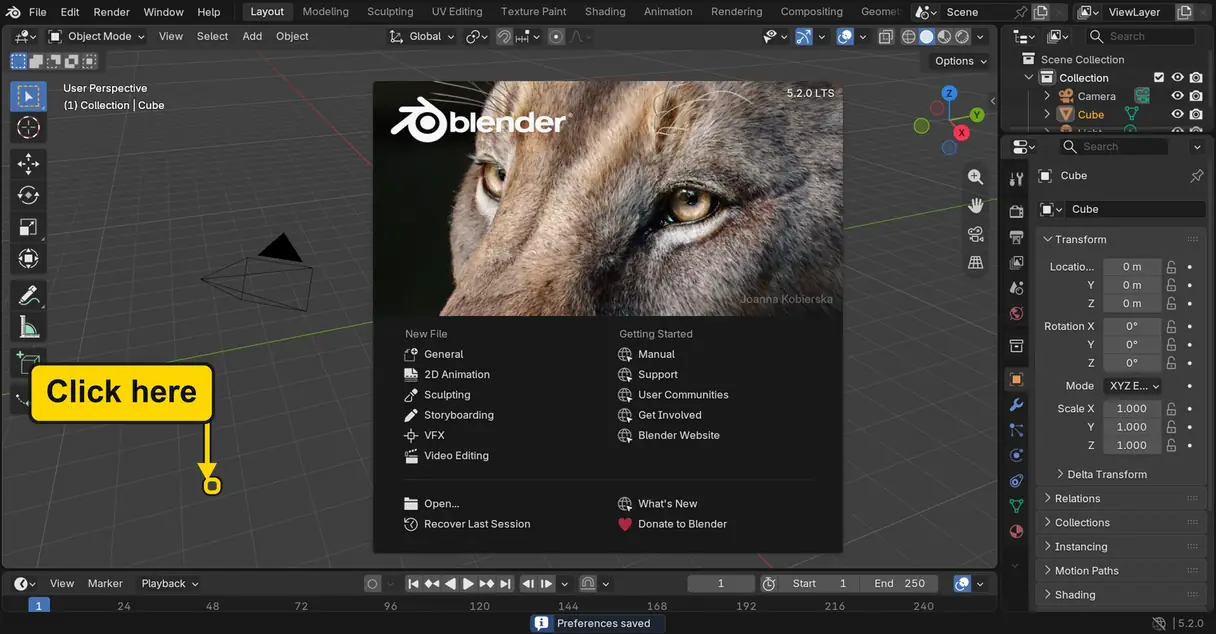
Step 3. Click the box away
WhereThe dark space outside the box.
DoClick once on the dark space, at the place marked on the picture.
You should seeThe box goes. It is called the splash, and it greets you at each start.
It worked whenNo box stands in the middle of the window, and a grey cube stands in the large dark area.
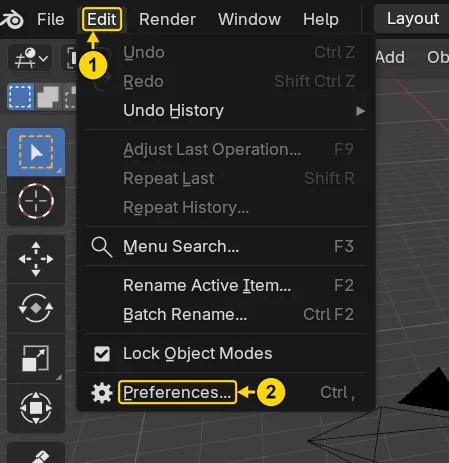
Step 4. Open Preferences
WhereThe top bar: the row of words that begins File, Edit.
DoClick Edit (marked 1), then Preferences… (marked 2).
You should seeA second window opens over the first, headed Preferences, with a list of tabs down its left side.
It worked whenThe Preferences window stands open.
Step 5. Start Install from Disk
WhereThe Preferences window.
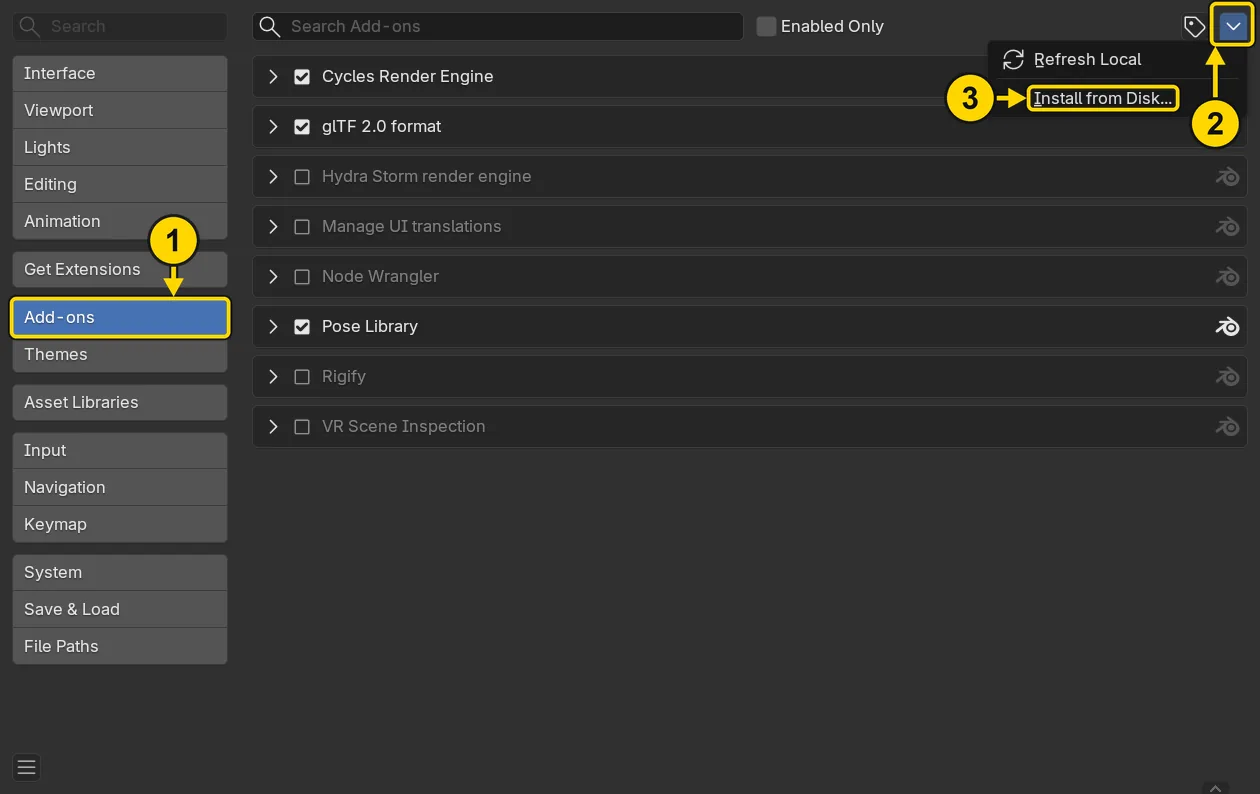
DoClick Add-ons in the list at the left (marked 1). Click the small arrow at the top right (marked 2), then Install from Disk… (marked 3).
You should seeA third window opens: Blender’s File Browser, where you choose a file. The tick boxes in the list are the add-ons Blender already has. Leave them alone.
It worked whenThe File Browser stands open, with Install from Disk and Cancel at its foot.
Step 6. Go to your Downloads folder
WhereThe left column of the File Browser, under System.
DoClick Downloads. Or click the long field at the top of the window, type the path of the folder, and press Enter.
You should seeThe list in the middle of the window now shows that folder. It shows only the kinds of file Blender can install here.
It worked whenThe zip stands in the list.
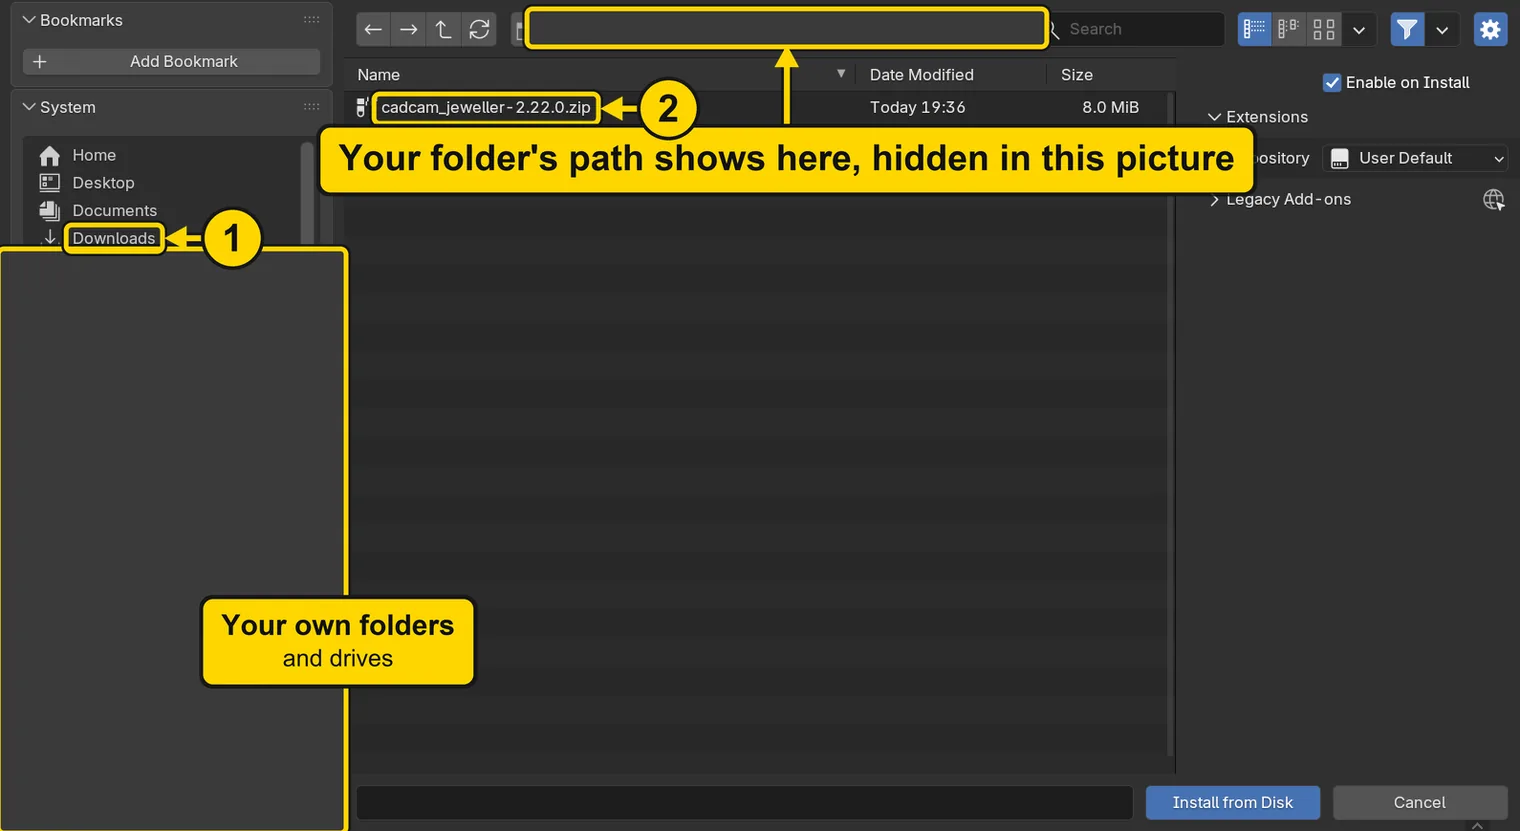
If it goes wrongThe zip is not in the list: the File Browser stands in another folder, or the zip does. Your web browser’s own list of downloads can show you where it went.
Step 7. Install the zip
WhereThe list in the middle of the File Browser, and the buttons at its foot.
DoClick the zip in the list (marked 1). Then press Install from Disk (marked 2).
You should seeThe zip’s name appears in the field at the foot. Leave Enable on Install ticked, at the top right. The File Browser shuts, and Blender takes a few seconds to install the add-on.
It worked whenIn the Preferences window, the row CAD/CAM Jeweller stands in the list.
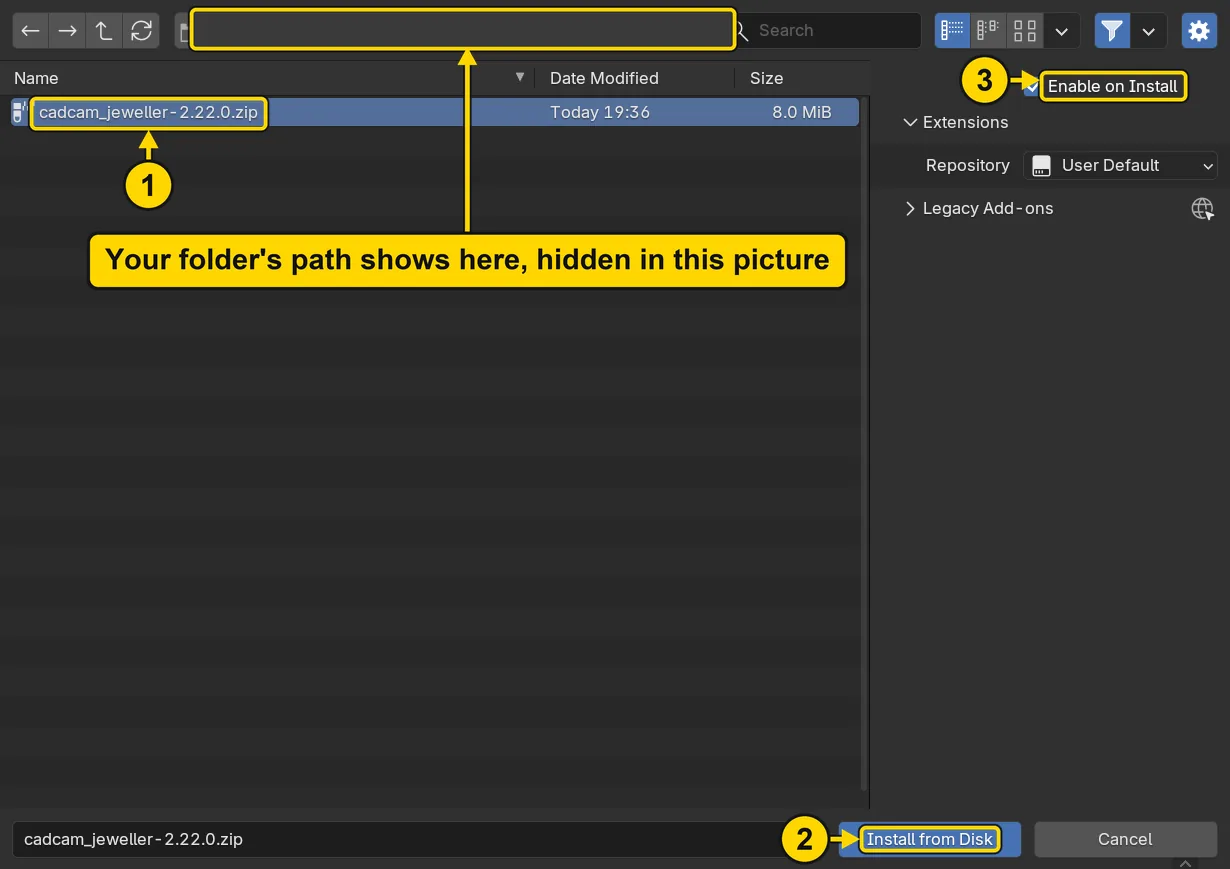
If it goes wrongThe File Browser shuts and no new row appears: no file was picked, so nothing was installed. Do the last three steps again, and click the zip so that its name stands in the field at the foot.
Step 8. Check the row, and shut Preferences
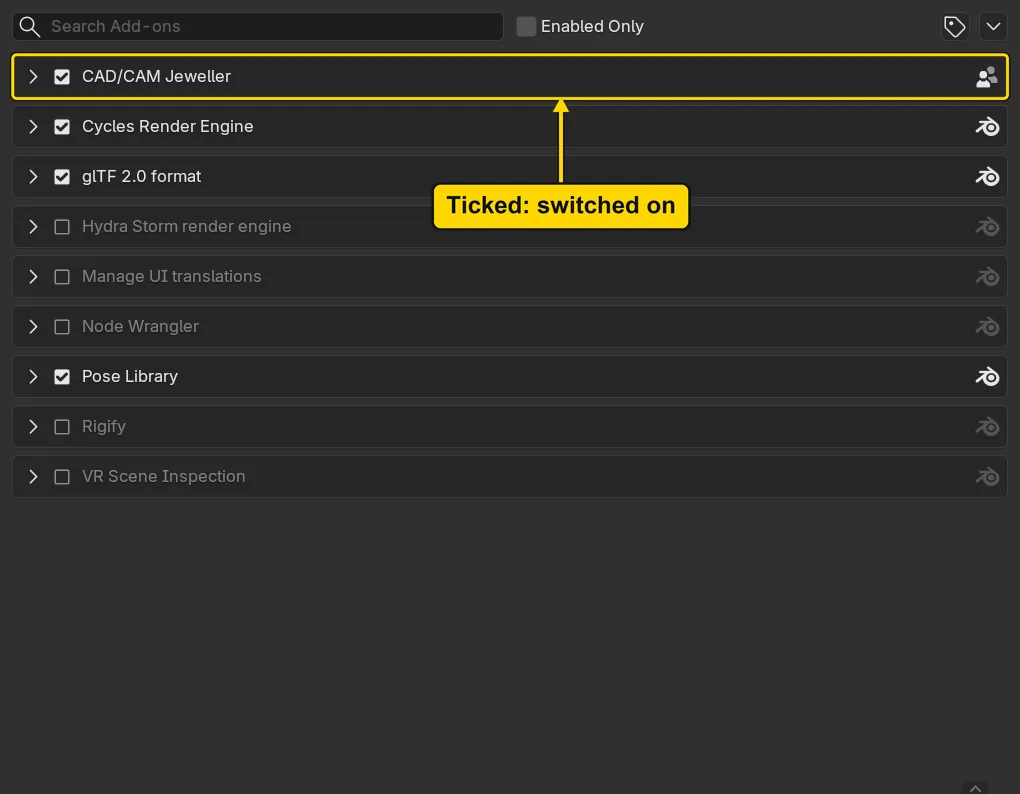
WhereThe Preferences window. The new row CAD/CAM Jeweller stands near the top of its list.
DoRead the row: its box is ticked, which means the add-on is switched on. Then shut the Preferences window with the X at its top right.
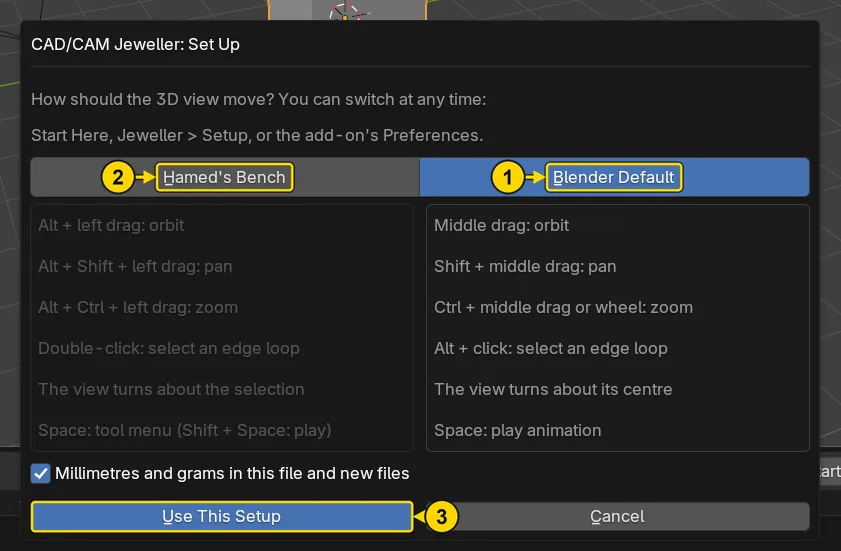
You should seeBlender’s main window, with a new window in its middle headed CAD/CAM Jeweller: Set Up. That window opens by itself as soon as Preferences is shut.
It worked whenThe window headed CAD/CAM Jeweller: Set Up stands in front of you.
Step 9. Answer the Set Up window
WhereThe window headed CAD/CAM Jeweller: Set Up.
DoLook at your mouse. Does its wheel click when you press it down? Yes: press Blender Default (marked 1). No wheel, or a touchpad: press Hamed’s Bench (marked 2). Then press Use This Setup (marked 3).
You should seeThis choice is how the mouse moves your view. The lines under each button list its moves, and later pages teach them both. Leave the tick on Millimetres and grams in this file and new files, because the add-on’s tools work in millimetres. When you press the button, the status bar, the line at the very bottom of the window, says Navigation and your choice, for a moment.
It worked whenThe window has gone. The next step shows where your choice stays written.
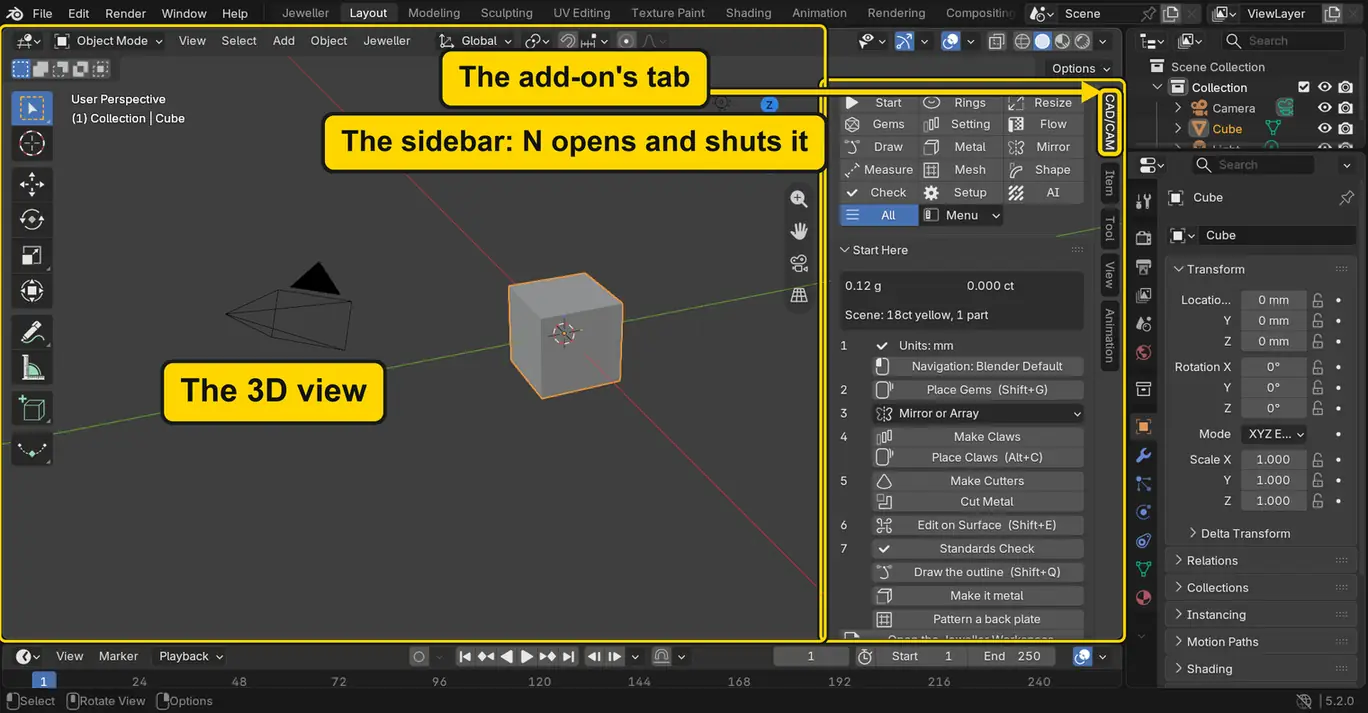
Step 10. Find the add-on’s tab
WhereThe 3D view: the large dark area in the middle of the window. Put the pointer over it.
DoPress N. Then click the word CAD/CAM on the right edge of the strip that opens.
You should seeThe strip is the sidebar, and CAD/CAM is the add-on’s tab on it. The small word buttons at its top are the section bar, and the Start Here panel stands under them.
It worked whenThe Start Here panel reads Units: mm, and Navigation: Blender Default or Hamed’s Bench, as you chose.
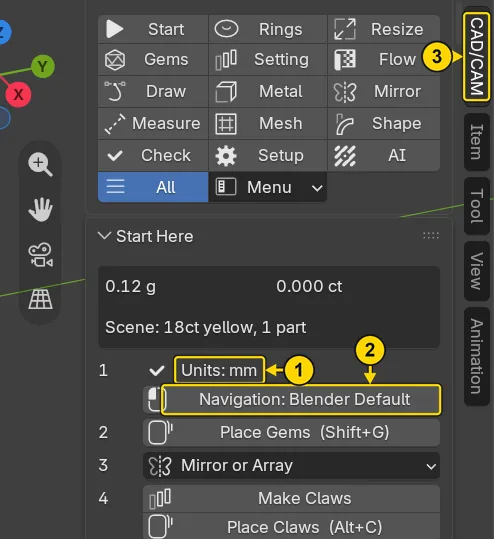
If it goes wrongNothing opens: the pointer was not over the 3D view. Move it there and press N again.
Check your result
| What to read | Where | What it should say |
|---|---|---|
| The add-on is switched on | Edit > Preferences, the Add-ons tab, the row CAD/CAM Jeweller | A tick in its box |
| The navigation you chose | The sidebar, the CAD/CAM tab, the Start Here panel | Navigation: Blender Default, or Hamed’s Bench if you chose that |
| The units | The same panel, its first line | Units: mm, with a tick |
Try it yourself
Open Edit > Preferences again, click Add-ons, and click the small arrow at the start of the row CAD/CAM Jeweller. The row opens and shows the add-on’s version and where its file stands, and under them the add-on’s own preferences, headed Bench setup, which say which navigation you chose in the Set Up window. Shut Preferences with the X at its top right.
What you learned
- An add-on goes in through Edit > Preferences, the Add-ons tab, the small arrow at the top right, Install from Disk…, with the zip as it came.
- The Set Up window asks once how the view should move. You can change the answer at any time.
Nover the 3D view opens the sidebar, and the add-on lives on its CAD/CAM tab.