
What you will make
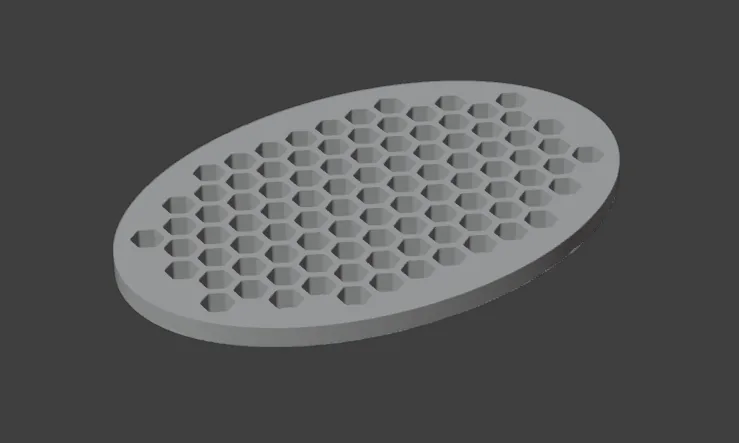
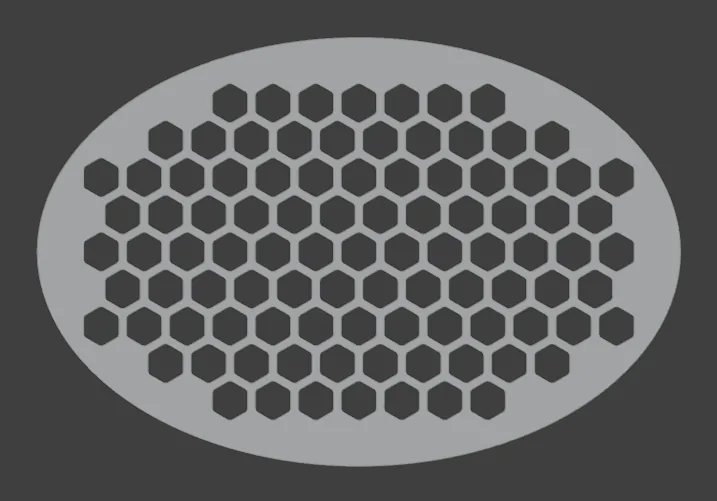
An oval plate 30 x 20 mm and 1.20 mm thick, pierced with 97 honeycomb holes, as an ordinary object that weighs 4.79 g in 18ct yellow gold. Piercing is how a jeweller takes the weight out of a plate and lets light through it, for the back or the front of a pendant. This plate is a drill. On a piece, ease its edge and give it a place to hang.
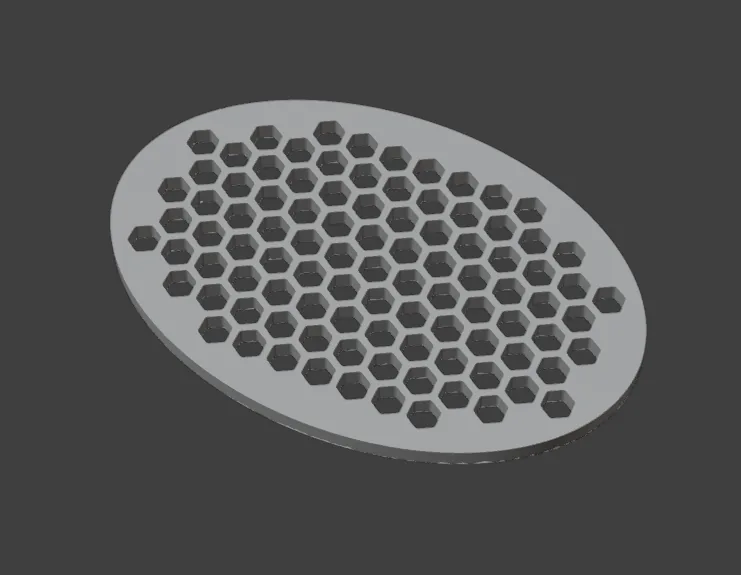
About 15 minutes.
Files
- p10-01-start.blend (100 KB): open this one to begin.
- p10-01-finished.blend (287 KB): the result, to compare with yours.
Both were made in Blender 5.2.0.
Before you start
- You have done Part 0, Blender from nothing.
- The add-on is installed, and its CAD/CAM tab is in the sidebar.
- Nothing else: the start file is already in millimetres.
Build it
Step 1. Open the start file and save your copy
WhereBlender’s top menu bar, File > Open, then File > Save As.
DoOpen p10-01-start.blend. Then choose File > Save As and give the file a name of your own, so that the start file stays clean.
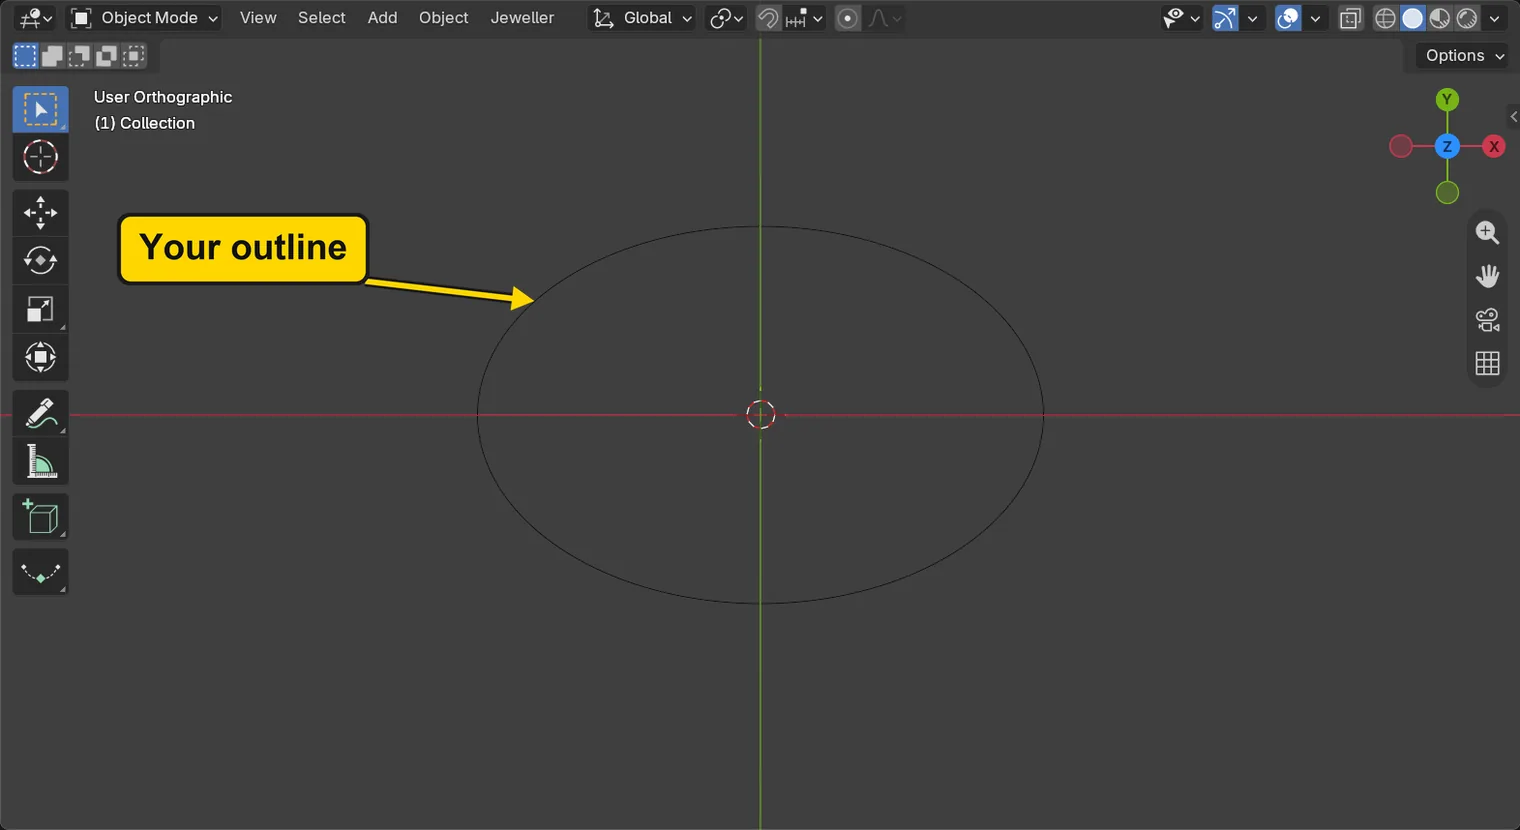
You should seeOne thin oval on the red and green lines, seen from above: your outline. It is a closed curve, with no gap in its line, and it gives the plate its shape. The small red and white ring inside it is Blender’s 3D cursor: leave it.
It worked whenThe oval is the only thing in the 3D view, apart from the 3D cursor.
Step 2. Click Flow in the section bar
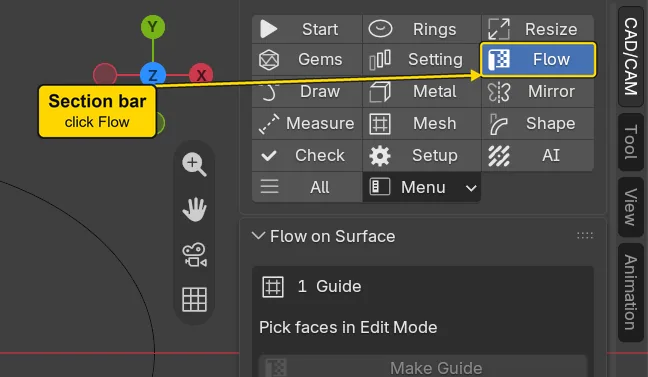
WhereThe sidebar at the right of the 3D view (press N with the pointer over the 3D view if it is shut), the CAD/CAM tab. The section bar is the block of small word buttons at the top of that tab.
DoClick Flow in the section bar.
You should seeFlow lights up, and the panels under the section bar change. Flow on Surface comes first.
It worked whenFlow is lit.
Step 3. Fold the panel above
WhereThe sidebar, the words Flow on Surface.
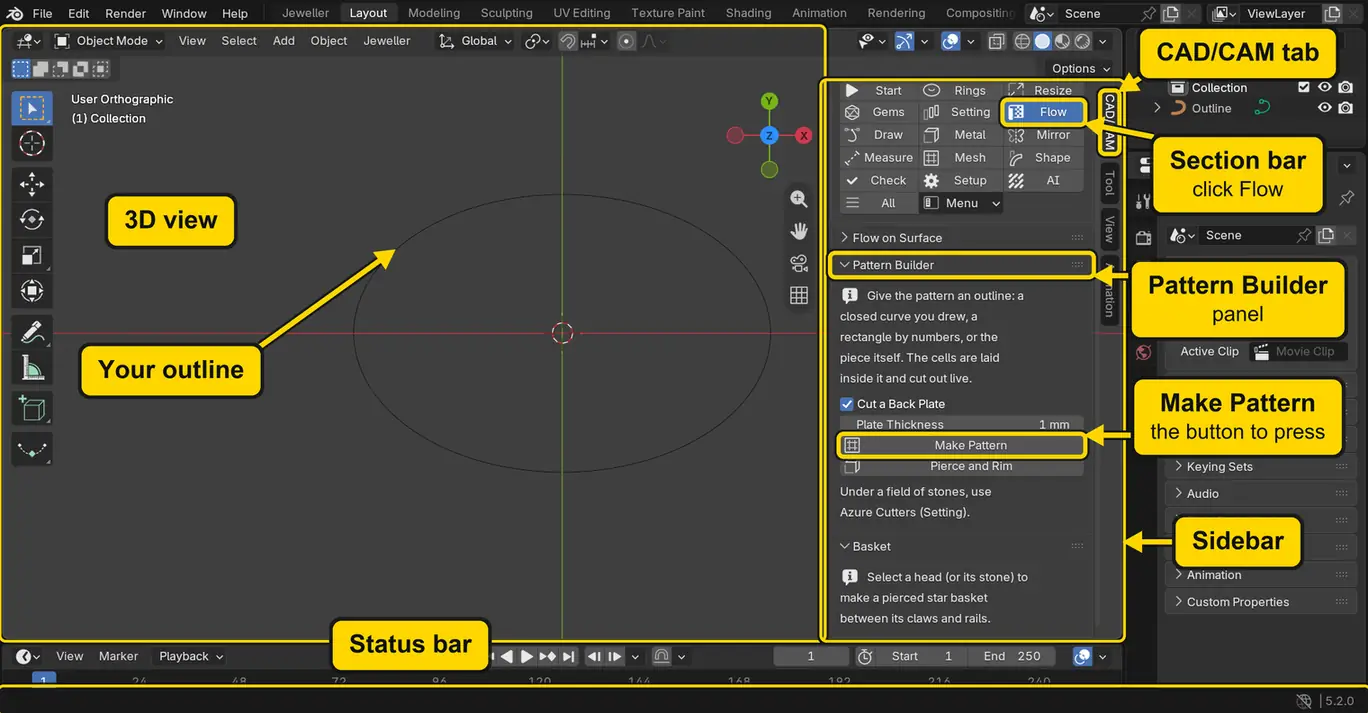
DoClick those words once, to fold that panel: it shuts up to its title. If it is already shut, leave it.
You should seeThe Pattern Builder panel moves up, with Make Pattern in it. The picture names the parts of the window this page uses.
It worked whenYou can read Make Pattern without scrolling.
Step 4. Select the outline
WhereThe 3D view.
DoClick once on the oval’s line, at its right-hand end.
You should seeThe line turns orange.
It worked whenThe line stays orange when you move the pointer away.
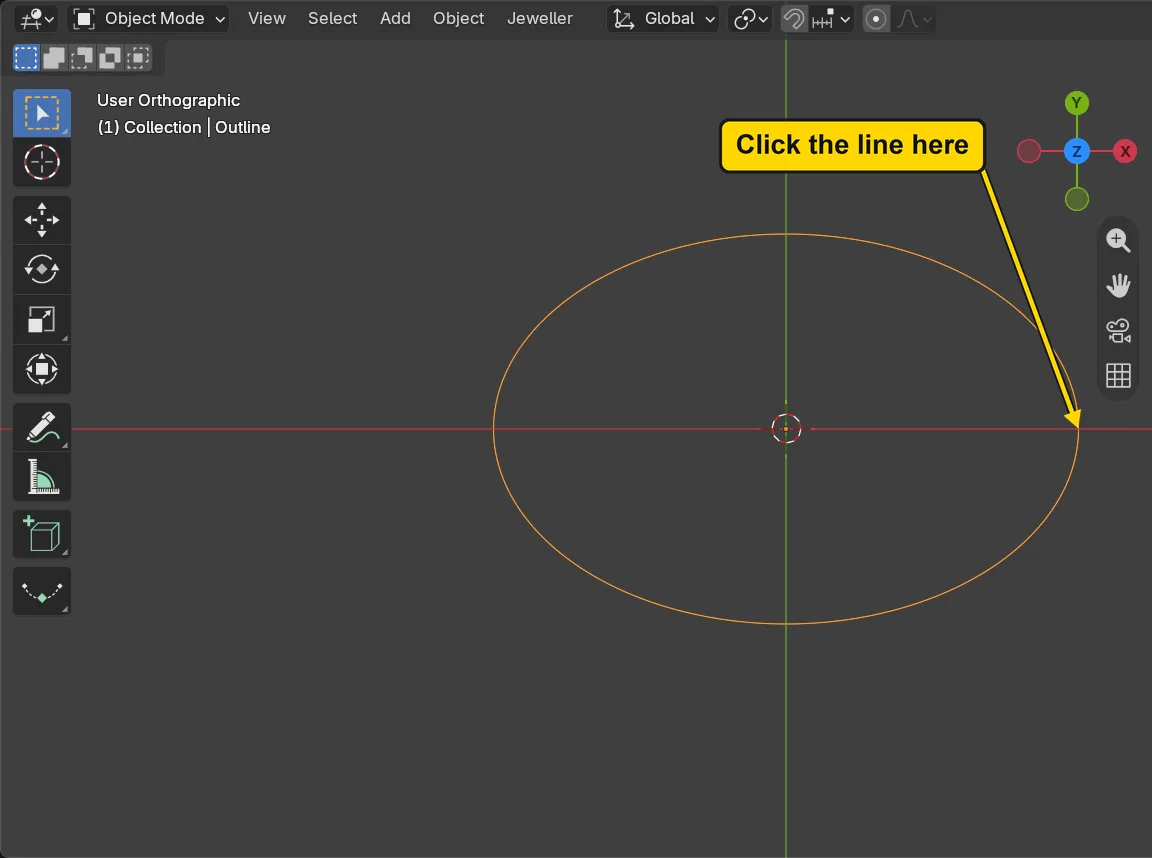
If it goes wrongNothing turns orange: the click missed the thin line. Click again, closer to it.
Step 5. Press Make Pattern
WhereThe Pattern Builder panel.
DoPress Make Pattern.
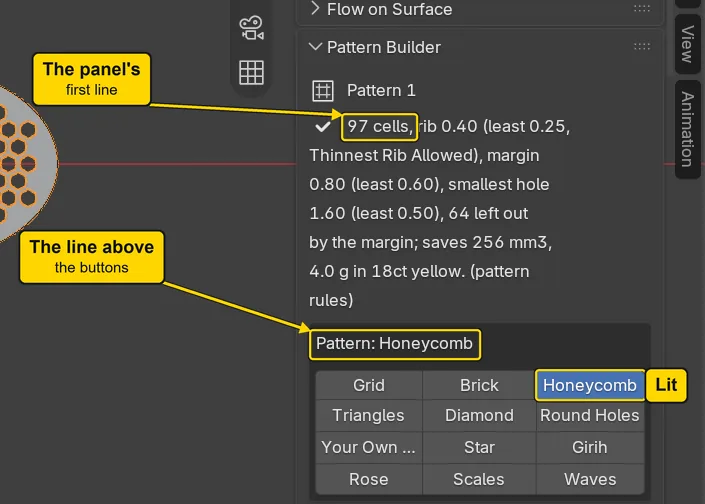
You should seeThe oval fills with metal and rows of small holes, and the panel fills with numbers. The orange lines only mean that the plate is selected. The panel’s first line, which wraps over several rows, stands under the words “Pattern 1” and gives the count of cells: a cell is one hole. The status bar at the very bottom says it too, but its message fades, and the panel keeps the same figure.
It worked whenThe panel’s first line begins “97 cells”, and the holes stop short of the edge all round.
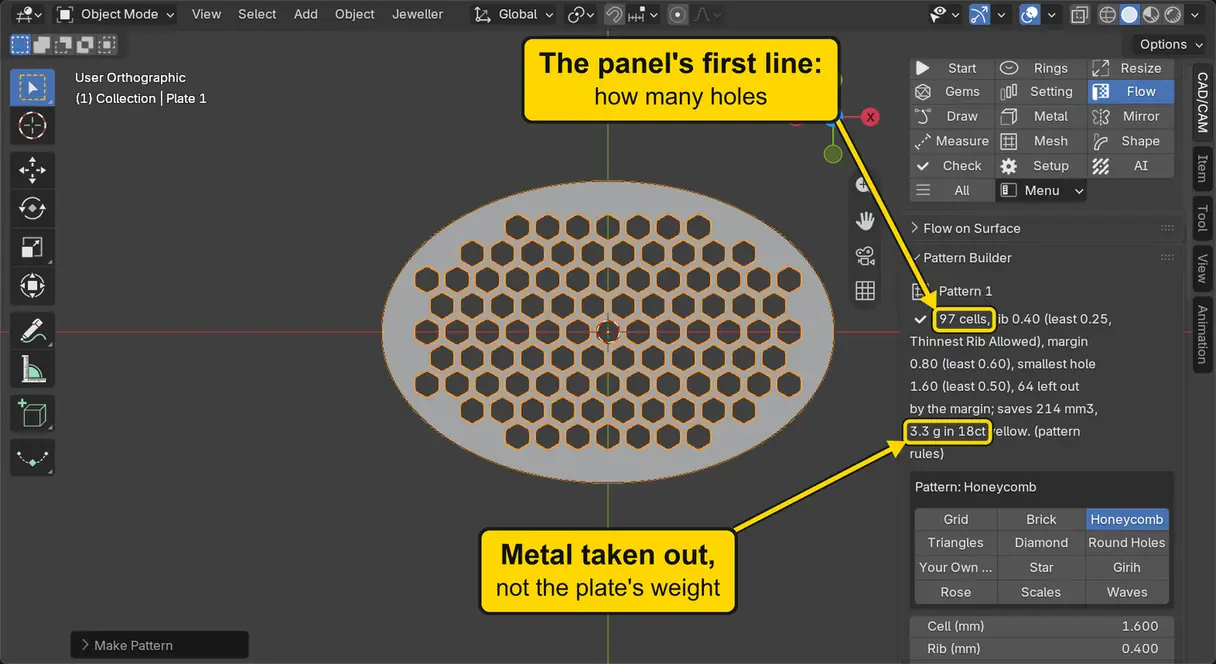
If it goes wrongYou get a rectangle, not your oval: nothing was selected when you pressed. Press Ctrl+Z once: the rectangle goes. Select the oval, then press again.
Step 6. Learn three words: cell, rib, margin
WhereThe 3D view, close to the plate’s right-hand end.
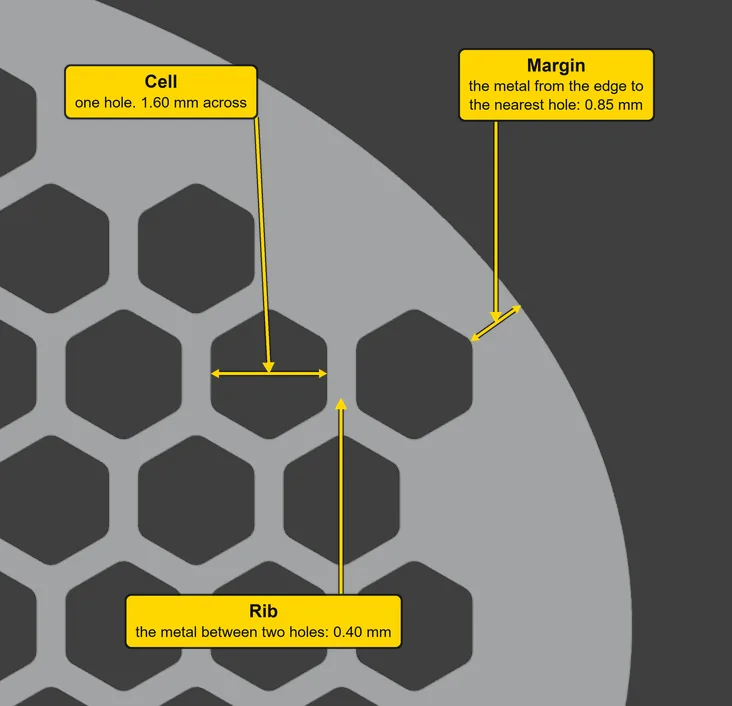
DoScroll the mouse wheel to zoom in, point with the pointer to the three things named in the picture (do not click), then scroll back out.
You should seeCell: one hole. Cell (mm) on the panel is its width, flat side to flat side. Rib: a rib, the bar of metal between two holes. Margin: the metal from the edge to the nearest hole.
It worked whenYou can point to each one on your own plate.
Step 7. Open the box at the bottom left
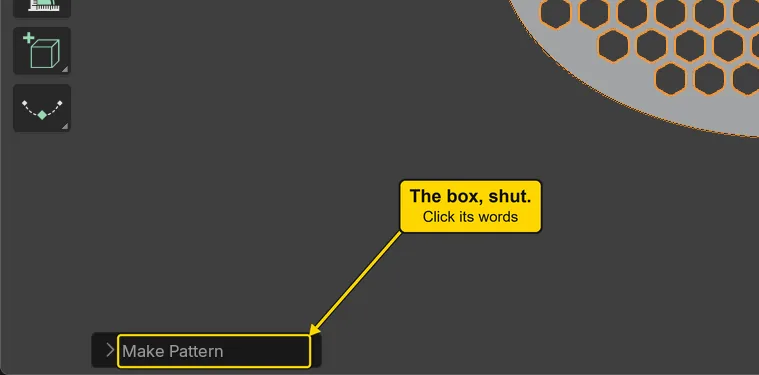
WhereThe bottom left corner of the 3D view: Blender’s Adjust Last Operation box, shut, showing only the words Make Pattern. This page calls it the box at the bottom left.
DoClick the words Make Pattern there.
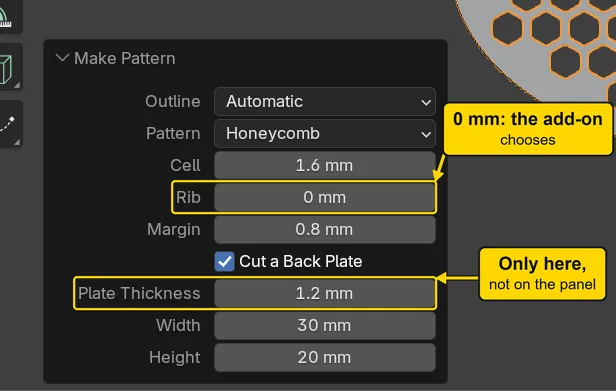
You should seeThe box opens upwards, as in the next picture. It holds this press’s own settings, Plate Thickness among them. Leave the other rows alone. Rib shows 0 mm: that means the add-on chooses, here 0.40.
It worked whenPlate Thickness reads 1 mm.
Step 8. Type the plate’s thickness
WhereThe box at the bottom left, the row Plate Thickness.
DoClick the middle of the number once, type the new one, then press Enter.
Type1.20
You should seeThe plate redraws, a little thicker. From straight above you see no change, because you look straight down on the plate: only the number tells you now. You see the thickness from the side in step 16.
It worked whenPlate Thickness reads 1.2 mm.
Step 9. Try all twelve family buttons
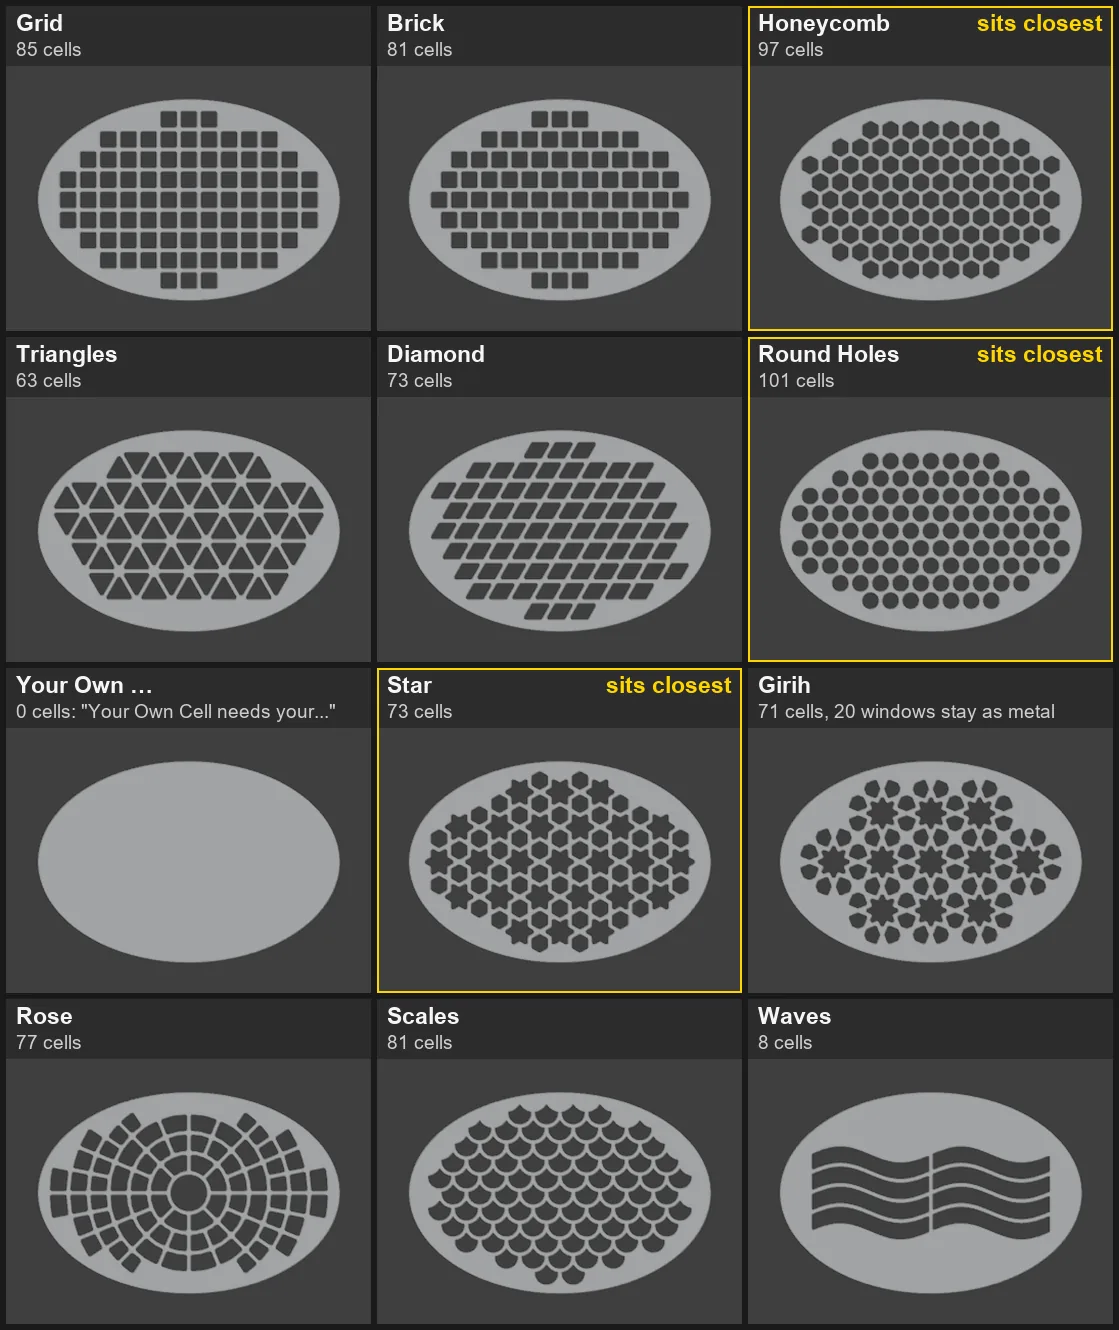
WhereThe Pattern Builder panel, the twelve family buttons, in four rows of three, under the words “Pattern: Honeycomb”.
DoPress each button in turn, left to right, top row first, and finish on Waves. Watch the plate.
You should seeThe pictures below, laid out as the buttons are, all at Cell (mm) 1.600. A family is the kind of pattern: the line above the buttons names it, and the panel’s first line counts its cells. You need not study each one. From your first press the box at the bottom left has gone: a family button has no box of its own. With Girih the panel warns that “windows” would close: windows are its small inner holes, and at this small cell they stay as metal. Nothing is wrong. Waves repeats in two blocks, so its lines step where the blocks meet.
It worked whenWaves is lit, and the line above the buttons reads “Pattern: Waves”.
Step 10. Go back with Ctrl+Z, then to Honeycomb
WhereThe 3D view with the pointer over it, then the family buttons.
DoPress Ctrl+Z once, then press Honeycomb.
You should seeCtrl+Z takes back your last press: the line above the buttons reads “Pattern: Scales”. If it reads another family, carry on: press Honeycomb. Then the rows of small hexagons come back. This is the safe family for a first plate. The grams on the first line have risen from 3.3 g to 4.0 g, because the plate is now 1.2 mm thick.
It worked whenHoneycomb is lit and the panel’s first line begins “97 cells”.
Step 11. See what Cell does
WhereThe Pattern Builder panel, the field Cell (mm) under the buttons.
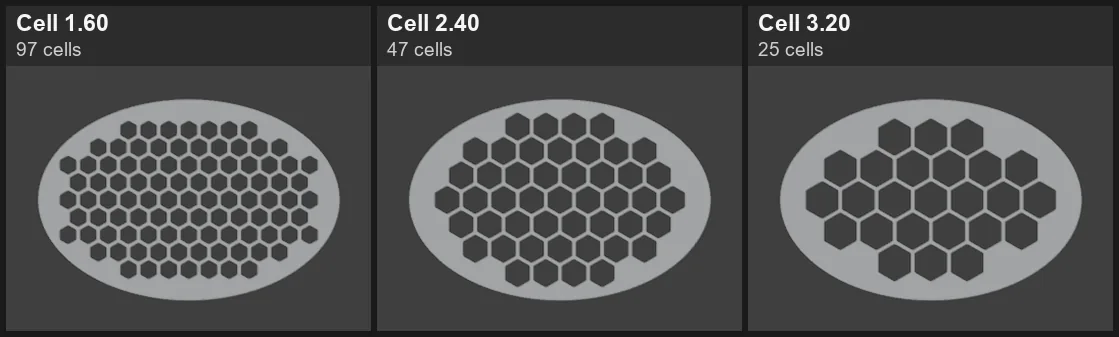
DoClick the middle of the number once, type the new one, press Enter, and look at the plate. Go down the table.
You should seeThe holes grow and there are fewer of them, as in the pictures.
| Type in Cell (mm) | The panel’s first line begins |
|---|---|
2.40 | 47 cells |
3.20 | 25 cells |
1.60 | 97 cells |
It worked whenCell (mm) reads 1.600 again, and the panel counts 97 cells.
Step 12. See what Rib does
WhereThe Pattern Builder panel, the field Rib (mm).
DoClick the middle of the number once, type the new one, press Enter, and look at the plate. Go down the table.
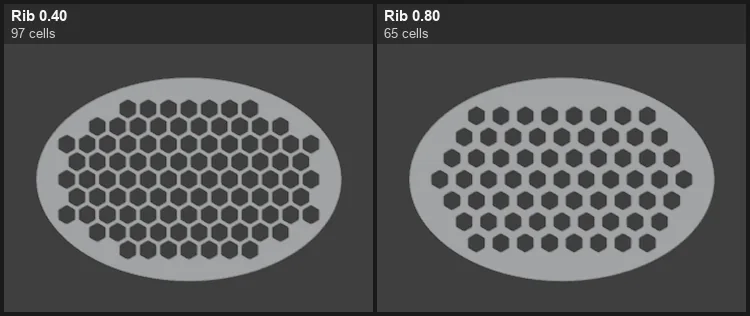
You should seeThe holes stay the same size and stand further apart, so fewer fit.
| Type in Rib (mm) | The panel’s first line begins |
|---|---|
0.80 | 65 cells |
0.40 | 97 cells |
It worked whenRib (mm) reads 0.400 again, and the panel counts 97 cells.
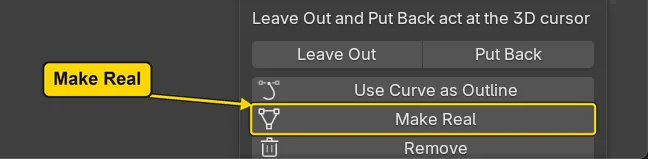
Step 13. Make it real
WhereThe Pattern Builder panel, near its foot. Scroll the sidebar with the mouse wheel if you cannot see it.
DoPress Make Real.
You should seeThe plate looks the same, and the panel now reads “Made real: Plate 1 real”. Before the press its first line began “97 cells”: that is how many holes are cut. Make Real turns the pattern into an ordinary object, “Plate 1 real”. The live plate that made it, the one whose numbers could still change, stays in the file, hidden. Leave it.
It worked whenThe words at the top left of the 3D view end in “Plate 1 real”.
Step 14. Tick Selected Only
WhereThe section bar at the top of the CAD/CAM tab, then the panel Reports & Checks, further down the sidebar.
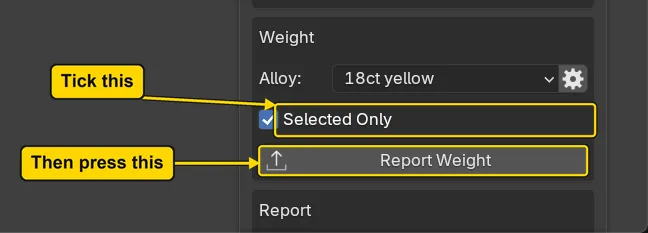
DoClick Check in the section bar. Scroll the sidebar down to the block headed Weight, then tick Selected Only.
You should seeThe tick shows. Check opens on other panels first, such as Wall Map: scroll down past them. The words at the top left of the 3D view should still end in “Plate 1 real”. If they do not, click the plate once.
It worked whenSelected Only is ticked.
Step 15. Read the plate’s weight
WhereThe panel Reports & Checks.
DoPress Report Weight, read the line TOTAL, then press Esc.
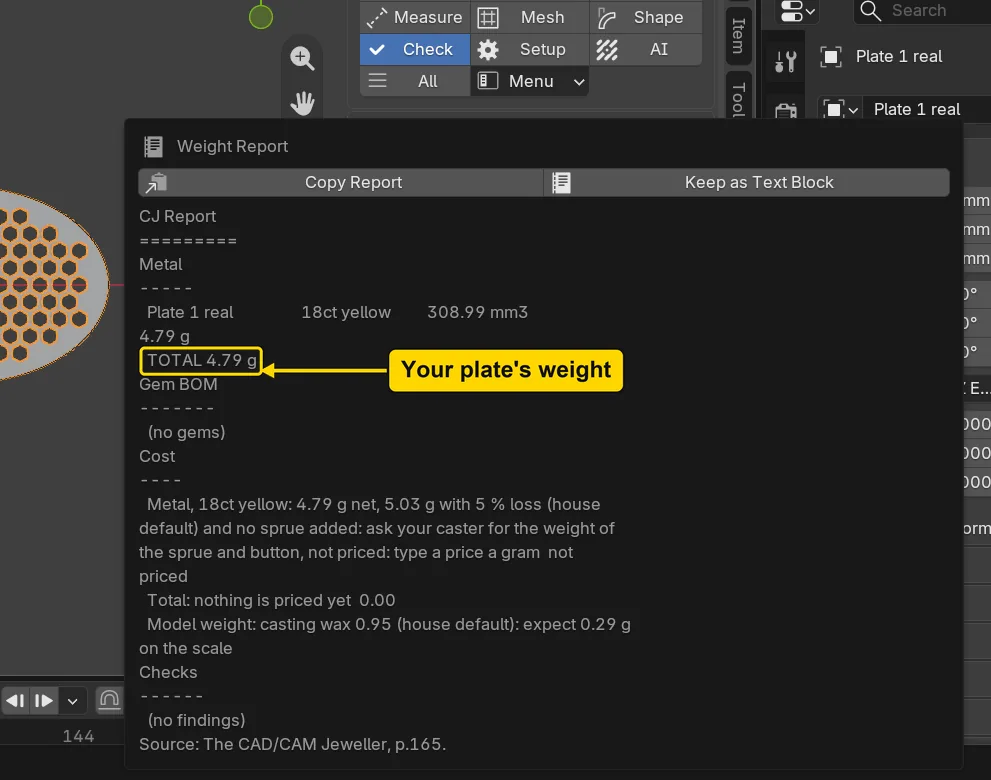
You should seeA window headed “Weight Report” opens over the screen. It names one part, “Plate 1 real”. Read only the line “TOTAL”: the other lines are for cost and casting, later.
It worked whenYou have read “TOTAL 4.79 g”, and Esc has shut the window.
Step 16. Look round your plate and save your copy
WhereThe 3D view, with the pointer over it.
DoOrbit the view lower, until you look across the plate as in the picture. Then press Ctrl+S to save your copy.
You should seeThe plate from an angle: flat, even, and 1.20 mm thick, with its holes going right through. A fine broken line along the lower edge is only how Blender draws that edge from this angle, not a crack.
It worked whenYou can see the wall of each hole, and your copy is saved.
Check your result
| What to read | Where | What it should say |
|---|---|---|
| The holes | With the plate selected, Flow in the section bar, the Pattern Builder panel | It reads “Made real: Plate 1 real”, then “The cells are cut into the metal”. It counted 97 cells before you pressed Make Real |
| The size | The Item tab, on the sidebar’s edge just below CAD/CAM: Dimensions | X 30 mm, Y 20 mm, Z 1.2 mm. A plate you forgot to thicken looks the same from above: only Z and the weight tell you |
| The plate’s weight | The Weight Report window, which Report Weight opens, with Selected Only ticked | “TOTAL 4.79 g”. “Plate 1 real”, 18ct yellow, 308.99 mm3 |
| The finished object | The words at the top left of the 3D view | They end in “Plate 1 real” |
Try it yourself
Open the start file again (Blender may ask whether to save the changes to your copy: choose Don’t Save), click the oval’s line and press Make Pattern. Then press Girih, a Persian knotted strapwork, and type 3.20 in Cell (mm): 23 large cells, with nothing left to close in the casting. Or leave it on Honeycomb and type 30 in Rotation (deg), further down the panel: the rows turn and the count goes from 97 to 103.
What you learned
- Make Pattern is the first button to press: select the closed curve, press it, and the plate is made.
- Plate Thickness is only in the box at the bottom left, and only until your next press.
- The panel’s grams are the metal taken out. The plate’s weight comes from Report Weight in Reports & Checks, with Selected Only ticked.