
What you will make
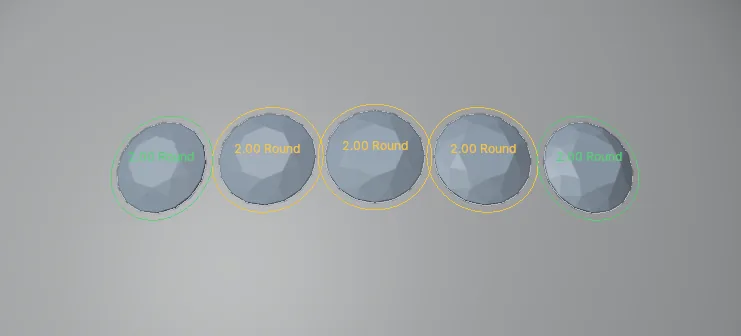
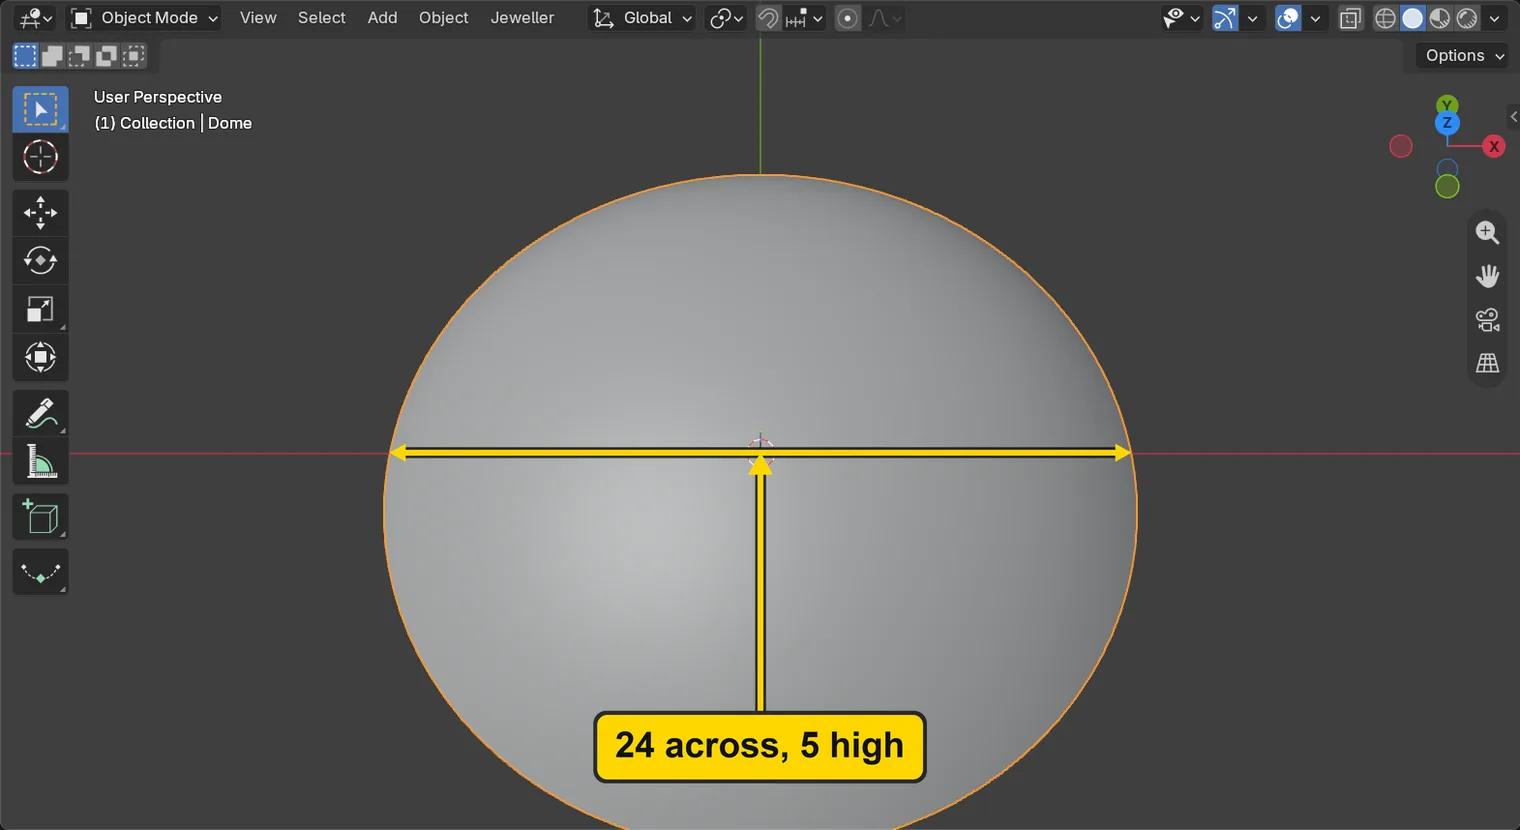
Five round stones, Round 2.00, laid in a row on a smooth dome 24 mm across and 5 mm high, no two closer than the gap you set, 0.15 mm. A jeweller sets stones close and even, and a gap that is too small leaves no metal between two seats. These stones are only laid on the dome: no seat is cut and nothing holds them. Cutting the seats and setting the stones come in later exercises. The gap is a number you set, and the colours of the preview stone tell you whether a click keeps it.
About 15 minutes.
Files
- p3-02-start.blend (256 KB): open this one to begin.
- p3-02-finished.blend (271 KB): the result, to compare with yours.
Both were made in Blender 5.2.0.
Before you start
- You have done Part 0, Blender from nothing, and Pick a cut and a stocked size, then change it (P3-01): the cut, the chips and Create at Cursor.
- The add-on is installed: CAD/CAM Jeweller 2.22.0 or later (Preferences > Add-ons shows the version). Its CAD/CAM tab is in the sidebar. The start file holds a smooth dome, 24 mm across and 5 mm high, in millimetres, so every number on this page is millimetres.
Build it
Step 1. Open the start file and save your copy
WhereThe top bar: the row of words that begins File, Edit.
DoDownload p3-02-start.blend from Files above and open it. Then choose File > Save As and save it under the name below, in a folder of yours. Open an exercise file and keep the start file safe (P0-07) shows how.
Typemy-dome.blend
You should seeThe 3D view shows a smooth grey dome, seen from a little above and in front, with an orange outline: it is selected. The Outliner, the list at the top right of the window, holds one object, Dome, and the title bar, the strip above File and Edit, begins my-dome. The first picture is the 3D view and the second is the title bar.
It worked whenThe title bar, the strip above File and Edit, begins my-dome.

Step 2. Choose Round 2.00 from its chip
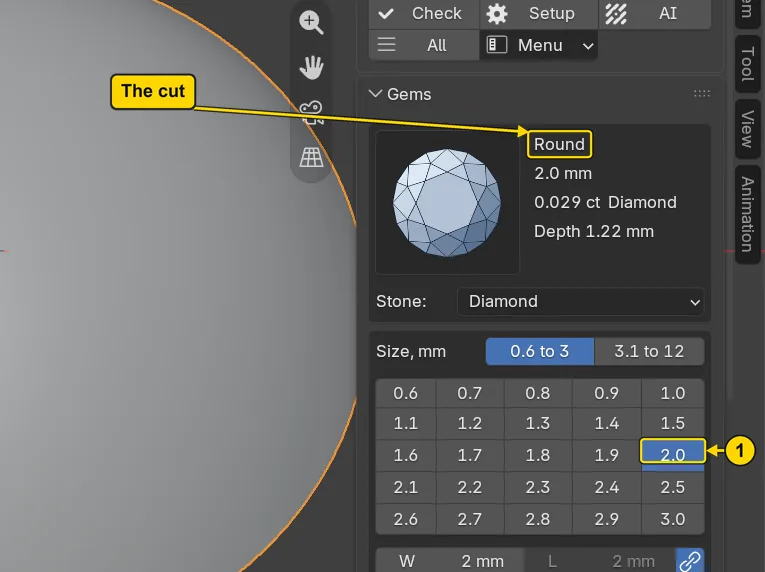
WhereThe sidebar. If it is shut, press N with the pointer over the 3D view. Click the CAD/CAM tab, then Gems in the section bar. The Gems panel, the Size, mm box.
DoClick the tab 0.6 to 3 if it is not lit, then click the chip 2.0, the chip marked 1 in the picture.
You should seeThe chip 2.0 is lit and the lines beside the stone’s picture read Round, 2.0 mm, a weight in carats and Depth. A Round 2.00 is a round stone 2.00 mm across, and it is a stocked size. These are the settings of the next stone.
It worked whenThe chip 2.0 is lit.
Step 3. Set the gap you want
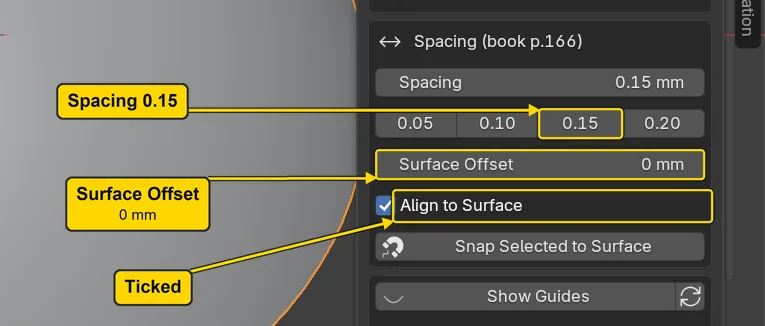
WhereThe Gems panel, the sub-panel Place & Guides: click its title to open it. The Spacing box is under the two large buttons.
DoClick the chip 0.15 in the row of four.
You should seeSpacing reads 0.15 mm. Spacing is the least gap you want between two stones, edge to edge. The four chips, 0.05, 0.10, 0.15 and 0.20, are the usual ones. The box is headed “Spacing (book p.166)”: the page number belongs to the add-on’s own reference book, and you can ignore it. Surface Offset reads 0 mm, which puts the middle of each stone’s girdle, its widest edge, on the surface: the stone’s point goes into the metal. It is a layout figure: nothing is cut on this page. Align to Surface is ticked, so each stone lies square to the dome. Leave both as they are.
It worked whenSpacing reads 0.15 mm.
Step 4. Switch the guides on
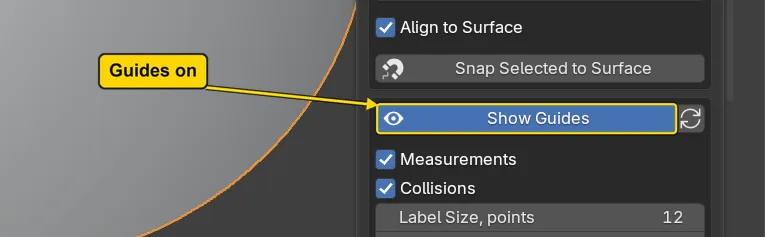
WhereThe Place & Guides panel, the box under Spacing: a wide button Show Guides with a small round arrow beside it.
DoPress the small round arrow beside Show Guides. The wide button does the same.
You should seeThe button Show Guides lights and its eye opens. Guides are marks the add-on draws round each stone in the 3D view: a pale ring at the stone’s girdle, a coloured ring one Spacing wider, and a label with its size. The coloured ring is green when the nearest stone is more than the Spacing plus 0.05 mm away, amber when it is nearer than that, and red only when two stones overlap. There is no stone yet, so nothing shows in the 3D view.
It worked whenShow Guides is lit.
Step 5. Press Shift+G and aim at the middle of the dome
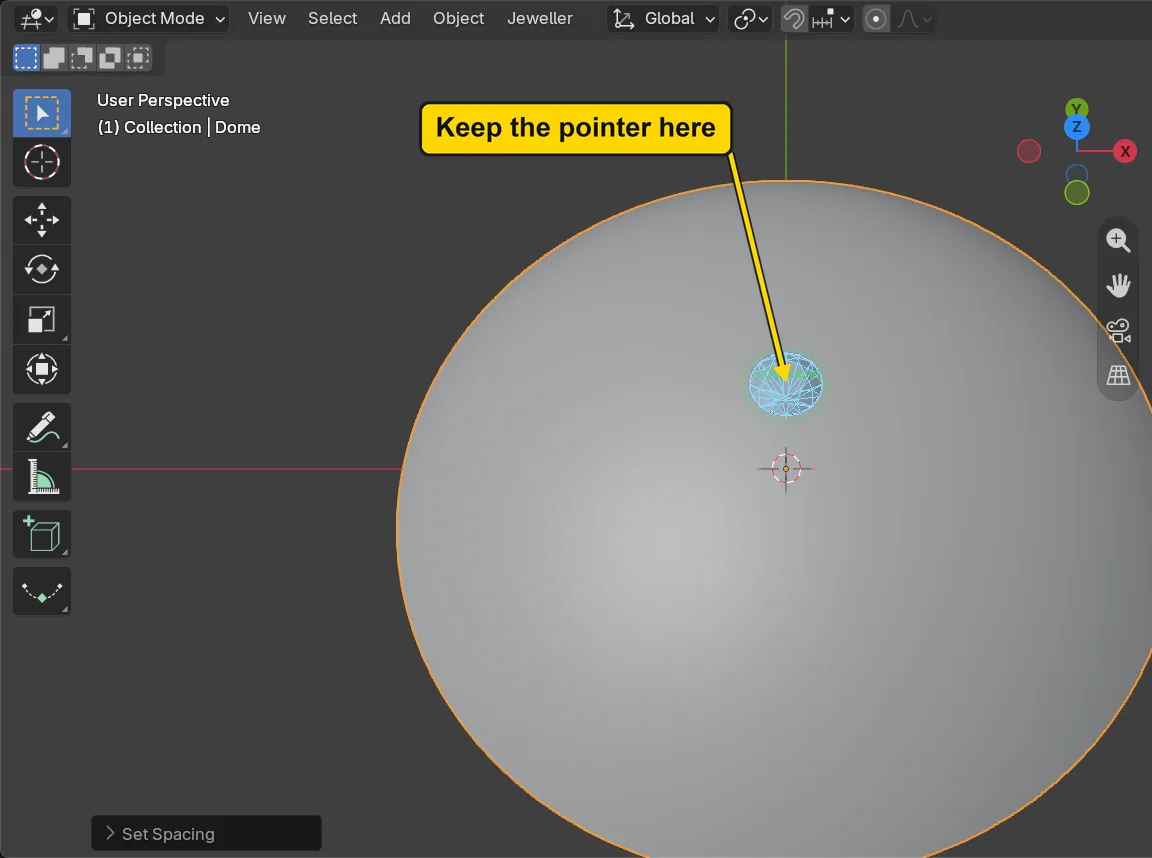
WhereThe 3D view. Move the pointer over the middle of the dome, at the place marked in the picture.
DoPress Shift+G with the pointer over the middle of the dome, then leave the pointer still.
You should seeA pale blue stone on the dome, following the pointer. Place Gems has started and runs until you press Enter. The status bar at the bottom begins with a read-out, “Size 2.00 mm | Spacing 0.15 mm | Gap n/a”, and then lists the keys the tool takes. Gap is n/a because there is no other stone yet.
It worked whenA blue preview stone stands on the middle of the dome.

Step 6. Click the first stone
WhereThe 3D view: the pointer stays where it is.
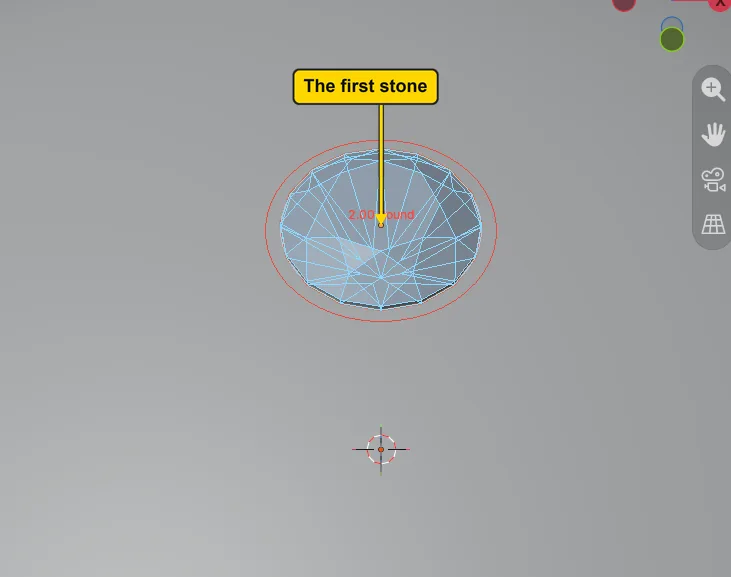
DoClick once with the left button.
You should seeA real stone where you clicked, with a green ring round it. Place Gems stays open: the blue preview is still there, ready for the next stone. Press nothing else yet.
It worked whenA real stone stands at the middle of the dome, and the tool is still running.
Step 7. Aim beside it and read the preview’s colour
WhereThe 3D view: move the pointer along the dome, to the right of the first stone, a little at a time.
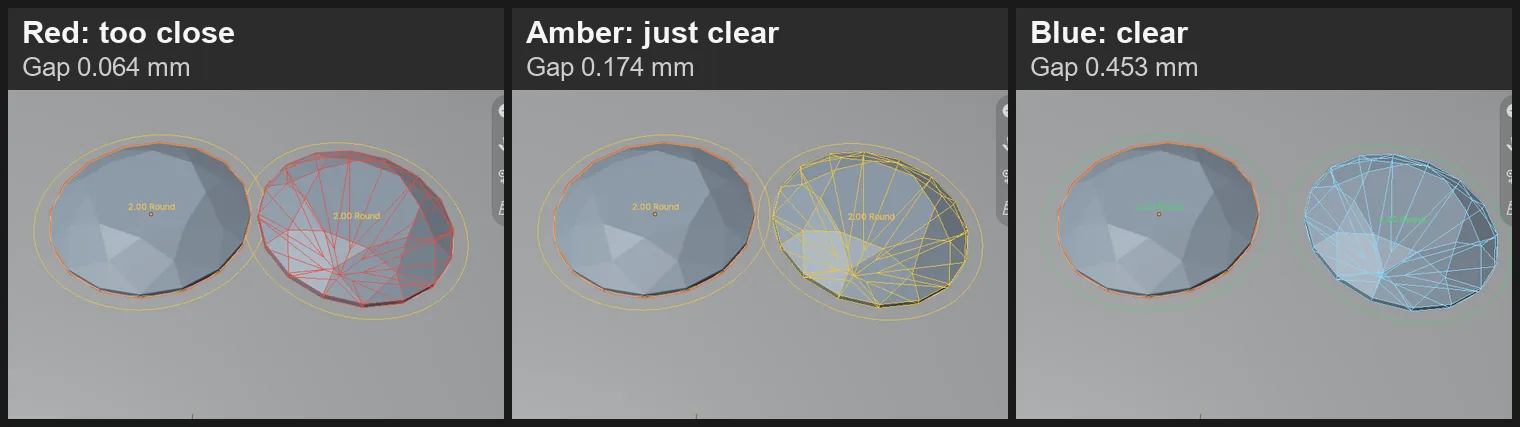
DoMove the pointer until it stands almost touching the first stone, then a little further, then clear of it. Do not click.
You should seeThe preview stone changes colour with its gap to the nearest stone. It is red when the gap is under the Spacing you set, 0.15, and a click there would leave stones too close. It is amber when the gap is from 0.15 to 0.20, just clear. It is blue beyond 0.20. A click is never refused, so the colour is your warning, and the read-out on the status bar gives the gap in millimetres. The preview turns red at the Spacing; the ring of a stone already placed turns red only when two stones overlap.
It worked whenThe preview is red close to the first stone, and blue clear of it.
If it goes wrongThe preview stays blue wherever you aim: the pointer is off the dome, or the first stone did not go in. The read-out says “No surface under the mouse” when the pointer is off every surface.
Step 8. Click four more stones and press Enter
WhereThe 3D view: the pointer over the dome.
DoZoom out if the dome is out of view, aim at amber or blue and click four times, two on each side of the first stone, then press Enter.
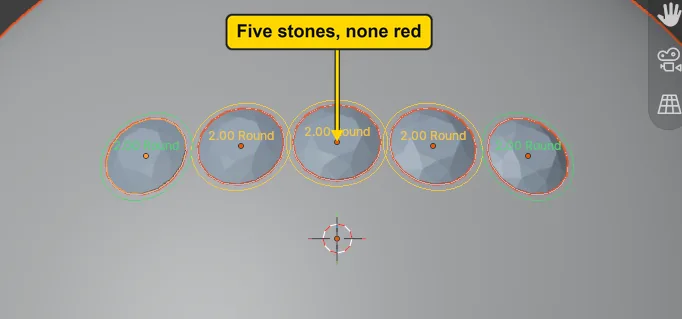
You should seeFive stones in a row along the top of the dome, each with a ring, green or amber, and none of them red. To zoom, turn the wheel, or slide two fingers on a touchpad. Enter ends Place Gems: the preview goes and the status bar says “Placed 5 gem(s)”, but its message fades. Press Esc or a right click instead and you stop without losing the stones already placed.
It worked whenFive stones stand in a row on the dome, none with a red ring, and the blue preview is gone.
Step 9. Read the tightest gap with Stats
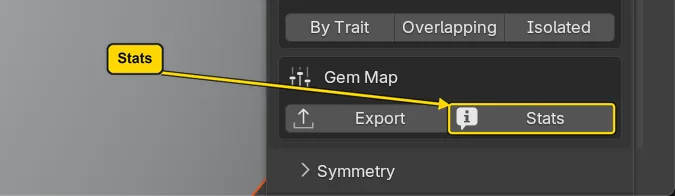
WhereThe Place & Guides panel, the box Gem Map at its foot: two buttons, Export and Stats. Scroll the sidebar down to them.
DoPress Stats.
You should seeA line on the status bar that begins “5 gem(s): 5 ROUND”, then the weight of the five stones and “tightest gap” with a number. The number is the smallest gap between any two stones: the page’s stones read 0.19 mm, and yours will be a few hundredths different, because your clicks fall a little elsewhere. If the number is under 0.15, one stone went in on red: press Ctrl+Z once to take back all of Place Gems, and lay them again. The line fades, so press Stats again to read it again.
It worked whenFive stones with green or amber rings stand in the 3D view, and the status bar line begins “5 gem(s): 5 ROUND”.

Step 10. Lift the middle stone by hand
WhereThe 3D view: the pointer over it. A click on the stone selects it alone.
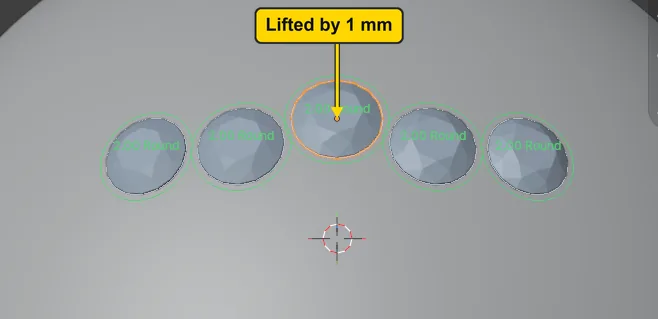
DoClick the middle stone, then press G, then Z, then type 1 on the number row (the keys above the letters), then press Enter.
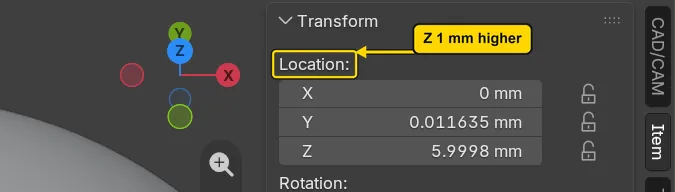
You should seeThe middle stone moves 1 mm straight up and stands clear of the dome. This is a move by a typed distance, as in Part 0. The other four stones stay where they were. Click the Item tab: Location: reads Z about 6 mm, 1 more than the 5 mm it stood at: the panel may show a few thousandths off, such as 5.9998. Then click the CAD/CAM tab to come back.
It worked whenThe middle stone stands above the dome.
Step 11. Bring it back with Snap Selected to Surface
WhereThe Place & Guides panel, the button Snap Selected to Surface, under the row of spacing chips. Scroll the sidebar up to it.
DoPress Snap Selected to Surface.
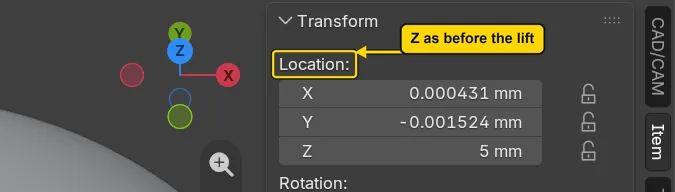
You should seeThe stone drops straight back onto the dome and lies square to it. The status bar says “Snapped 1 gem(s), 0 found no surface” for a moment. Click the Item tab: Location: reads Z about 5 mm again, as before the lift. X and Y read numbers very near 0, a few thousandths of a millimetre: ignore them. Then click the CAD/CAM tab to come back.
It worked whenThe stone lies on the dome again, in its row.
Step 12. Look at the finished row
WhereThe 3D view.
DoLook at the picture. To see your dome like this, click it, choose View > Frame Selected, then zoom in with the wheel.
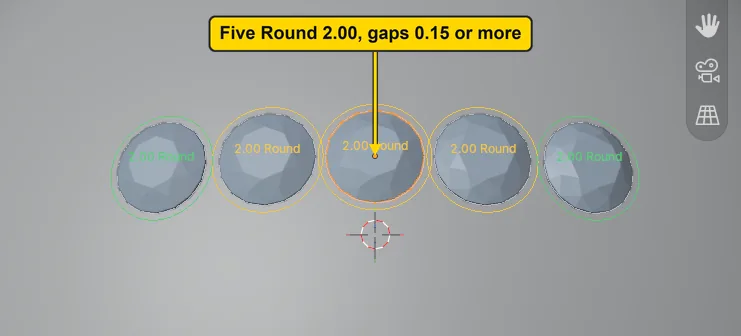
You should seeFive round stones in a row with an even small gap between each pair, lying on the dome, each with a green or amber ring. They are laid, not set: there is no seat under them.
It worked whenYou see five stones in a row on the dome, none touching.
Step 13. Save your work
WhereThe 3D view: move the pointer over it.
DoPress Ctrl+S.
You should seeBlender writes your copy at once, with no question, because the file already has a name. An asterisk, *, in the title bar marks changes that are not saved, and it goes now. Save your work and get it back (P0-12) says more about saving.
It worked whenThe title bar begins my-dome and carries no asterisk.
No picture: the only change is a message on the status bar, and it fades.
Check your result
| What to read | Where | What it should say |
|---|---|---|
| The five stones | The Outliner, the list at the top right of the window, under CJ Gems | Five stones: CJ_Gem_Round_2.00x2.00 and four more whose names begin the same way |
| The gap you set | The CAD/CAM tab, Gems section, Place & Guides panel, the field Spacing | It reads 0.15 mm |
| The gaps | The 3D view, looking down on the row | No ring is red, and no stone touches its neighbour. An amber ring is fine when Stats read 0.15 or more at step 9. The page’s own stones read 0.19 mm at the tightest, and yours differ by a few hundredths |
| The middle stone, lifted and brought back | The Item tab of the sidebar, Location: | Z reads about 5 mm again, the same as before the lift |
Try it yourself
Open your copy again and press Shift+G over the dome. Turn the wheel once to make the preview stone larger (on a touchpad, slide two fingers up or down on it). Press [ or ] to change the spacing, or hold Alt and turn the wheel, and watch the preview change colour. Press Esc to stop without placing a stone.
What you learned
- Spacing is the gap you want between stones. The preview is blue when clear, amber when the gap is from the Spacing to 0.05 mm more, and red when closer than the Spacing. A placed stone’s ring is red only when two stones overlap.
- Place Gems (
Shift+G) lays stones where you click, square to the surface, and goes on until you pressEnter. Stats reads the count and the tightest gap. - Snap Selected to Surface brings a lifted stone back to the dome.