
What you will make
A pattern of cells on a dome’s crown, reshaped with your hands: its Cell 2.42, its rib 0.63 (a rib, the bar of metal between two holes), slid with no number typed. You try a turn and take it back. Then a back plate, as in P10-09, Fit a back plate to a solid, its thickness dragged to 0.95 mm on the model. Reach for these when the place matters more than the figure: where the pattern’s middle falls, or how it turns against a stone or an edge.
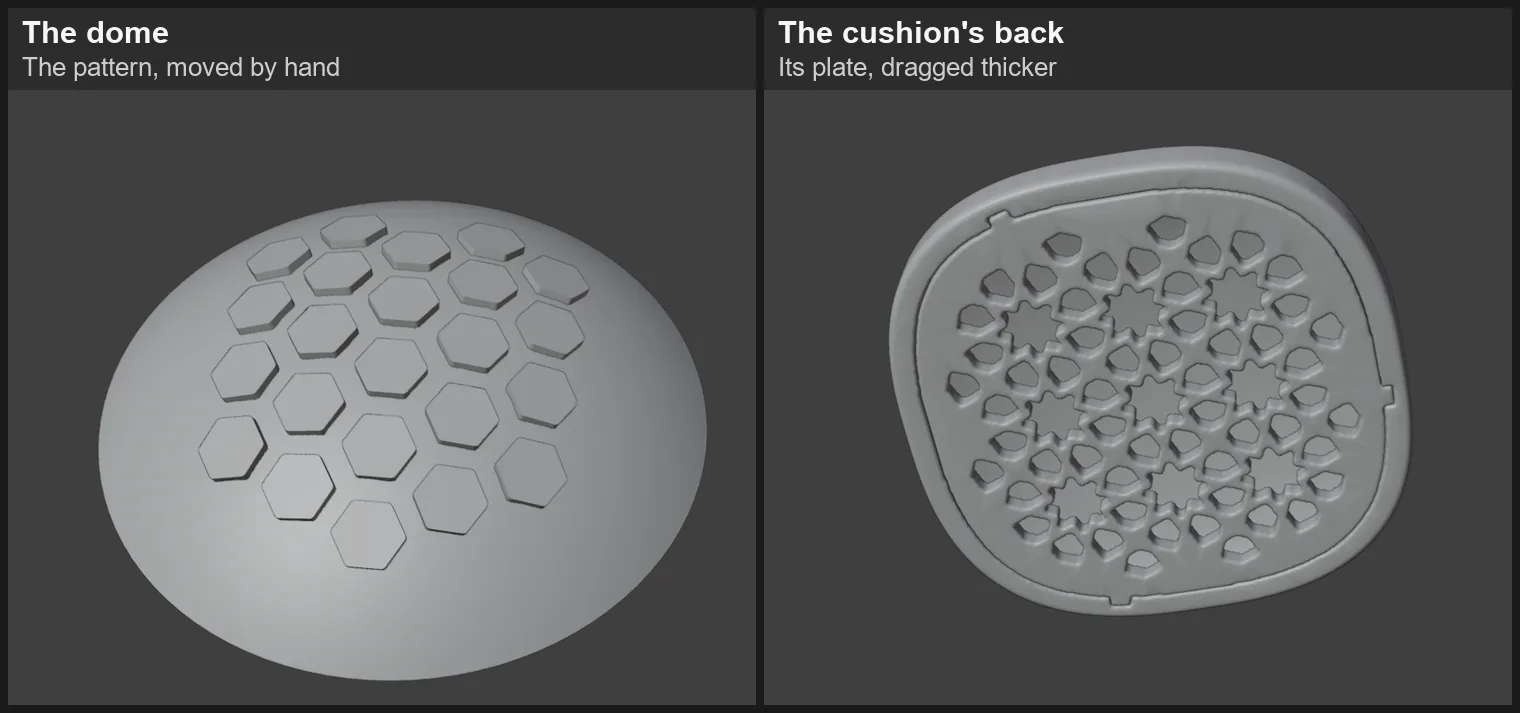
About 15 minutes.
Files
- p10-10-start.blend (837 KB): open this one to begin.
- p10-10-finished.blend (4.04 MB): the result, to compare with yours.
Both were made in Blender 5.2.0.
Before you start
- You have done Part 0, Blender from nothing.
- You have done P10-05, Pierce a dome at true size, and P10-09, Fit a back plate to a solid.
- The add-on is installed, and its CAD/CAM tab is in the sidebar. The start file is in millimetres, and its Finish Voxel is already 0.12, so that your file stays light.
- A drag’s size depends on your zoom: your numbers will differ from these. What must match is that the panel reads what the handle reads.
Build it
Step 1. Open the start file, and save your own copy
WhereBlender’s top menu bar, File > Open, then File > Save As.
DoOpen p10-10-start.blend. Then save it under a name of your own, so that the start file stays clean.
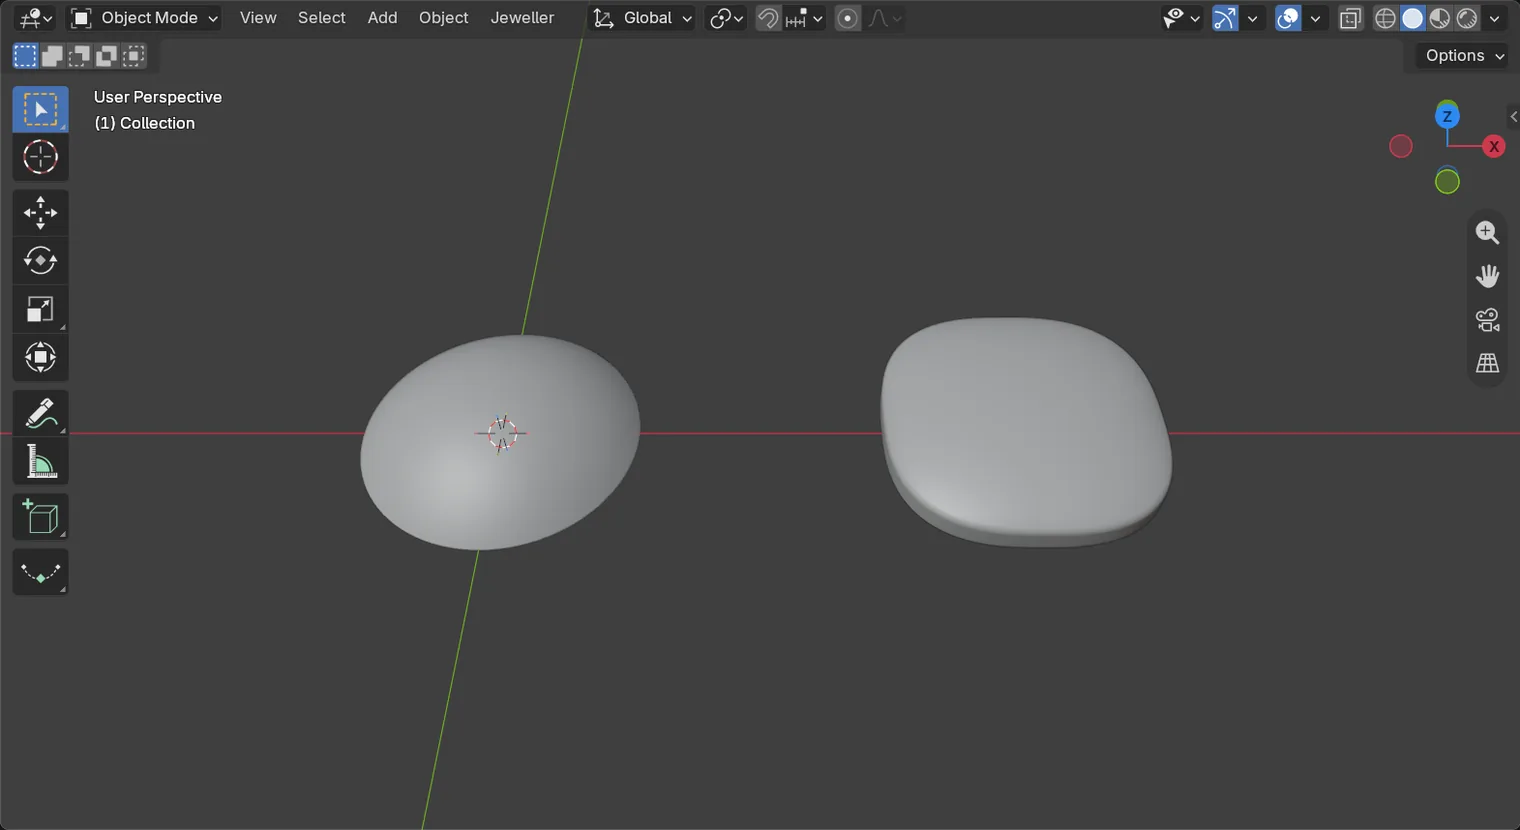
You should seeA smooth dome and, to its right, the soft cushion. The faces of the dome’s crown are already picked for you, in the file.
It worked whenThe 3D view shows the two pieces and nothing else.
Step 2. Bring the dome to the middle
WhereThe 3D view, then the View menu in the bar above it.
DoClick the dome, then choose View > Frame Selected.
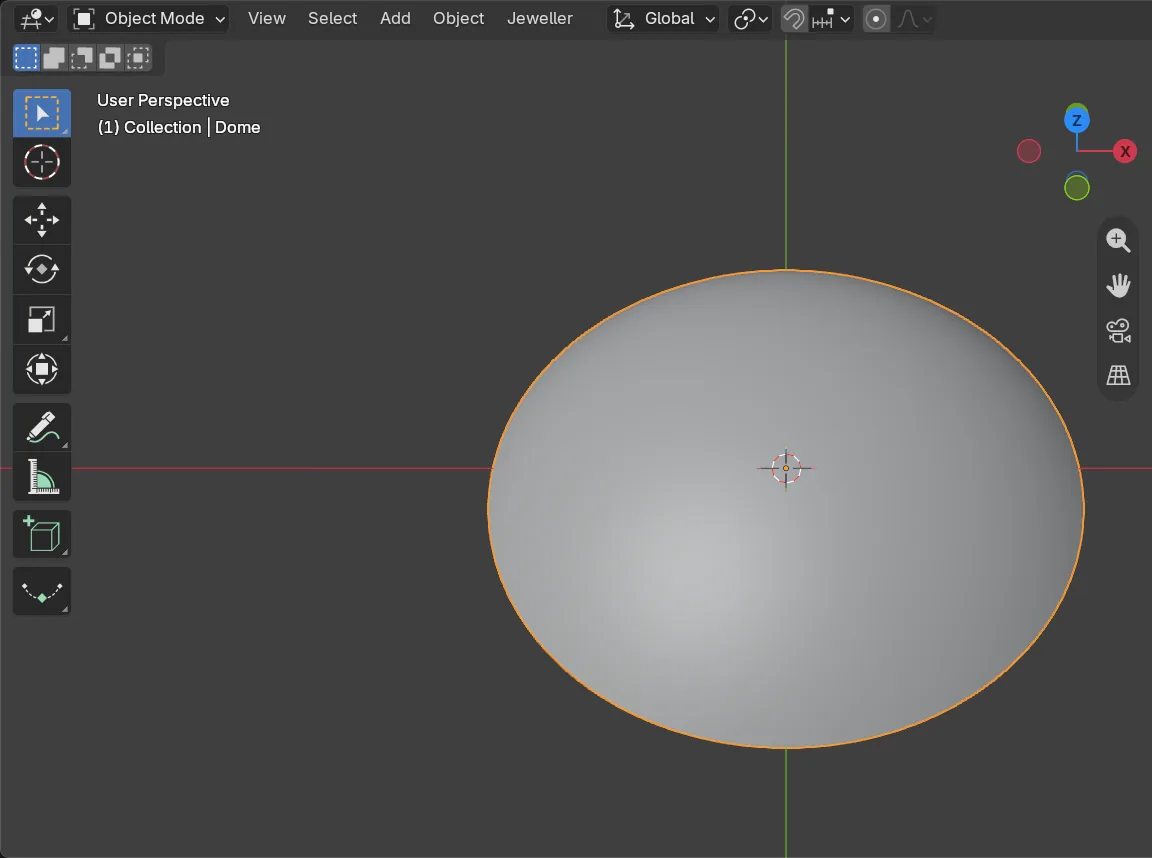
You should seeAn orange line round the dome, and the dome comes to the middle of the 3D view.
It worked whenThe words at the top left of the 3D view end in Dome.
Step 3. Lay a pattern on the crown
WhereThe sidebar’s Flow section, the Pattern Builder panel. Fold Flow on Surface if it takes the room.
DoPress Tab to enter Edit Mode, where you work on one piece’s own faces, edges and points. Then press Make Pattern. It leaves Edit Mode by itself, so do not press Tab again.
You should seePosts on the crown: the pattern’s cells, standing solid until they are cut. Small blue marks, the handles, stand among them. The marks in the column look alike. Rest the pointer on one and its name shows beside it, and the mark turns white, as in each tile of the picture.
It worked whenThe panel counts 55 cells, and you can see the word Done on the model.
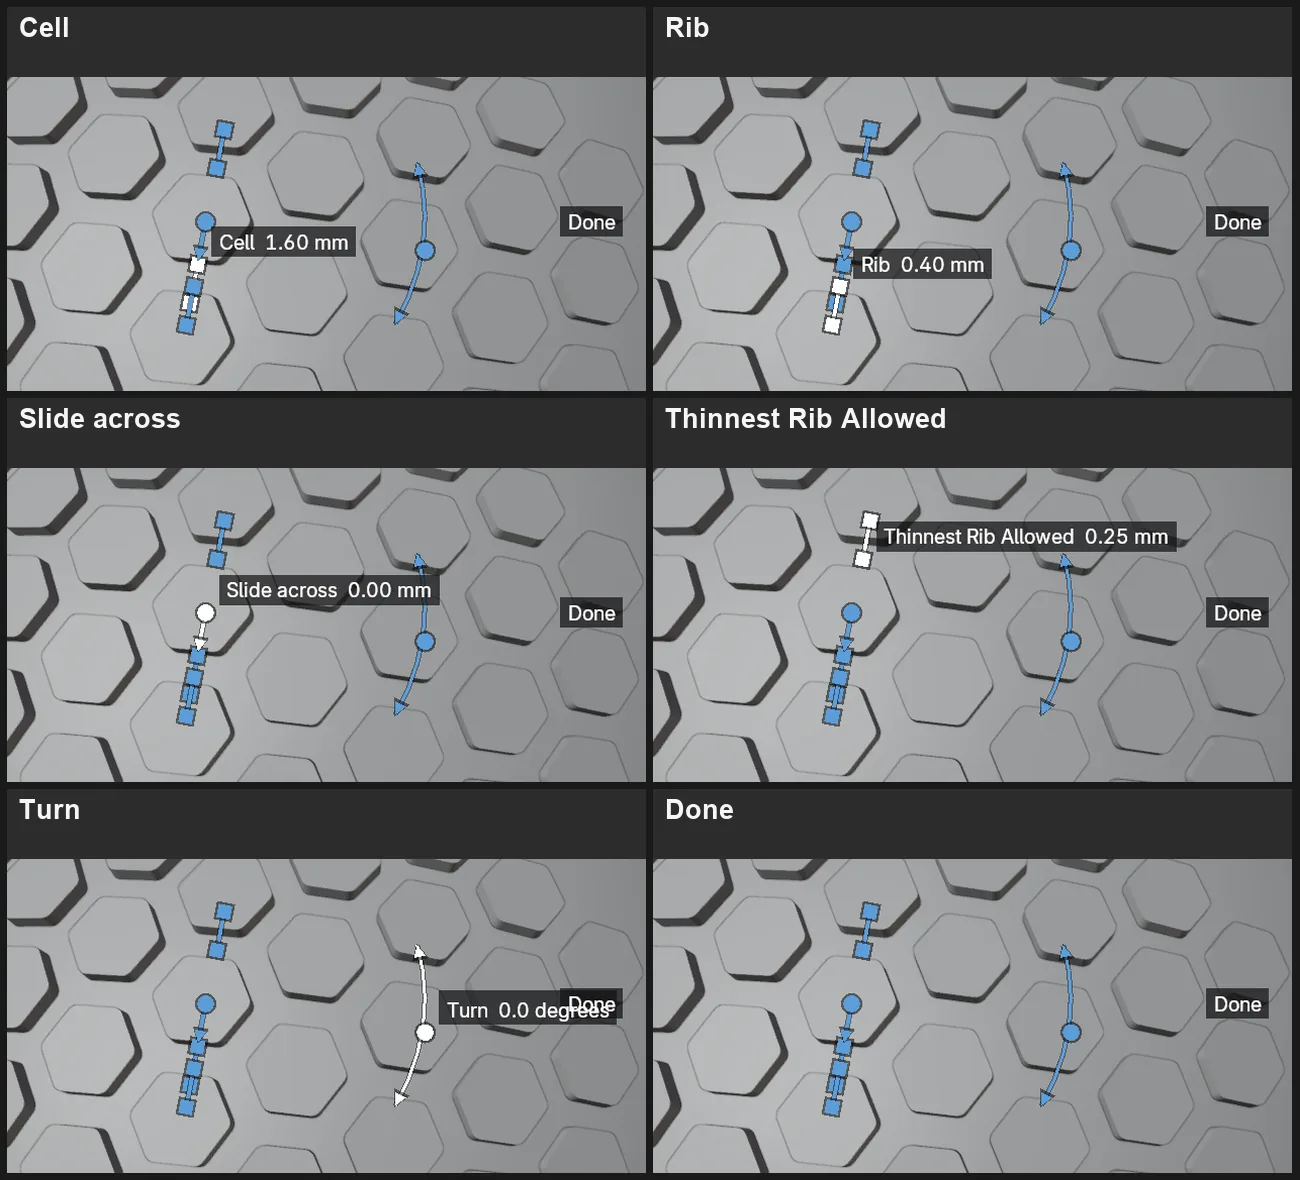
If it goes wrongYou see no handles at all, on a flat plate from a curve: a flat plate has no handles: its numbers stay in the panel. A pattern needs a piece under it, as here.
Step 4. Drag Cell
WhereThe 3D view, the marks by the middle cell.
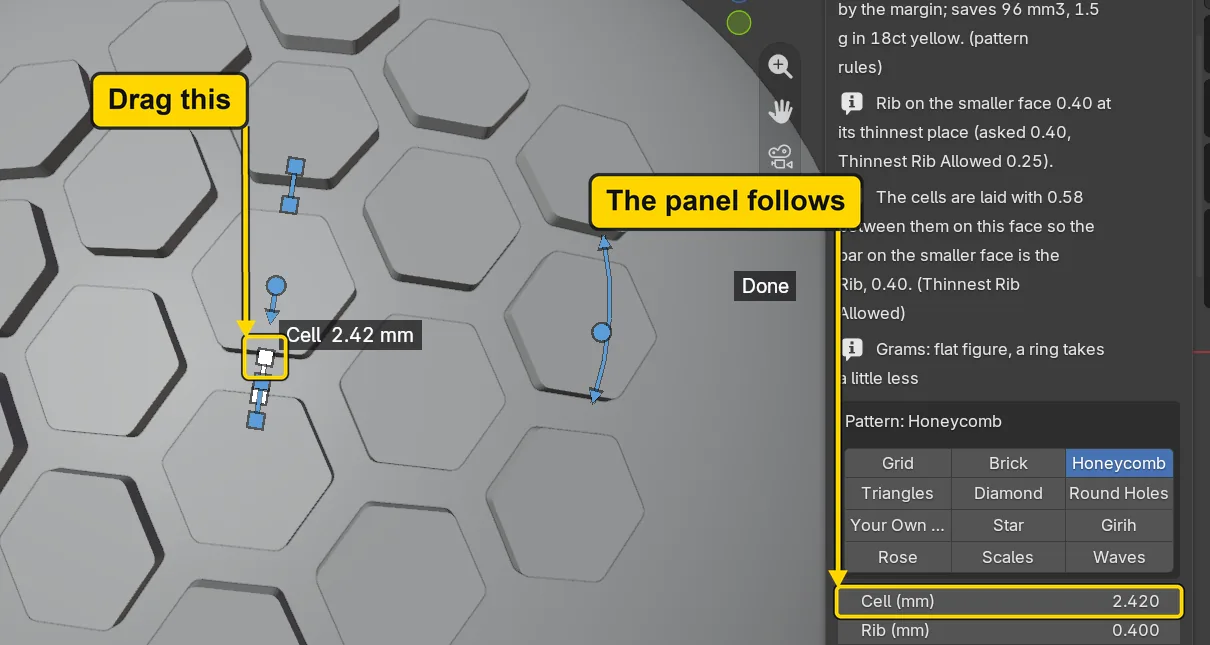
DoRest the pointer on the marks by the middle cell until one reads “Cell”. Press on that one, drag it a little away from the middle of the pattern, and let go.
You should seeEvery cell grows, and the rows thin out. Rest the pointer on the handle again: its label reads “Cell 2.42 mm”, and Cell (mm) in the panel reads the same. In the panel’s first line, “house default” means the add-on’s starting number.
It worked whenThe panel’s Cell (mm) has changed from 1.60. Here it reads 2.42, and 19 cells. Your zoom sets how far a drag goes, so yours will differ.
Step 5. Drag Rib
WhereThe 3D view, the marks by the next cell.
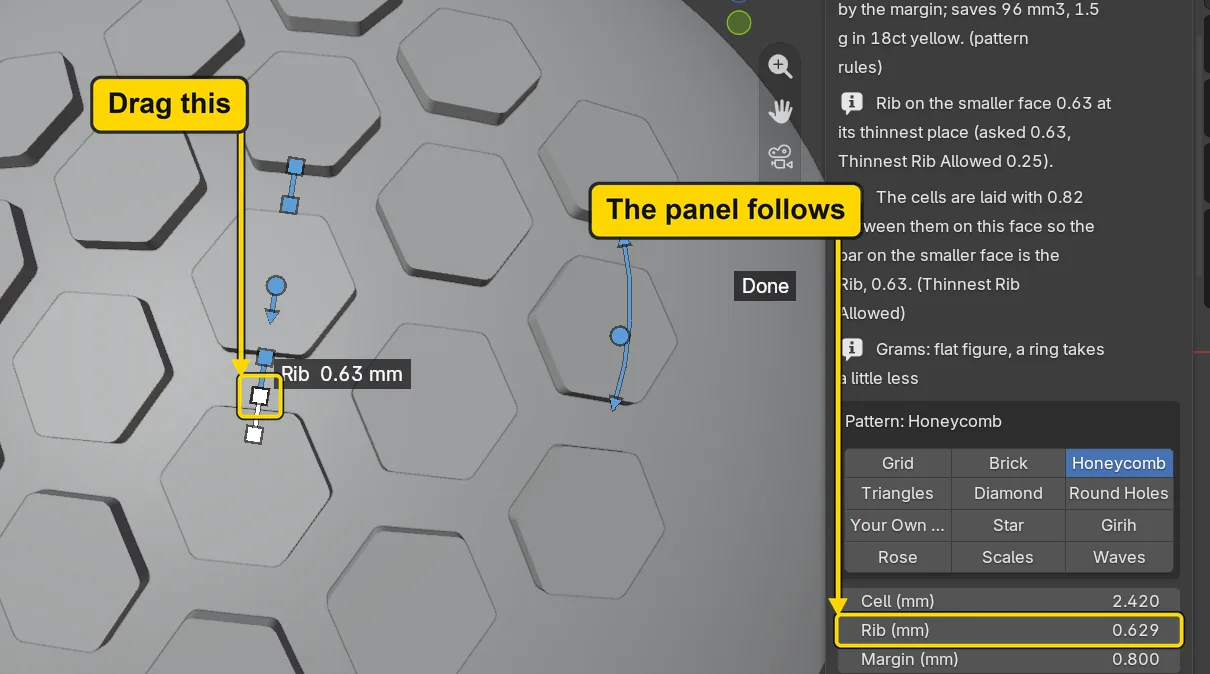
DoRest the pointer on the marks by the next cell until one reads “Rib”. Press on that one, drag it a little away from the middle, and let go.
You should seeThe metal between the cells grows and fewer cells fit. Rest the pointer on the handle again: its label reads “Rib 0.63 mm”. Rib (mm) in the panel reads the same.
It worked whenThe panel’s Rib (mm) has changed from 0.40. Here it reads 0.63.
Step 6. Drag Slide across
WhereThe 3D view, the arrow at the pattern’s middle.
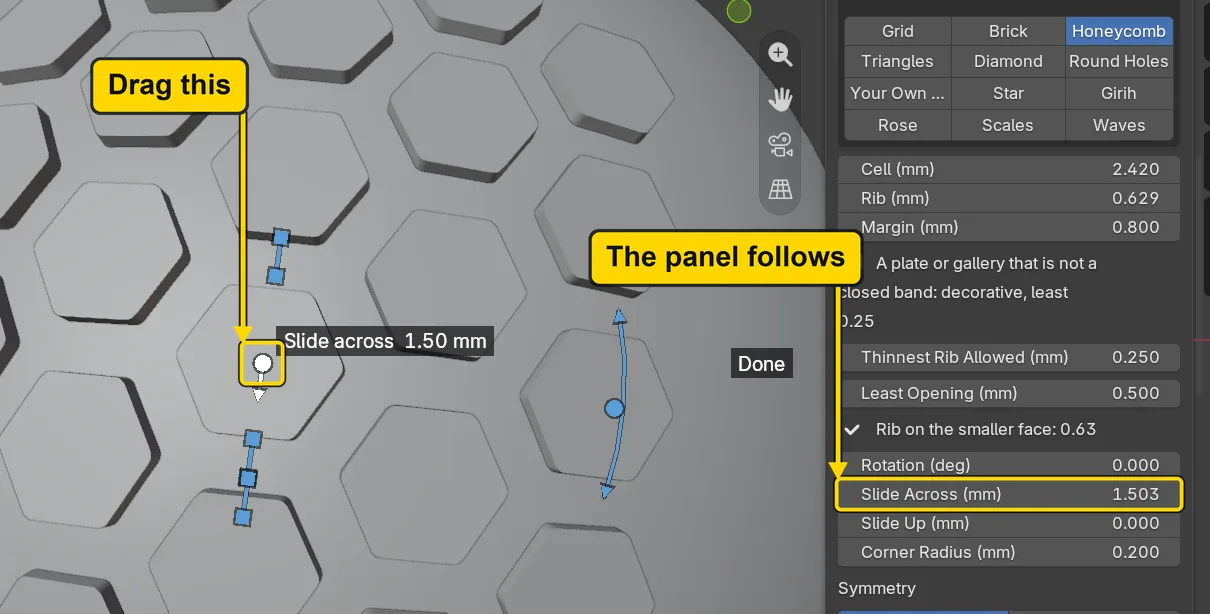
DoRest the pointer on the arrow at the pattern’s middle until it reads “Slide across”. Press on it, drag it along its arrow by about one cell, and let go.
You should seeThe whole pattern slides over the crown. Rest the pointer on the handle again: its label reads “Slide across 1.50 mm”. Slide Across (mm) in the panel reads the same.
It worked whenThe panel’s Slide Across (mm) is no longer 0. Here it reads 1.50.
Step 7. Drag Turn, and take it back
WhereThe 3D view, the Turn handle, on its curved line.
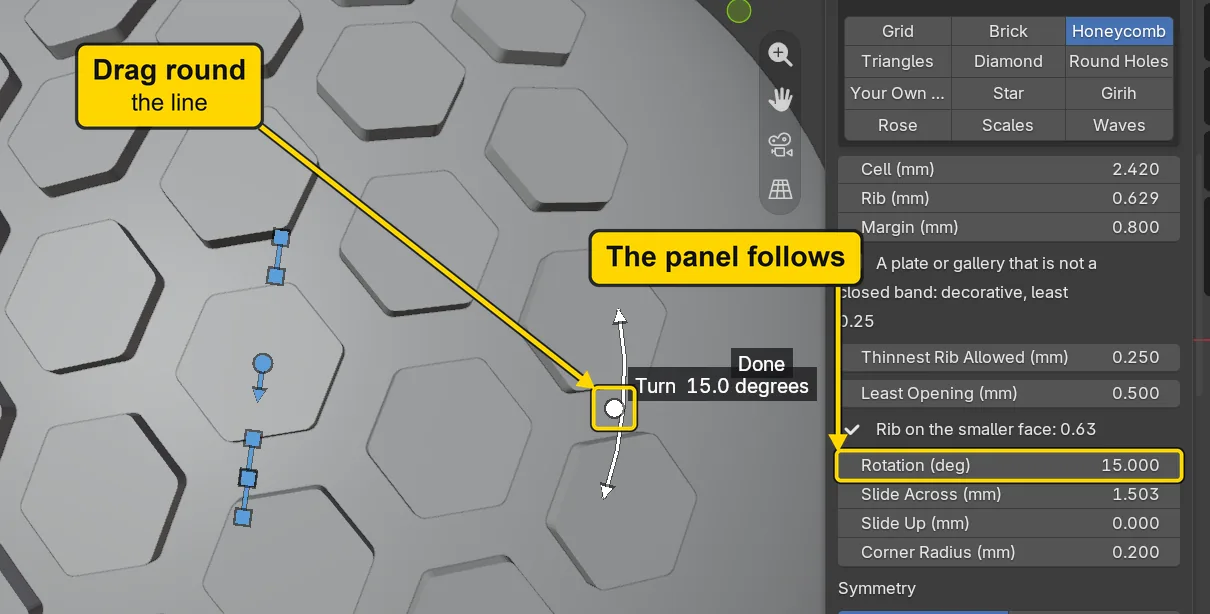
DoHold Ctrl, press on it, drag a little along its line, and let go: Ctrl snaps the turn to 15 degrees. Rest the pointer on it and read it. Then, with the pointer over the 3D view, press Ctrl+Z once.
You should seeThe cells turn, and the label reads “Turn 15.0 degrees”. Ctrl+Z puts the turn back and leaves every other drag as it was.
It worked whenRotation (deg) reads 0 after the Ctrl+Z, and Slide Across (mm) still reads 1.50.
Step 8. Drag Thinnest Rib Allowed
WhereThe 3D view, the Thinnest Rib Allowed handle, on the far side of the middle cell from Rib.
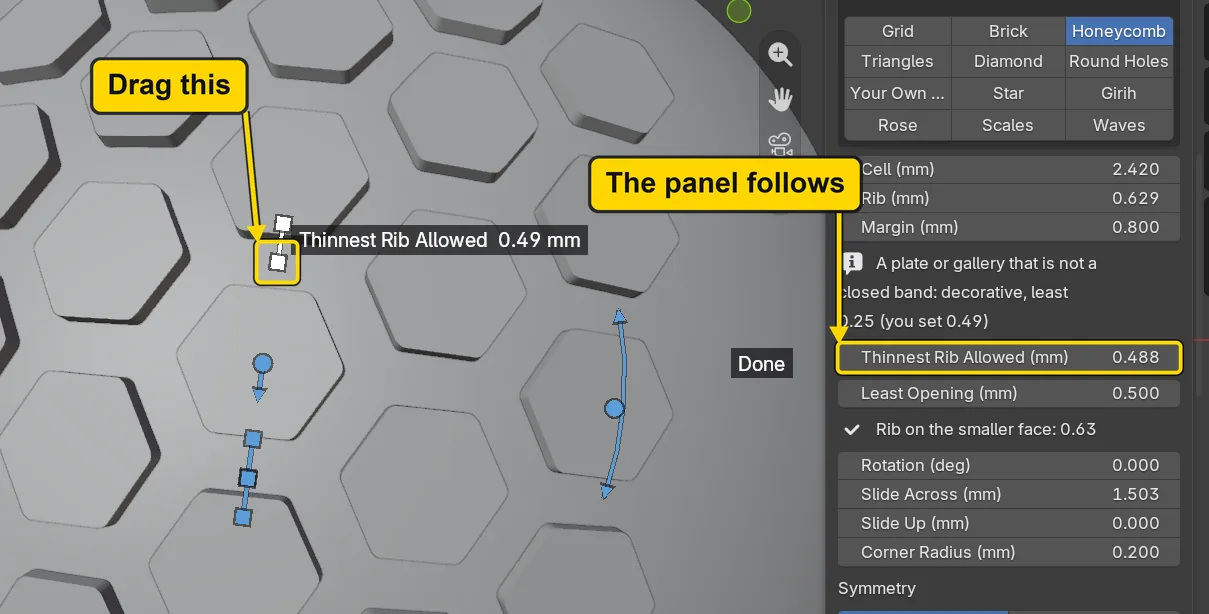
DoRest the pointer on the marks until one reads “Thinnest Rib Allowed”. Press on that one, drag it a little away from the middle, and let go.
You should seeThe label reads “Thinnest Rib Allowed 0.49 mm”, and the panel’s Thinnest Rib Allowed (mm) reads the same. The pattern may not move at all: the cell count stays.
It worked whenThe panel’s Thinnest Rib Allowed (mm) has changed from 0.25.
Step 9. Put the handles away
WhereThe 3D view, the word Done on the model.
DoClick Done. Look at the crown. Then click the crown once.
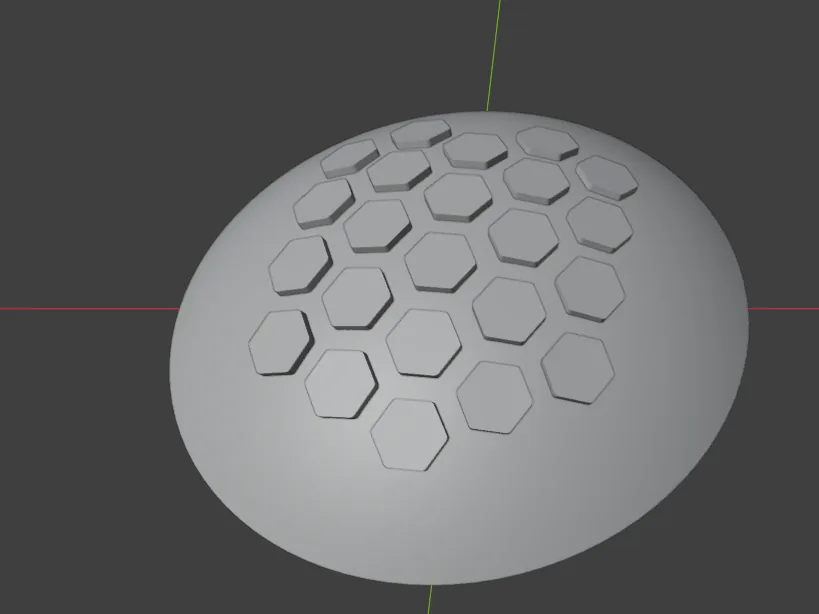
You should seeThe handles go, so you can judge the pattern with nothing over it: here it stands off centre, as you slid it. The click brings them back, with every number as you left it.
It worked whenThe handles are back after the click.
Step 10. Make a back plate
WhereThe 3D view, then the sidebar’s Shape section, the Back Plate panel.
DoClick the cushion. Click Shape, fold Hollow Out, press Make Back Plate, and wait.
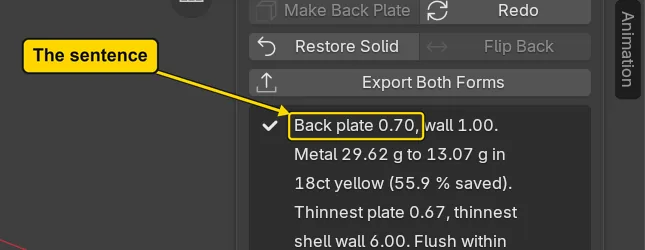
You should seeHalf a minute or more later, a long sentence under the buttons, beginning “Back plate 0.70”.
It worked whenThe sentence reads “Two parts, each one closed body”.
Step 11. Find the Plate thickness handle
WhereThe 3D view, the small coloured axes at its top right, then the View menu in its bar.
DoClick the faint ball opposite the blue Z ball, to look from underneath. The cushion is still selected, so choose View > Frame Selected. Rest the pointer on the handle.
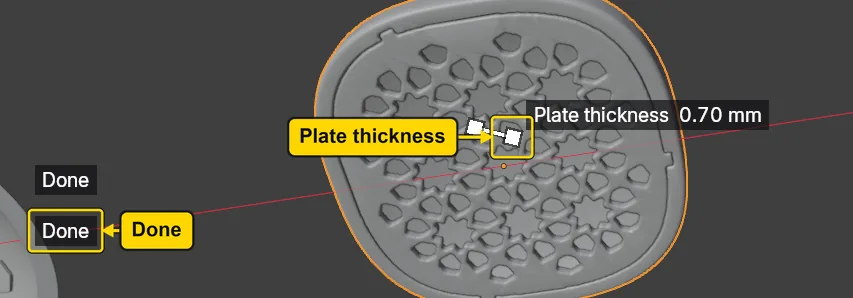
You should seeOn the back stand two things only: the Plate thickness handle and Done. The label beside the handle reads “Plate thickness 0.70 mm”.
It worked whenYou can read the label beside the handle.
Step 12. Drag the plate’s thickness
WhereThe 3D view, the Plate thickness handle.
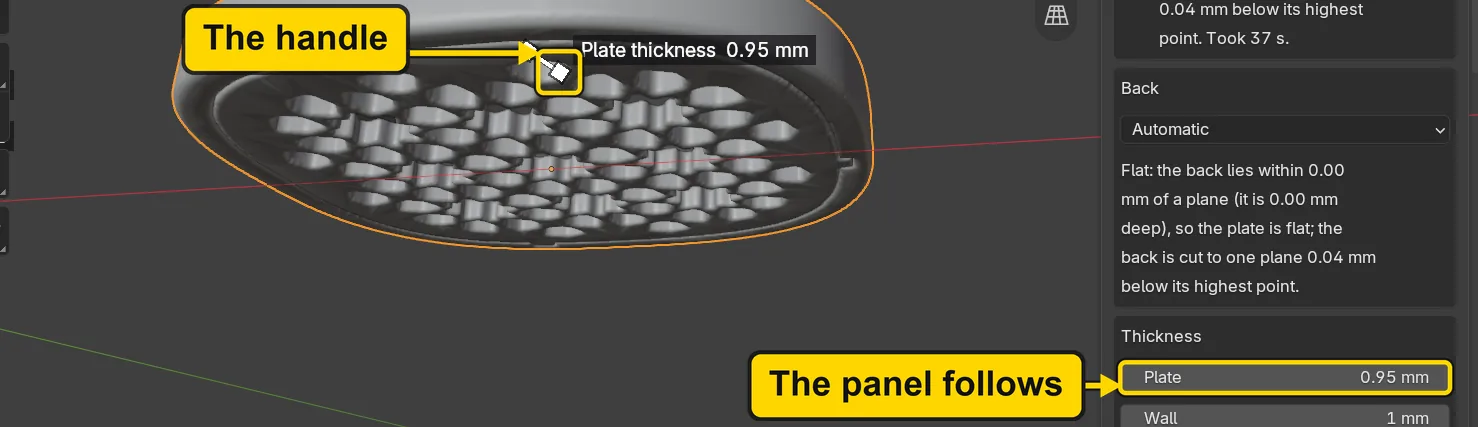
DoOrbit until you look along the back from low down, as in the picture. Hold Ctrl, press on the handle, drag it along its arrow, into the piece, until the label reads 1.00. Let go, and wait.
You should seeThe number moves as you drag and nothing else does. When you let go, Blender stands still for half a minute or more while the whole part is made again. Then the sentence begins “Back plate 0.95”. Another number? Press Ctrl+Z once, which gives back the plate you had, and drag again.
It worked whenPlate in the Thickness box reads the same as the sentence.
Step 13. Open More: all the handles
WhereThe Back Plate panel, the button More.
DoPress More, then look at the back of the piece.
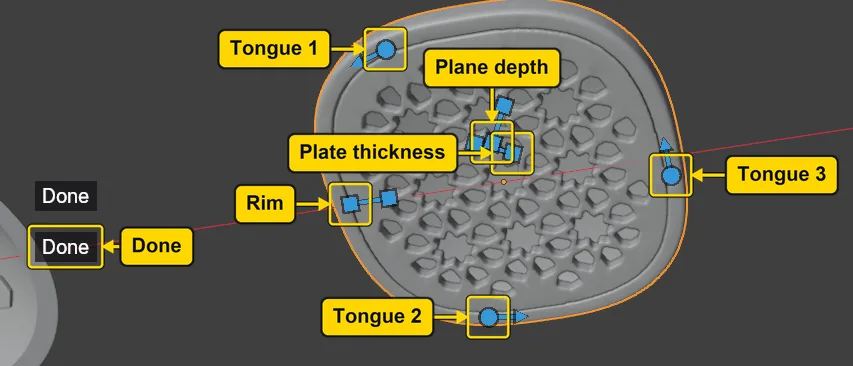
You should see7 things on the model now: Plate thickness, Rim on the opening’s edge, Plane depth on the flat back, Tongue 1, Tongue 2 and Tongue 3 at the tongues, and Done. The picture names them.
It worked whenYou can see the three tongue handles, at the plate’s edge.
Step 14. Save your copy
WhereBlender’s window, with the pointer over the 3D view.
DoPress Ctrl+S.
No picture: nothing on the screen changes.
Check your result
| What to read | Where | What it should say |
|---|---|---|
| The handle’s label | Click the dome, and rest the pointer on the Cell handle | Its name and its value: “Cell 2.42 mm” |
| The panel | With the dome clicked, Flow in the section bar: Cell (mm) | The same value as the handle: 2.42 here. Yours will differ with your zoom |
| The Ctrl+Z | The same panel: Rotation (deg) and Slide Across (mm) | Rotation 0: the turn went back. Slide Across still as you left it, 1.50 here |
| Back Plate’s handles | On the back of the cushion, with More open | 7: Plate thickness, Rim, Plane depth, Tongue 1, Tongue 2, Tongue 3 and Done |
| The plate’s thickness | The sentence under the Back Plate buttons, with the cushion clicked | “Back plate 0.95, wall 1.00” |
Try it yourself
Stay where step 13 leaves you, with More open and the back of the cushion in view. Drag Rim a little inward and let go: half a minute or more later the frame is wider and the windows fewer, and Rim in the panel reads the same. Then drag Tongue 1 along the plate’s edge: Tongue 1 in the panel reads its new degrees, and the sentence still says “fits one way round”.
What you learned
- A pattern on a piece has handles on the model, and the panel reads what they read. A plate made from an outline has none: its numbers stay in the panel.
- The label beside a handle shows only when the pointer is on it. One
Ctrl+Zundoes one drag. Done puts the handles away and a click on the piece brings them back. - Back Plate’s handles make the whole part again when you let go: half a minute or more a drag. Most of them show only while More is open.