
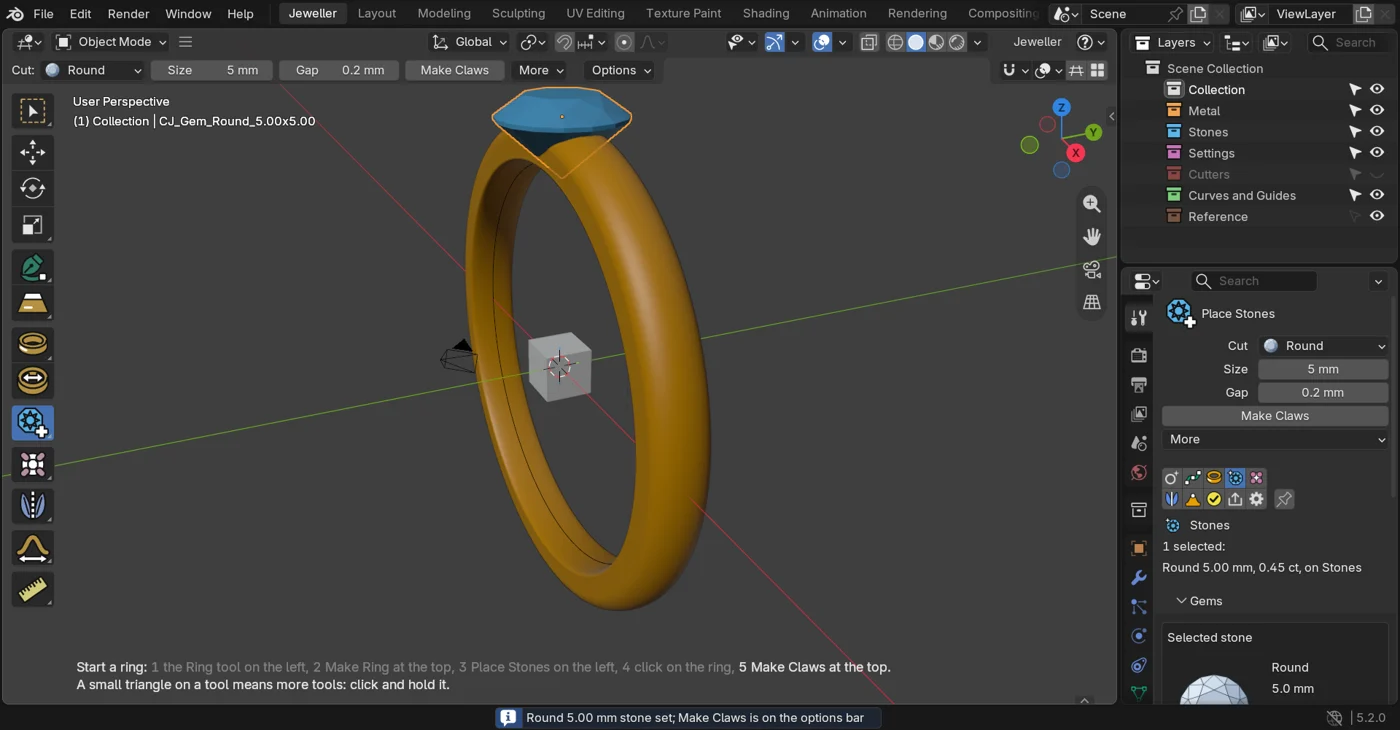
The Jeweller workspace is a Blender workspace of the add-on’s own. The tools stand down the left in the order a piece is made, the active tool’s few options run along the top, the layers sit at the top right and the settings below them, so the piece keeps the most room. It teaches nothing new: the panels are the add-on’s own, and every other workspace is as it was.
Where to find it
Blender’s workspace tabs along the top. Add it from the right-click menu of any workspace tab, from Start Here, or from Jeweller > Setup > Add the Jeweller Workspace. Blender 5.2 or later: on an older Blender it stays off and the rest of the add-on works as before.
Use it
Step 1. Add the workspace
Wherethe right-click menu of any workspace tab, Add the Jeweller Workspace.
Doclick it. When the file has the tab already, the same button opens it.
You should seethe Jeweller tab first in the row, and the window fitted to your screen.
If it goes wrongon a Blender older than 5.2 the button is not offered.
Step 2. Make a first ring
Wherethe toolbar on the left, then the options bar at the top.
Dopick the Ring tool and click Make Ring. Pick a stone from the picture shelf at the bottom, or Place Stones on a small screen, and click the ring to set it. Then click Make Claws at the top.
You should seea rail and a shank at the size shown, on the Metal layer; the stone on the Stones layer; claws on the Settings layer. A hint at the lower left of the 3D view lists the steps and turns each grey when it is done.
If it goes wronga file that is not in millimetres is put into millimetres, and the status line says so.
Step 3. Read the layers
Wherethe Layers list at the top right.
Doclick a row to make that layer current. Click the eye to hide a layer, the arrow to lock it.
You should seeBlender’s own Add and the add-on’s makers putting new objects on the current layer.
Step 4. Use the Settings tabs
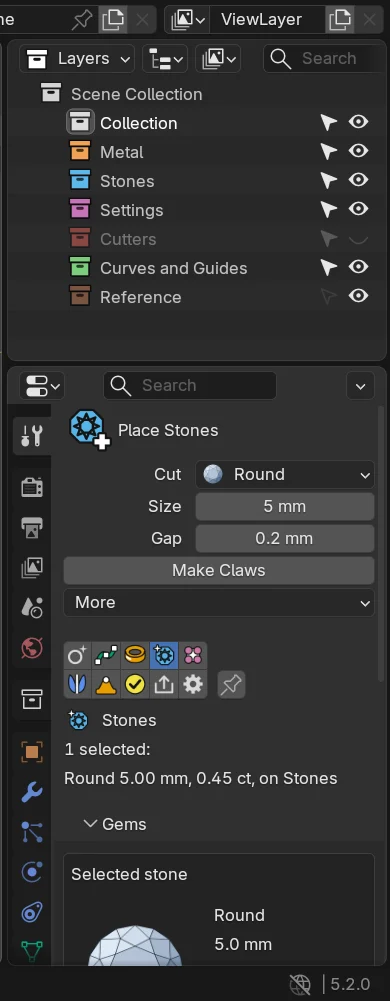
Wherethe Settings panel, bottom right.
Dopick a tab: Piece, Draw, Ring, Stones, Setting, Ornament, Shape, Check, Make or Setup. The pin lets the tabs follow the tool again.
You should seethe add-on’s panels for that stage, with the open tab following the tool you picked, and a line naming what is selected.
The layers
Use Jeweller Layers (in the Piece tab) adds the layers a piece lacks. A layer’s colour is its objects’ colour in the Solid view.
| Layer | Colour | Holds | At first |
|---|---|---|---|
| Metal | Amber | Shank, rail, halo band, metal from curves, sweeps, signets | Shown |
| Stones | Blue | Stones | Shown |
| Settings | Pink | Claws, grains, bezels, channels | Shown |
| Cutters | Red | Cutters and seats | Hidden |
| Curves and Guides | Green | Pen drawings, sections, flow guides, pattern outlines | Shown |
| Reference | Grey | Reference pictures | Locked |
- The first time the Jeweller tab shows a file that has no Jeweller layers, the six are made and the old CJ collections are moved into them, in one undo step with a line on the status bar. Setup has a switch for it. Objects keep their names, data and materials, and a collection of your own is untouched.
- Panels that count what they made now say the layer’s real name, for example “3 cutters in Cutters”.
The picture shelf and the Settings tab
The workspace’s picture shelf holds the add-on’s pictures of cuts, settings and signets. It is added to your asset libraries only when you say yes, and Setup adds or removes it at any time. It opens with three tabs, Stones, Settings and All, as its first tiles.
- Settings shows ten types: Bezel, Under-Bezel, Collet, Head, Claws, Pave, Halo, Channel, Cutters and Castle, then the pictures of the setting in use.
- A click on Bezel, Under-Bezel, Collet or Head makes it on the selected stones. One
Ctrl+Ztakes it back, and a stone that already has one is left as it is, in words. - Once the pictures are added, the shelf opens or shuts by the screen’s size when a file’s tab first shows. A shelf you opened or shut yourself is left as you have it.
- The bottom right shows the setting in use. Show all settings brings the full list back until the tool changes.
Settings
| Setting | Default | What it changes |
|---|---|---|
| Add the Jeweller tab to every file | On | Every file you open gets the tab without switching to it, about 29 KB a file. In the preferences and the Setup tab. |
| Handles on the Model | On | Shows the handles on heads, settings and shanks. One switch for all. |
| Fit to My Screen | Once, when added | Sets the right column, the shelf and the toolbar for a small, desktop or large screen. Never on a resize. |
| Show Blender’s other tools here | Off | Brings back Annotate, Measure, Add and the posing tools, which this workspace leaves out. Preferences. |
Good to know
- Load UI is never changed. To start Blender in the workspace, open the tab, then File > Defaults > Save Startup File.
- Remove the Jeweller Tab from This File takes it out. While Add the Jeweller tab to every file is on, the next file you open gets it again: switch that off to stop it.
- A file saved with the workspace keeps it as a plain layout of Blender’s own areas, even without the add-on.