
What you will do
You will add a cylinder and give it the numbers you want in the box that opens at the bottom left of the 3D view. Blender makes every new thing at its own size, and this box is the quickest way to change it. The box goes as soon as you do something else.
About 5 minutes.
Files
No file to download. You begin from Blender’s own File > New.
Before you start
- You can type a number into a field: Type an exact number into a field (P0-13).
- New files open in millimetres, as they do when you left the tick on Millimetres and grams in this file and new files in Install Blender and the add-on (P0-01).
Build it
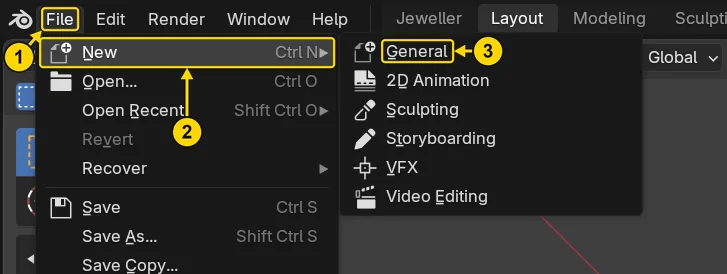
Step 1. Start a new file
WhereThe top bar: the row of words along the very top of the window.
DoClick File (marked 1), rest the pointer on New (marked 2), then click General (marked 3).
You should seeA new file: a grey cube in the middle of the 3D view, with a camera and a light round it.
It worked whenIn the Outliner, at the top right of the window, you can read Camera and Cube.
If it goes wrongA box asks whether to save your changes: press Don’t Save: you only have Blender’s own cube to lose.
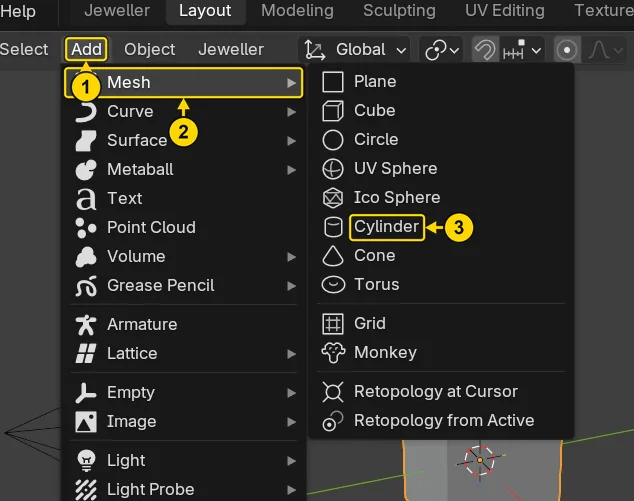
Step 2. Add a cylinder
WhereThe header, along the top of the 3D view.
DoClick Add (marked 1), rest the pointer on Mesh (marked 2), then click Cylinder (marked 3).
You should seeA cylinder is made at the middle of the grid, much bigger than the cube, so your view may be full of grey. A small box with the words Add Cylinder appears at the bottom left of the 3D view.
It worked whenThe box headed Add Cylinder stands at the bottom left of the 3D view.
Step 3. Open the box
WhereThe bottom left of the 3D view.
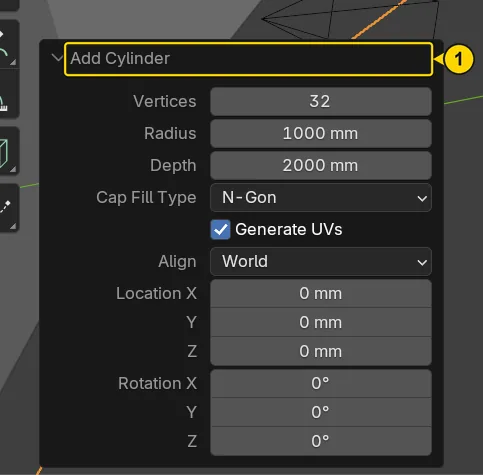
DoClick the words Add Cylinder (marked 1) to open the box, if only its title shows.
You should seeThe box opens. Blender calls it the Adjust Last Operation box: it holds the numbers of the tool you just used. It lists Vertices 32, Radius 1000 mm and Depth 2000 mm. Those two big numbers are not a mistake: Blender’s Add menu makes things in metres, whatever the file’s units. In a file in millimetres a 2 metre cylinder reads 2000 mm. So type the size you want in the box.
It worked whenThe box lists Vertices, Radius and Depth.
Step 4. Type the number of vertices
WhereThe box: the row Vertices.
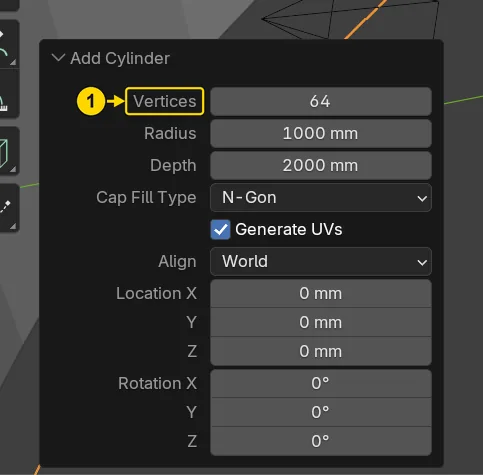
DoClick the number beside Vertices (marked 1), type 64 and press Enter.
Type64
You should seeThe side of the cylinder gets smoother. Vertices are the corners round the cylinder: more of them make a rounder side. The box stays open.
It worked whenThe box reads Vertices 64.
Step 5. Type the radius and the depth
WhereThe box: the rows Radius and Depth.
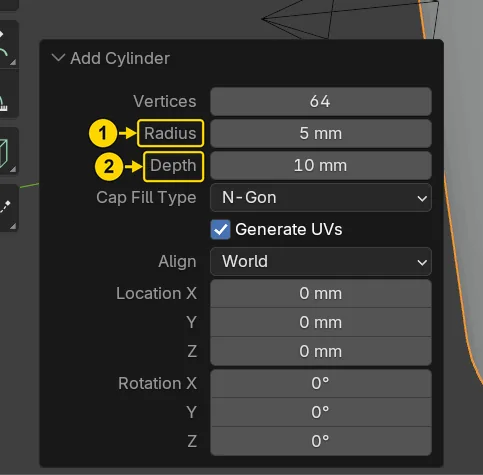
DoType the two numbers of the table into their rows, one after the other: click the number, type, press Enter.
You should seeThe cylinder shrinks to a small round column. Radius is the distance from the middle to the side, so a radius of 5 makes a cylinder 10 across.
It worked whenThe box reads Radius 5 mm and Depth 10 mm.
| Row | Type |
|---|---|
| Radius | 5 |
| Depth | 10 |
Step 6. See all of it
WhereThe 3D view.
DoMove the pointer over the 3D view and press Home, or choose View > Frame All.
You should seeThe view pulls back to fit everything in sight: the cylinder, with the camera beside it. Blender’s cube is hidden inside it. The box is still open at the bottom left.
It worked whenThe whole cylinder can be seen in the 3D view, and the box still reads Vertices 64.
Step 7. Read its size
WhereThe sidebar, at the right of the 3D view.
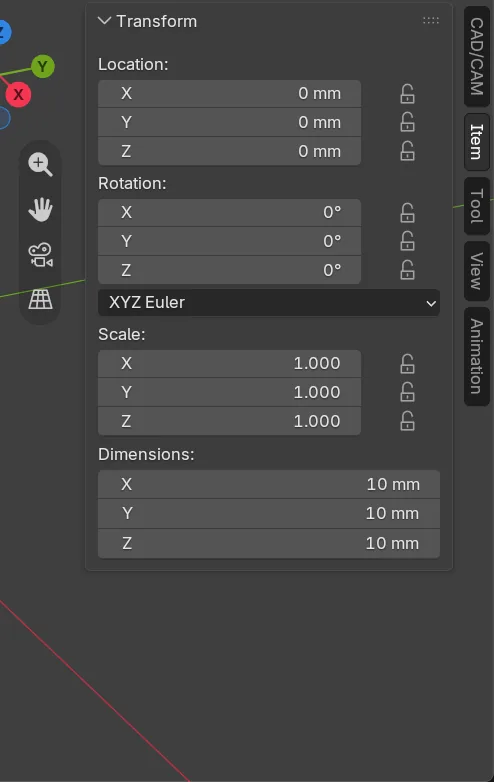
DoPress N with the pointer over the 3D view if the sidebar is shut. Then click the Item tab.
You should seeThe row Dimensions: reads 10 mm three times: across, across and tall.
It worked whenDimensions X, Y and Z read 10 mm.
Step 8. Do something else: the box moves on
WhereThe 3D view. Move the pointer off the sidebar and into the dark area.
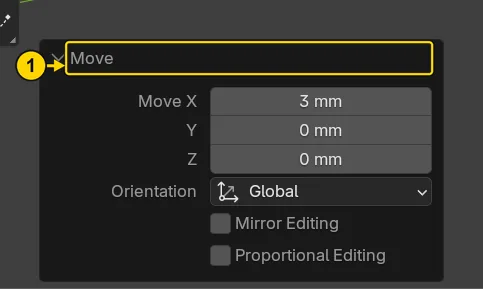
DoPress G, X, 3 and Enter. This slides the cylinder 3 mm along X.
You should seeThe box now says Move, and holds that tool’s numbers. The cylinder’s own Vertices, Radius and Depth are out of reach: the box always belongs to the last tool you used.
It worked whenThe box at the bottom left is headed Move.
If it goes wrongNothing moves: the pointer is still over the sidebar. Move it over the 3D view and press the keys again.
Check your result
| What to read | Where | What it should say |
|---|---|---|
| The cylinder’s size | The sidebar, Item tab, the row Dimensions: | X 10 mm, Y 10 mm, Z 10 mm |
| The cylinder itself | The 3D view | A small round cylinder with a smooth side, standing in the middle of the grid |
Try it yourself
Begin from File > New > General. Add a cylinder, then click Cube in the Outliner: the box goes. Press Ctrl+Z: the cylinder is chosen again, but the box does not come back. Type your numbers in the box before you do anything else.
What you learned
- A tool’s numbers open in the box at the bottom left of the 3D view, headed with the tool’s name, the moment it runs.
- Type your numbers there at once. Do the next thing and the box moves on to that thing.
- Blender’s Add menu makes things in metres: in a file in millimetres its cylinder starts with Radius 1000 mm and Depth 2000 mm. Type the size you want.