
What you will make
A round stone 5.00 mm across, a Round 5.00, standing in a head of four claws over the thick top of the band from Build a band to a ring size (P1-01). A head is the claws and the two rails that hold a stone, and a rail is a ring of metal under the stone. The claws stand 2.00 mm above the table, the stone’s flat top, and keep one thickness from foot to tip. 2.00 is long on purpose: the setter, who sets the stone at the bench, trims the claws to it. The rails are under the stone, so from above you see only the stone and its four claws. The head hangs 0.15 mm over the band and touches it nowhere: this ring is two pieces, the band and the head. Make a head real, alone and as a prototype (P4-09) joins them.
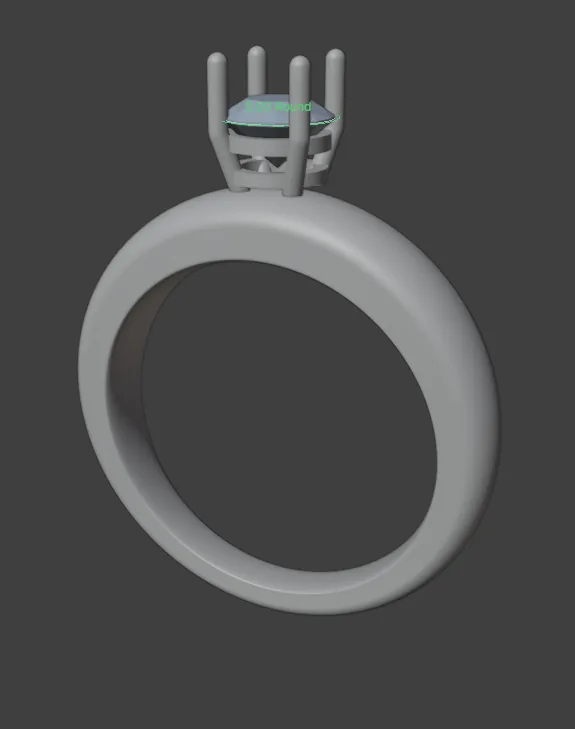
About 15 minutes.
Files
- p1-02-start.blend (2.24 MB): open this one to begin.
- p1-02-finished.blend (2.37 MB): the result, to compare with yours.
Both were made in Blender 5.2.0.
Before you start
- You have done Part 0, Blender from nothing, and you have built the band in Build a band to a ring size (P1-01). The start file holds that band, in millimetres.
- The add-on is installed, and its CAD/CAM tab is in the sidebar.
Build it
Step 1. Open the start file and save your copy
WhereThe top bar: the row of words that begins File, Edit.
DoDownload p1-02-start.blend from Files above and open it. Then choose File > Save As and save it under the name below, in a folder of yours. Open an exercise file and keep the start file safe (P0-07) shows how.
Typemy-ring.blend
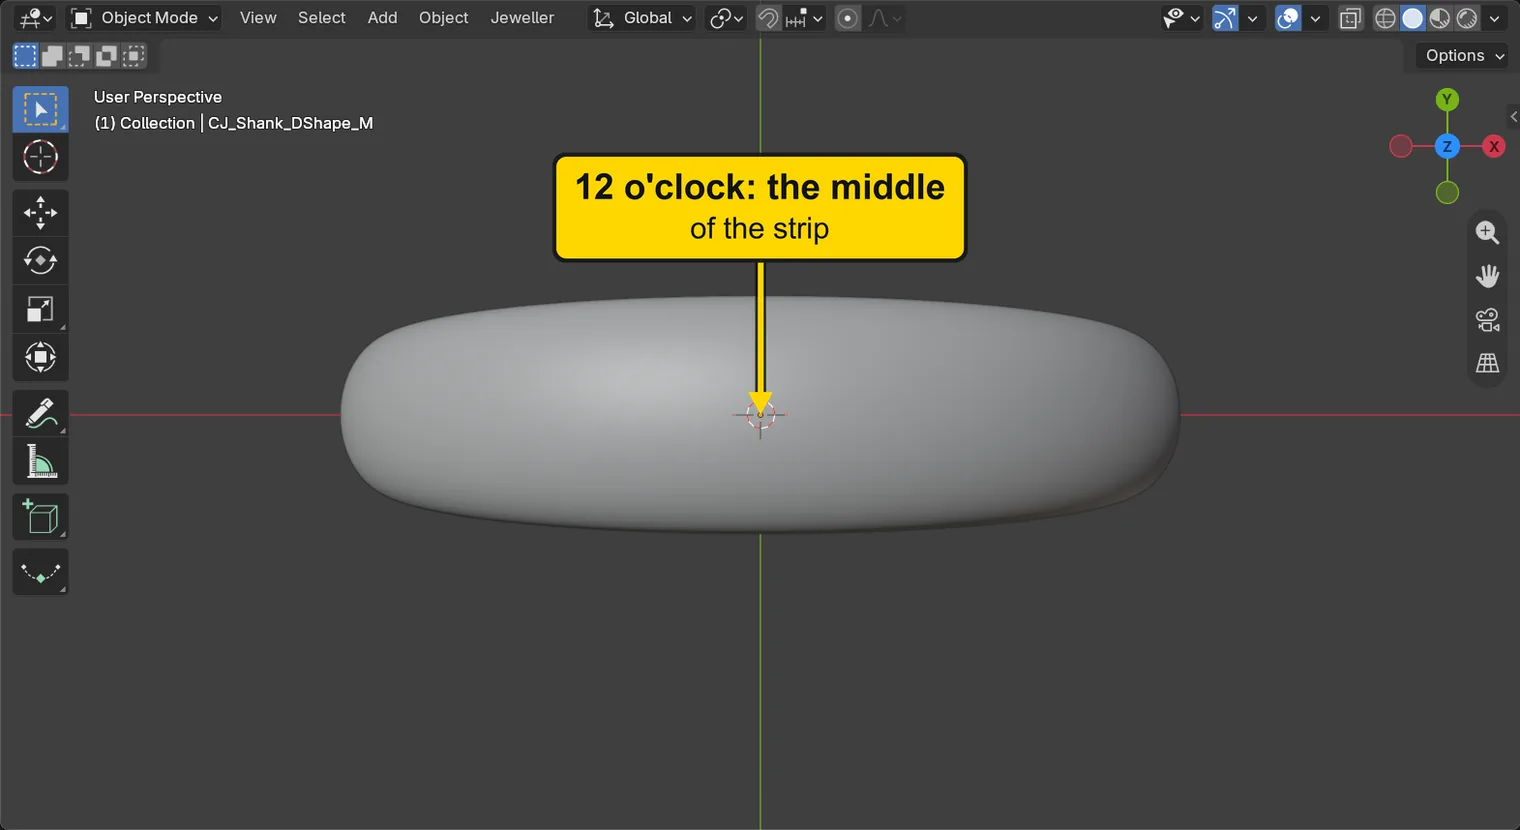
You should seeThe 3D view looks straight down on the band, a long strip across the middle of the view, with the top of the ring in its middle. If you ever lose this view, click the blue Z ball on the small coloured axes at the top right of the 3D view. The title bar, the strip above File and Edit, begins my-ring.
It worked whenThe title bar, the strip above File and Edit, begins my-ring.
Step 2. Choose the stone’s size from its chip
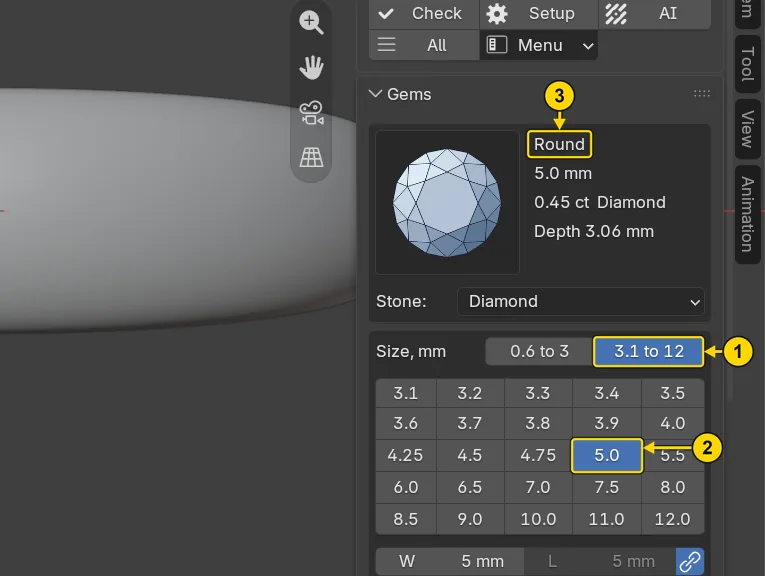
WhereThe section bar, Gems, then the Gems panel. A chip is a small button that holds one size.
DoClick the tab 3.1 to 12 (marked 1 in the picture), then click the chip 5.0 (marked 2).
You should seeThe chip is lit and the lines beside the stone’s picture read Round, 5.0 mm, a weight in carats, and Diamond (marked 3, at the first line). A Round 5.00 is a round stone 5.00 mm across. The chips are stocked sizes, the calibrated sizes a dealer sells, so a stone you choose from them can be bought. Nothing is made yet.
It worked whenThe chip 5.0 is lit.
Step 3. Lift the stone with Surface Offset
WhereThe Gems panel, the sub-panel Place & Guides. Click its title to open it if it is shut.
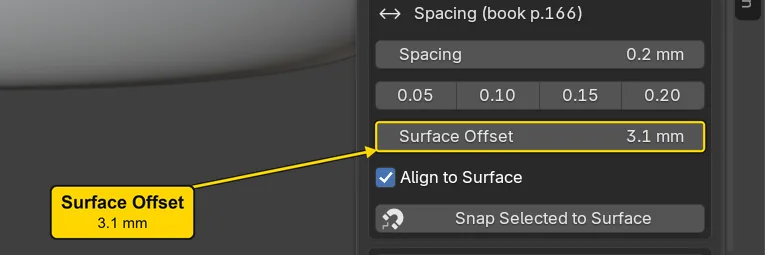
DoOpen Place & Guides, then click the middle of Surface Offset once, type the number, and press Enter.
Type3.10
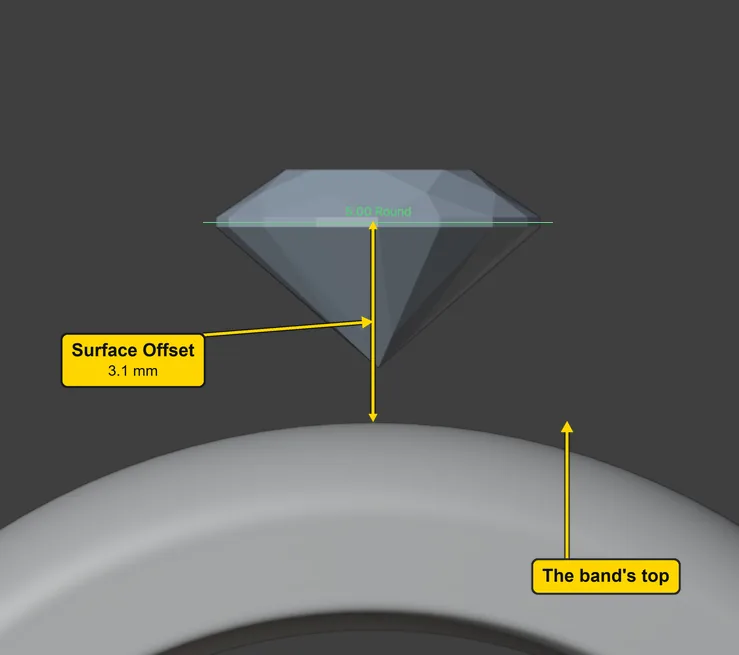
You should seeSurface Offset reads 3.1 mm. The stone will stand this far above the surface you click on, counted from the middle of the stone. Step 9 says where the number comes from: it lifts the head’s lowest metal level with the top of the band at 12 o’clock.
It worked whenSurface Offset reads 3.1 mm.
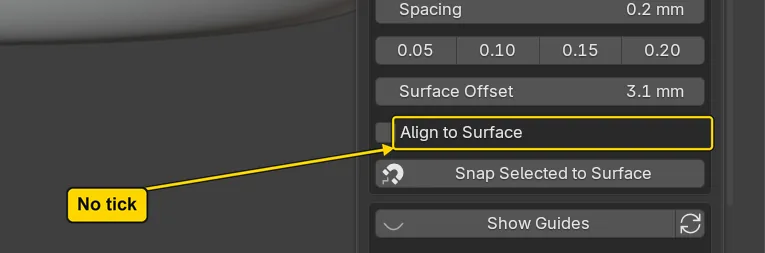
Step 4. Turn Align to Surface off
WhereThe Place & Guides panel, the tick box Align to Surface, under Surface Offset.
DoClick Align to Surface so that its tick goes.
You should seeThe box is empty. With the tick on, Place Gems tips every stone to lie square to the surface under the pointer. The top of this band is not quite level, so the stone would lean a little with it instead of standing upright. With the tick off, the stone stands upright, and its head hangs level.
It worked whenAlign to Surface has no tick.
Step 5. Press Shift+G and aim at the middle of the strip
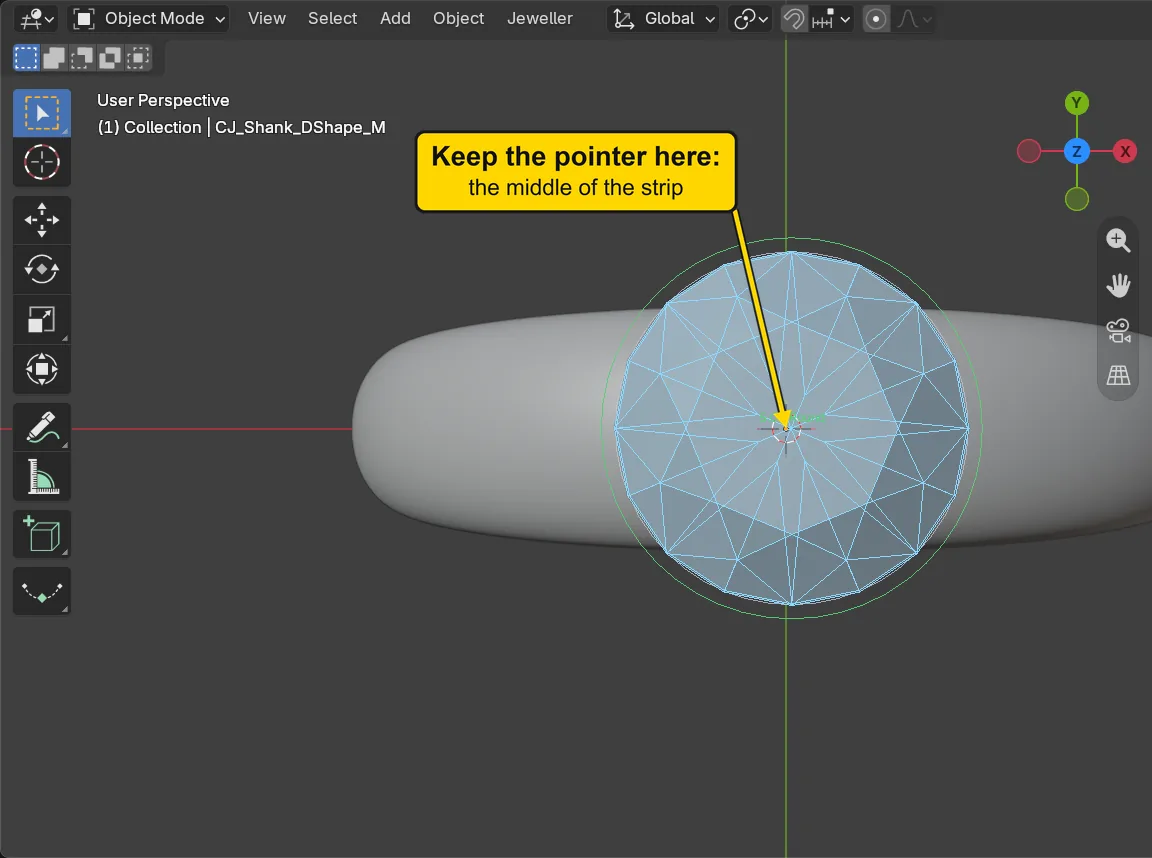
WhereThe 3D view. Move the pointer over the middle of the strip, at the place marked in the picture, then press Shift+G.
DoPress Shift+G with the pointer over the middle of the strip, then leave the pointer still.
You should seeA blue preview stone on the strip, following the pointer. Place Gems has started and keeps running until you press Enter. Aim at the exact middle of the strip: the stone lands where the pointer is. The status bar at the bottom shows the keys Place Gems takes.
It worked whenA blue preview stone stands over the middle of the strip.
Step 6. Click once, then press Enter
WhereThe 3D view: the pointer stays where it is.
DoClick once with the left button, then press Enter.
You should seeA real stone where you clicked, selected, in place of the blue preview. The status bar says “Placed 1 gem(s)”, but its message fades: the stone’s name stays at the top left of the 3D view. Place Gems has ended, so you can use the keys as usual. From the front the stone stands clear above the band: the head you make in step 9 stands in that space.
It worked whenThe name at the top left of the 3D view ends CJ_Gem_Round_5.00x5.00.
If it goes wrongThe stone stands off the middle of the strip: the click was to one side. Press Ctrl+Z once: the stone goes. Then press Shift+G and aim again.
Step 7. Check where the stone stands
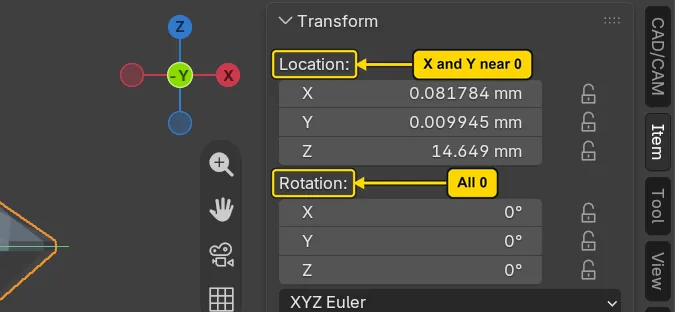
WhereThe sidebar: click the Item tab on its edge, then read Location: and Rotation:.
DoClick the Item tab and read the two groups. Then click the CAD/CAM tab to come back.
You should seeLocation: reads X and Y close to 0, and Z 14.65 mm: the band’s top is at 11.55, and you lifted the stone by 3.1. Rotation: reads 0 on all three. Blender shows many decimals: X and Y of 0.08 and 0.01 mm, for example, are a click a few pixels off, and do no harm. If either is over 0.3 mm, press Ctrl+Z once and place the stone again.
It worked whenRotation: reads 0 on all three, and X and Y are close to 0.
Step 8. Open the Head Builder and read the button
WhereThe section bar, Setting, then the Head Builder panel.
DoClick Setting in the section bar. With the stone selected, read the panel.
You should seeThe panel opens with the line “1 stone selected.” at its top, then pictures of the claws and the rail, and lower down a button that reads Make 1 Head: scroll the sidebar down to it. A head is the claws and the two rails that hold a stone.
It worked whenThe button reads Make 1 Head.
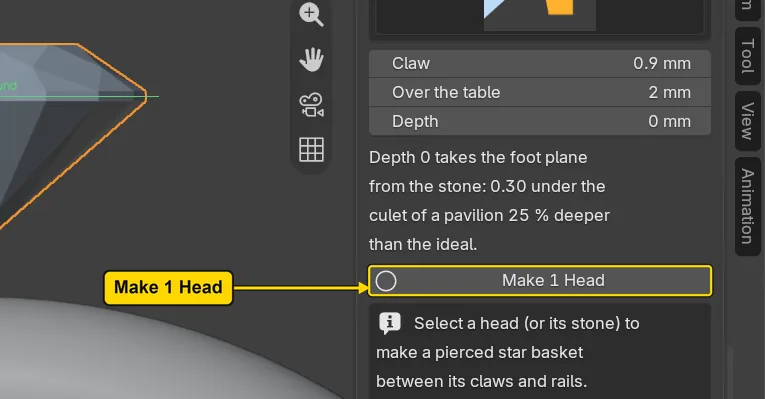
Step 9. Press Make 1 Head
WhereThe Head Builder panel, the button Make 1 Head.
DoLeave every number as it is, and press Make 1 Head.
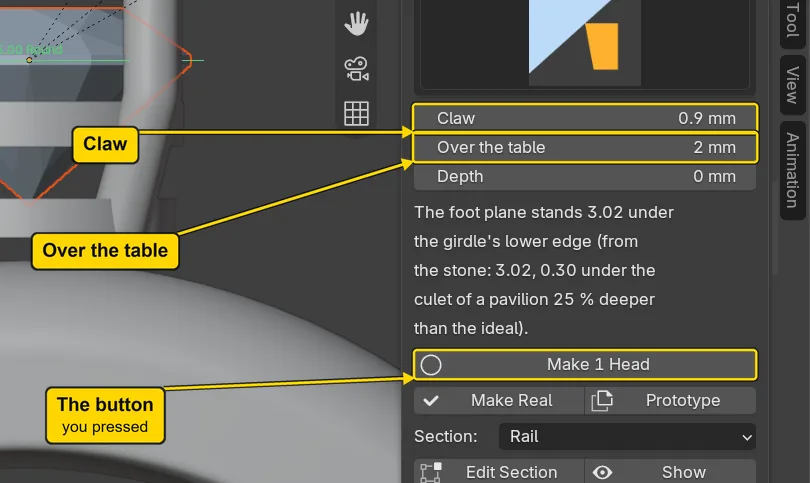
You should seeFour claws round the stone. Scroll the sidebar down, under the buttons Make Real and Prototype: a line there begins “Seen from the top only the stone and the claws show”. The numbers are the add-on’s starting numbers, and they are the bench’s: Claw 0.9 mm, the thickness of each claw, and Over the table 2 mm, how far the claws stand above the table, the stone’s flat top. A line there reads “The foot plane stands 3.02 under the girdle’s lower edge”: the 3.02 behind the 3.1 of step 3. The head is live: it follows its stone until you make it real, in a later exercise.
It worked whenClaw reads 0.9 mm and Over the table reads 2 mm.
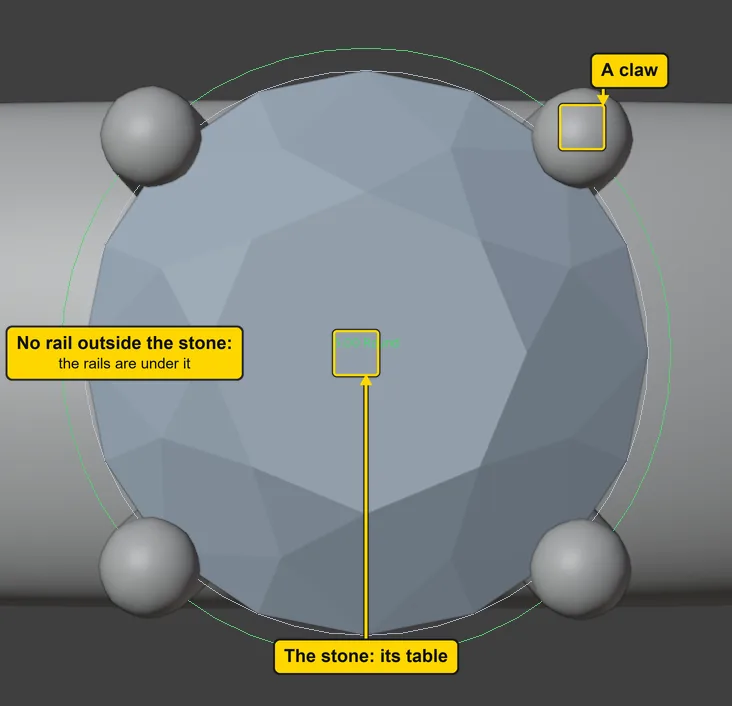
Step 10. Look down on the head
WhereThe 3D view: move the pointer over it.
DoLook at the picture. If your view has turned, click the blue Z ball of the gizmo, at the top right of the 3D view, then press Home or choose View > Frame All.
You should seeFrom above you see only the stone and its four claws. The two rails that carry the stone are under it, inside its outline, so they do not show. This is the rule of the bench for a head: nothing but the stone and the claws is seen from above.
It worked whenYou see the stone and four claws, and no metal ring round the stone.
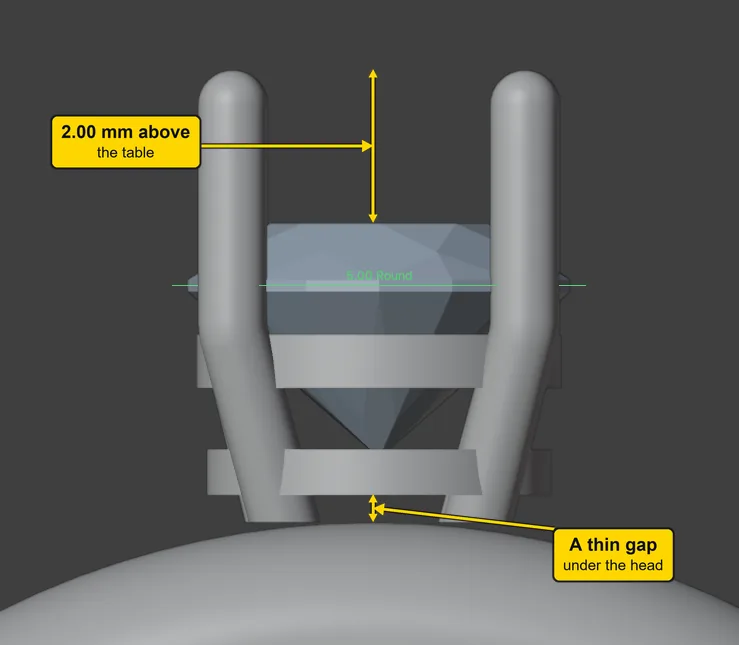
Step 11. Look at the head from the side
WhereThe 3D view.
DoLook at the picture, which looks at the ring from the front.
You should seeThe claws stand 2.00 mm above the table and keep one thickness from the foot to the tip. Under the head is a thin gap: the head touches the band nowhere. Its nearest metal, the foot of a claw, stands 0.15 mm from the band. The head and the band are two pieces, and Make a head real, alone and as a prototype (P4-09) joins them.
It worked whenYou can see a thin gap under the head, and the claws standing above the stone’s table.
Step 12. Save your work
WhereThe 3D view: move the pointer over it.
DoPress Ctrl+S.
You should seeBlender writes your copy at once, with no question, because the file already has a name. An asterisk, *, in the title bar marks changes that are not saved, and it goes now. Save your work and get it back (P0-12) says more about saving.
It worked whenThe title bar begins my-ring and carries no asterisk.
No picture: the only change is a message on the status bar, and it fades.
Check your result
| What to read | Where | What it should say |
|---|---|---|
| The stone | The words at the top left of the 3D view | It names CJ_Gem_Round_5.00x5.00 |
| Where the stone stands | The Item tab of the sidebar, Location: and Rotation: | X and Y close to 0, Z 14.65 mm: the band’s top at 11.55 plus the 3.1 you typed. Rotation 0 on all three |
| The head’s numbers | The CAD/CAM tab, Setting section, Head Builder panel | Claw reads 0.9 mm and Over the table reads 2 mm |
| The head’s own words | The same panel, under Make 1 Head | Scroll down, under the buttons: a line begins “Seen from the top only the stone and the claws show” |
| The gap | The 3D view, from the front, under the head | A thin gap shows between the head and the band |
Try it yourself
Open your copy again and click the stone. In the Setting section, on the Head Builder panel, click the middle of Claw once, type 1.2 and press Enter: the head makes itself again with thicker claws, because it is live (it follows its numbers until you make it real). Type 0.9 to put it back.
What you learned
- A size chip is a stocked size, one you can buy. Place Gems (
Shift+G) puts the stone where you click. - Surface Offset lifts the stone off the band, and Align to Surface off keeps it upright, so that the head hangs just over the band’s top. It touches nothing yet.
- Make 1 Head at its own numbers makes the claws and rails as a bench makes them: claws 2.00 above the table, one thickness, the rails hidden under the stone. How the head joins the band is a later page (P4-09).